> ## Documentation Index
> Fetch the complete documentation index at: https://docs.juicebox.ai/llms.txt
> Use this file to discover all available pages before exploring further.
# Mysolution Integration Set-up
> Connect Mysolution to Juicebox.
 ## About the integration
Connect Mysolution to Juicebox to import jobs and start searches from their job descriptions. You can also export profiles with resumes to a selected job. This connector does not provide full-database candidate reading for rediscovery.
## Before you start
A Salesforce System Administrator must configure the connection. Keep your Juicebox connection window open while creating the Salesforce connected app.
Open **Integrations** in Juicebox, select **Mysolution**, and choose **Activate**. Keep the connection window open while completing the steps below. If the integration is not visible, ask [Juicebox Support](mailto:support@juicebox.ai) to confirm access for your account.
The screenshots show vendor settings or the connection window provided by Kombo. Use the credentials, source labels, permissions, and URLs from your own connection; screenshot values are examples.
## Enter the Salesforce instance URL
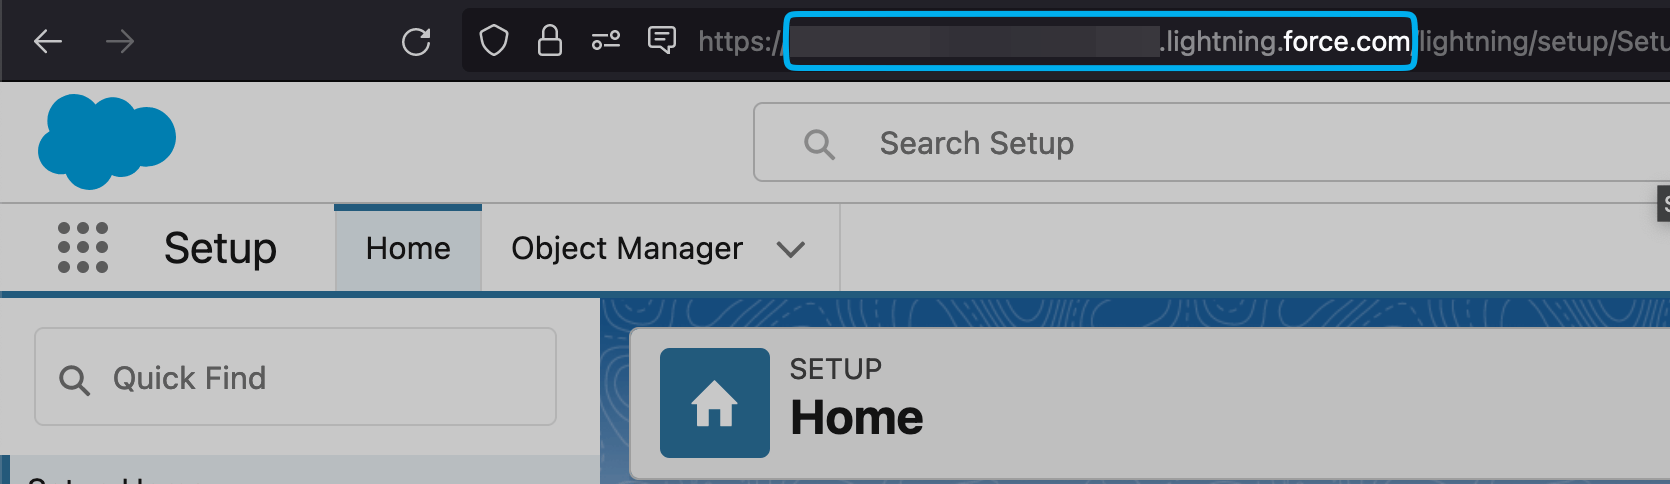
Sign in to the Mysolution Salesforce instance, copy its URL, and enter it in Juicebox.
## About the integration
Connect Mysolution to Juicebox to import jobs and start searches from their job descriptions. You can also export profiles with resumes to a selected job. This connector does not provide full-database candidate reading for rediscovery.
## Before you start
A Salesforce System Administrator must configure the connection. Keep your Juicebox connection window open while creating the Salesforce connected app.
Open **Integrations** in Juicebox, select **Mysolution**, and choose **Activate**. Keep the connection window open while completing the steps below. If the integration is not visible, ask [Juicebox Support](mailto:support@juicebox.ai) to confirm access for your account.
The screenshots show vendor settings or the connection window provided by Kombo. Use the credentials, source labels, permissions, and URLs from your own connection; screenshot values are examples.
## Enter the Salesforce instance URL
Sign in to the Mysolution Salesforce instance, copy its URL, and enter it in Juicebox.
 ## Create the connected app
1. Open the upper-right gear, select **Setup**, and go to **Platform Tools > Apps > App Manager**.
2. Choose **New Connected App**. Enter the app name, API name, and contact email.
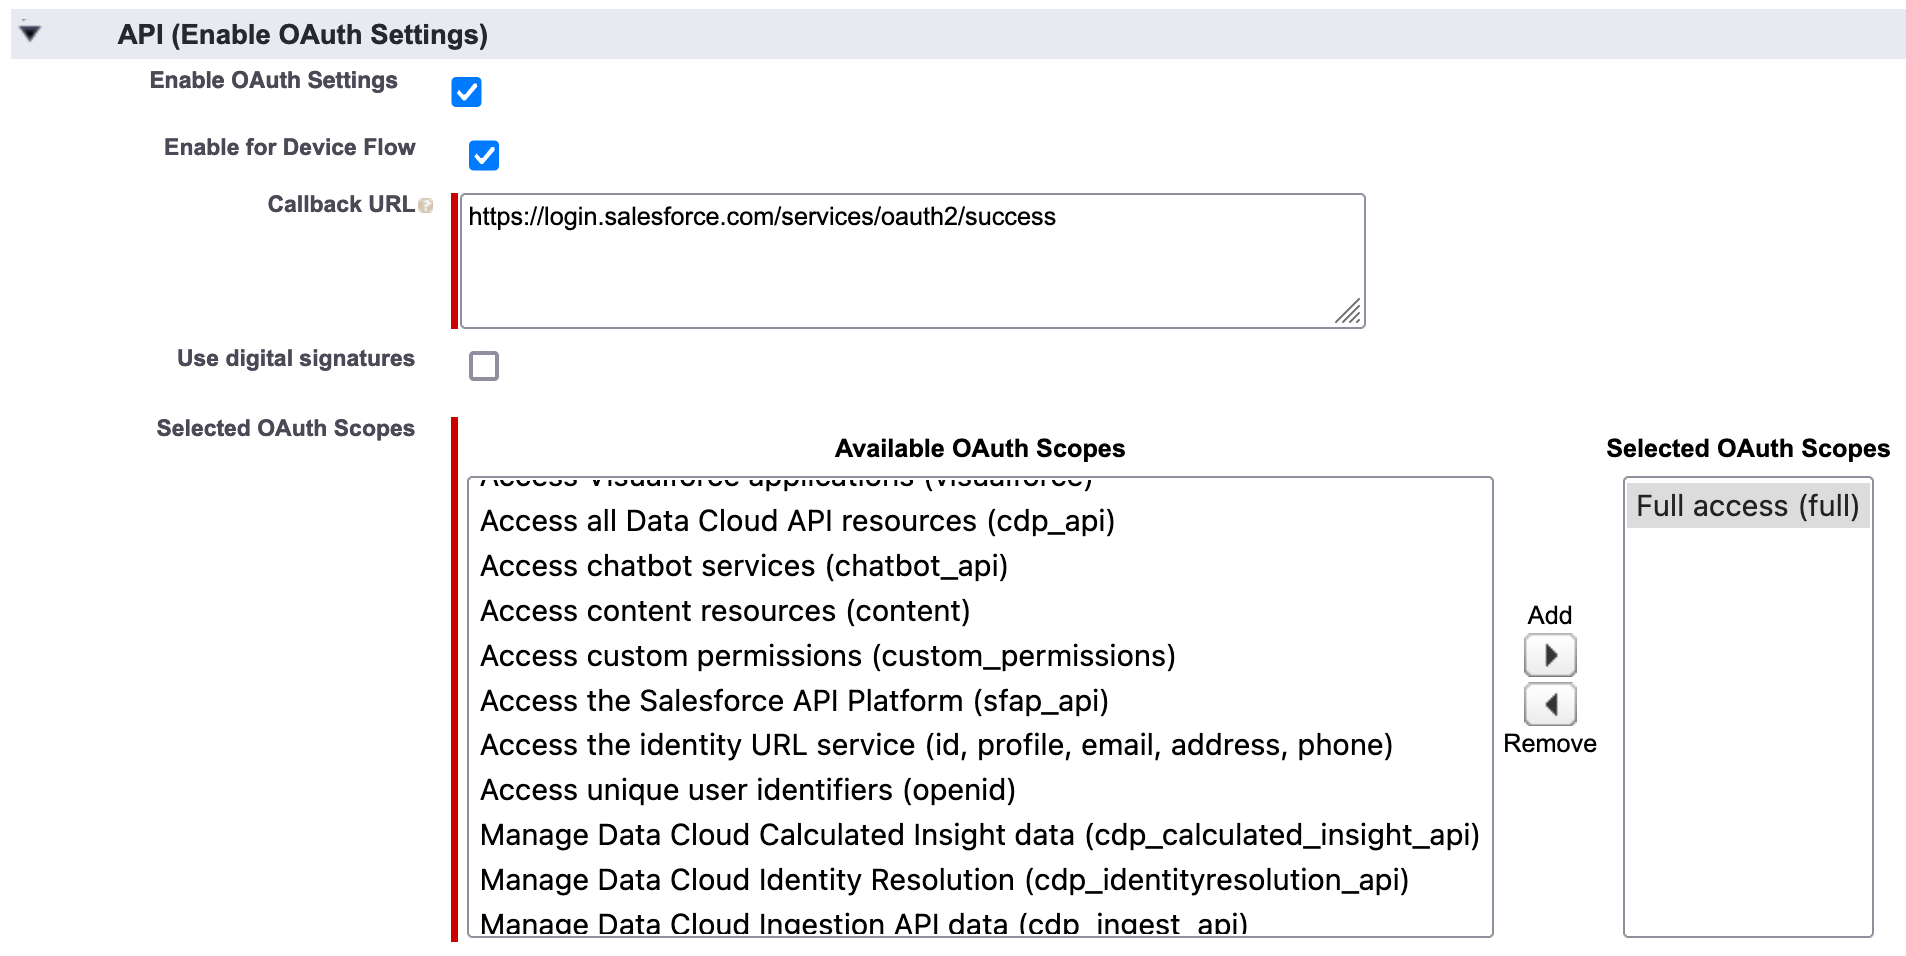
3. Enable **OAuth Settings** and **Device Flow**. Use `https://login.salesforce.com/services/oauth2/success` as the documented callback URL unless your current connection instructions specify a different value.
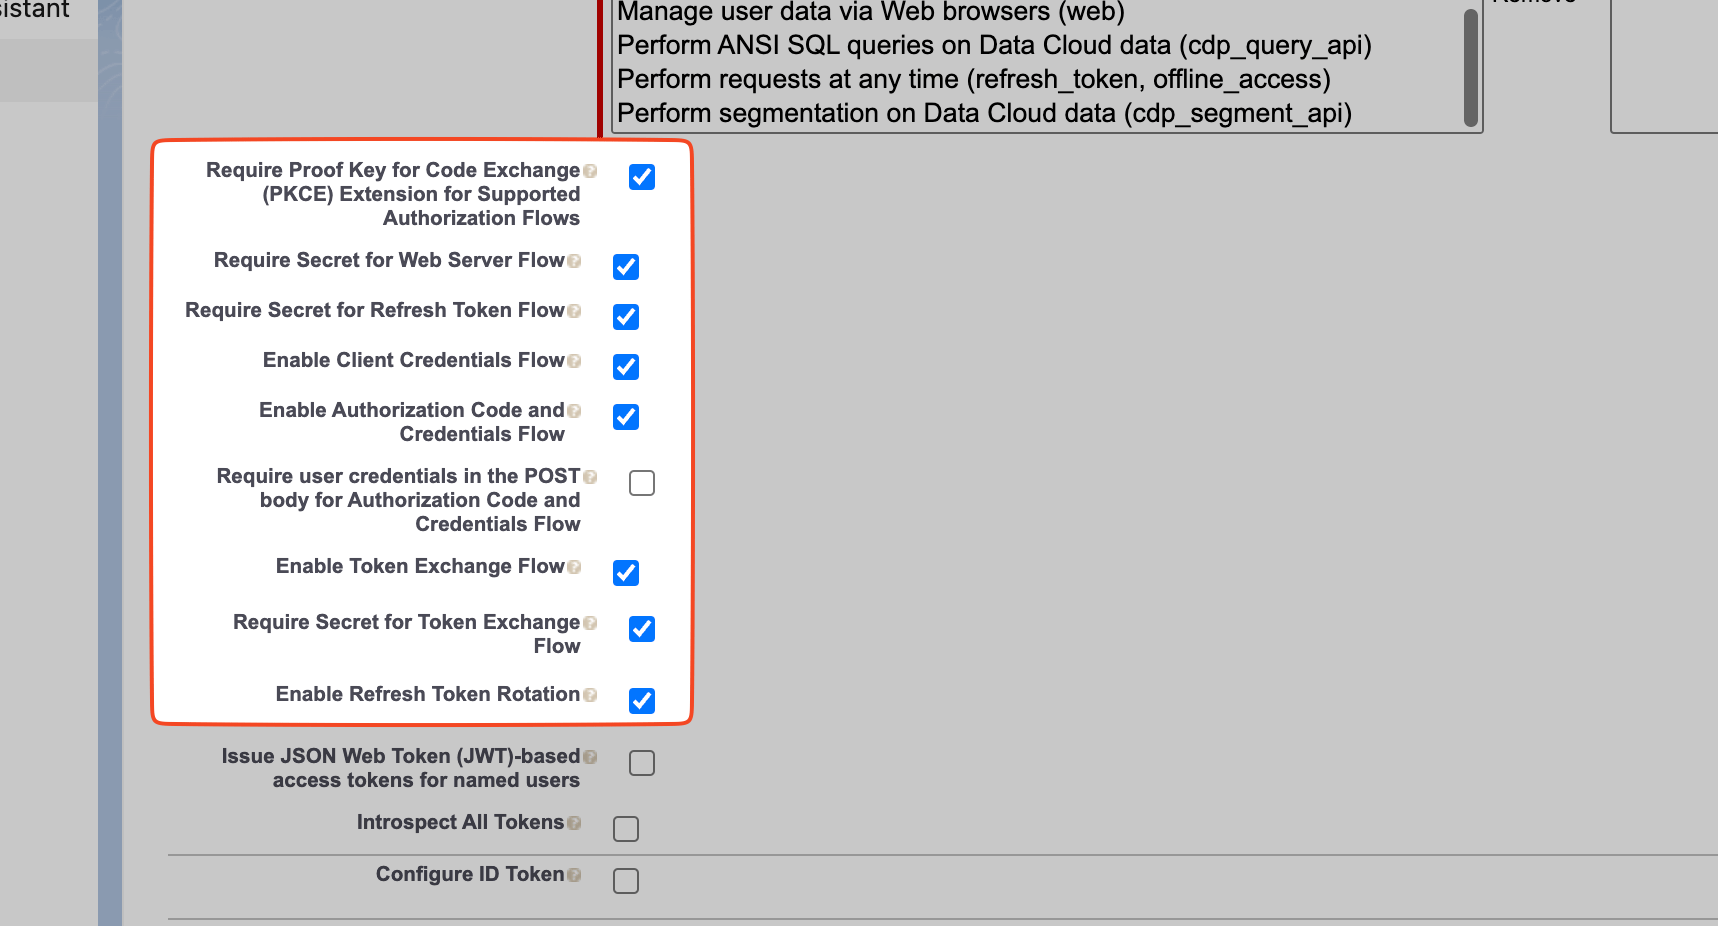
4. Configure the OAuth scopes and client-credentials settings shown in the connection instructions, then save and continue.
## Create the connected app
1. Open the upper-right gear, select **Setup**, and go to **Platform Tools > Apps > App Manager**.
2. Choose **New Connected App**. Enter the app name, API name, and contact email.
3. Enable **OAuth Settings** and **Device Flow**. Use `https://login.salesforce.com/services/oauth2/success` as the documented callback URL unless your current connection instructions specify a different value.
4. Configure the OAuth scopes and client-credentials settings shown in the connection instructions, then save and continue.
 ## Assign the run-as user
Open **Manage > Edit Policies** for the app. Under **Client Credentials Flow > Run As**, select the System Administrator user required by the documented setup and save.
## Assign the run-as user
Open **Manage > Edit Policies** for the app. Under **Client Credentials Flow > Run As**, select the System Administrator user required by the documented setup and save.
 ## Retrieve and enter consumer details
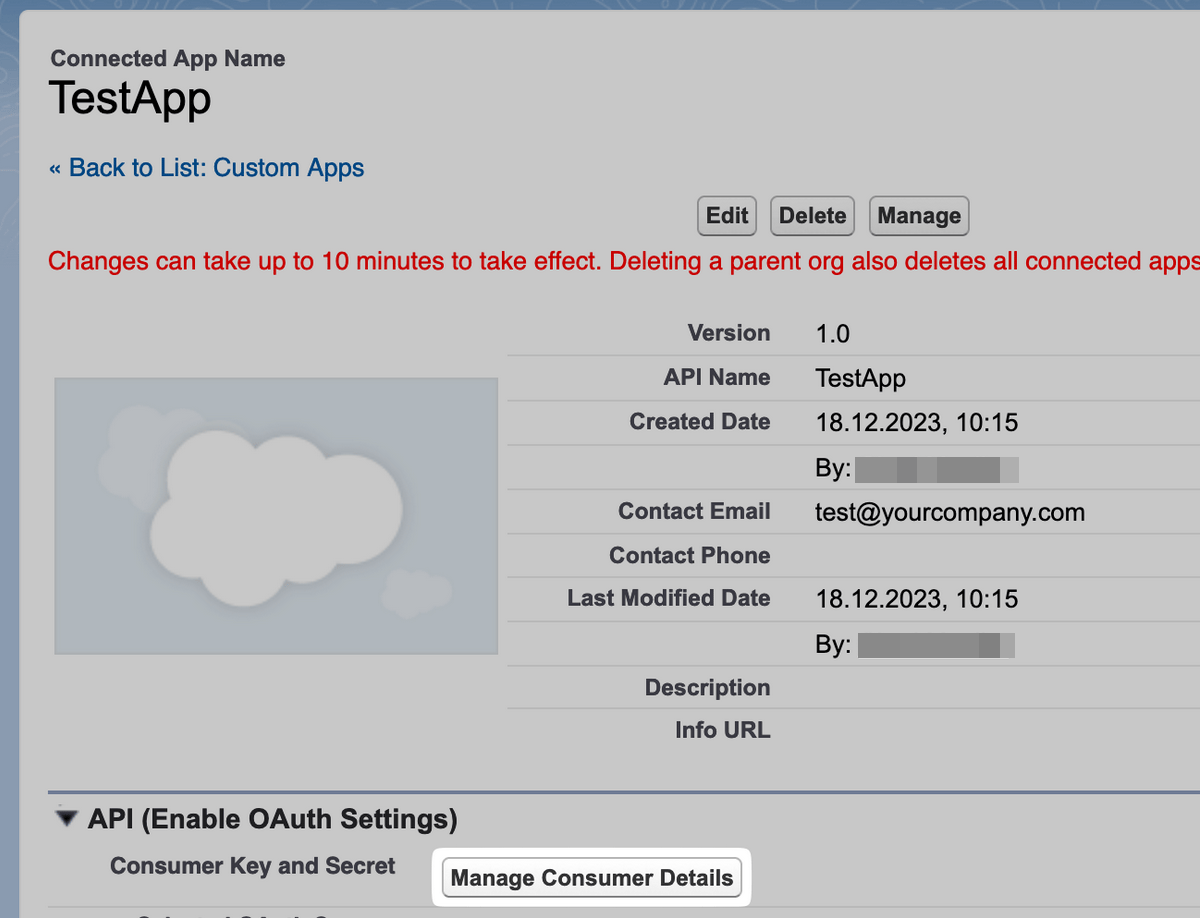
Return to **App Manager**, open the app’s **View** page, and open **Manage Consumer Details**. Complete any identity check. Copy **Consumer Key** to the Juicebox **Client ID** field and **Consumer Secret** to **Client Secret**, then complete setup.
## Retrieve and enter consumer details
Return to **App Manager**, open the app’s **View** page, and open **Manage Consumer Details**. Complete any identity check. Copy **Consumer Key** to the Juicebox **Client ID** field and **Consumer Secret** to **Client Secret**, then complete setup.
 ## Confirm the integration
Finish the connection window and return to Juicebox. Confirm that the connection has completed, then allow the initial sync to populate your data.
* Check that the expected jobs appear in Juicebox.
* Export a test profile with a resume to a selected job, then verify the application in Mysolution.
If validation fails, check the credentials, account or region, and permission list shown in the connection window. Contact Juicebox Support if the expected data is still missing.
## Using the integration
Start from an imported job on the [Projects](/projects) page to create a search linked to that job.
To send a profile to Mysolution, follow the [export steps](/exports) and select the connected ATS and intended job.
## Support
For help, contact [support@juicebox.ai](mailto:support@juicebox.ai). For an overview of available workflows, see [ATS Integrations](/ats-integrations).
ATS-side setup reference: [Kombo’s Mysolution connection guide](https://help.kombo.dev/hc/en-us/articles/17322501611153-Mysolution-How-do-I-link-my-account).
## Confirm the integration
Finish the connection window and return to Juicebox. Confirm that the connection has completed, then allow the initial sync to populate your data.
* Check that the expected jobs appear in Juicebox.
* Export a test profile with a resume to a selected job, then verify the application in Mysolution.
If validation fails, check the credentials, account or region, and permission list shown in the connection window. Contact Juicebox Support if the expected data is still missing.
## Using the integration
Start from an imported job on the [Projects](/projects) page to create a search linked to that job.
To send a profile to Mysolution, follow the [export steps](/exports) and select the connected ATS and intended job.
## Support
For help, contact [support@juicebox.ai](mailto:support@juicebox.ai). For an overview of available workflows, see [ATS Integrations](/ats-integrations).
ATS-side setup reference: [Kombo’s Mysolution connection guide](https://help.kombo.dev/hc/en-us/articles/17322501611153-Mysolution-How-do-I-link-my-account).