> ## Documentation Index
> Fetch the complete documentation index at: https://docs.juicebox.ai/llms.txt
> Use this file to discover all available pages before exploring further.
# SAP SuccessFactors Integration Set-up
> Enable the two-way integration between SAP SuccessFactors and Juicebox.
## About the integration
Juicebox's integration with SAP SuccessFactors allows you to:
1. **Export Profiles to SAP SuccessFactors**: Save profiles directly into SAP SuccessFactors, including contact details, current company and job, profile URLs, and more.
1. **\[Configurable] Auto-Export:** Juicebox has the ability to auto-export profiles to your ATS with configurable triggers, including after shortlisting, after adding to a sequence, or after an interested response.
2. **Custom Integration Fields:** On some plans, integration fields can be customized further based on your preferred fields.
2. **Link SAP SuccessFactors Jobs to Juicebox**
1. **Import Job Descriptions**: Import a job description from SAP SuccessFactors into Juicebox to automatically kick off a search using the job description.
2. **Simplify Exports:** When exporting a profile from Juicebox to the ATS, it will automatically be connected to the correct job in the ATS. More details [here](/projects).
3. **View Profiles in SAP SuccessFactors**: View profiles already in SAP SuccessFactors within Juicebox. Avoid reaching out to the same profile twice, and instantly view your relationship history.
### Start a project via the SAP SuccessFactors integration
Open the projects page and select **Import Job from ATS / CRM**. You will then see your SAP SuccessFactors jobs and can select the corresponding option.
### Export profiles to SAP SuccessFactors
Follow the regular [export](/exports) steps and select **Export to SAP SuccessFactors** on either an individual profile or a bulk export. After exporting, you will see the profile created in your SAP SuccessFactors account.
### View profiles already in SAP SuccessFactors
Juicebox will tag profiles that already exist in SAP SuccessFactors. You will see the last modified date, as well as the option to view the profile directly in SAP SuccessFactors by clicking the **View in ATS** button.
## Before you start
* You must be an **Admin** of your SAP SuccessFactors instance. If you are not an admin, you won't be able to search for and access the configuration pages described below. Alternatively, contact your SuccessFactors admin and have them take over the setup process.
* The **OData v2 API** must be available and enabled on your SuccessFactors instance. It is enabled by default, so this is usually not something to worry about.
The overall setup takes about 30 minutes and has three main steps:
1. Create a new user and a permission group for that user.
2. Create a new permission role and assign it to the newly created permission group.
3. Generate the API credentials for that permission role.
## Find your API domain
Your API domain depends on which region you are based in. To find it:
1. Open the [SuccessFactors API URLs list](https://help.sap.com/docs/SAP_SUCCESSFACTORS_PLATFORM/2abbb39286994389bb0f1f4418773a7c/af2b8d5437494b12be88fe374eba75b6.html?locale=en-US#api-servers).
2. Filter for production environments, unless you're trying to connect a preview instance.
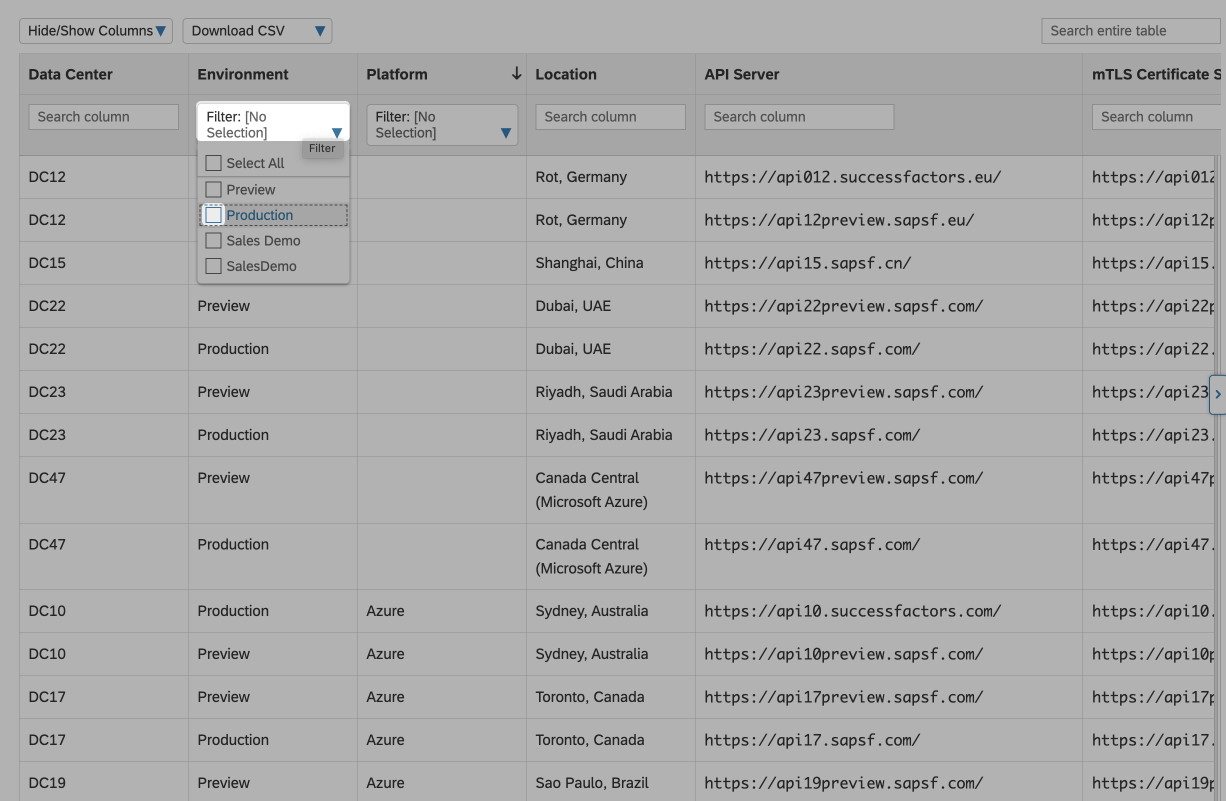 3. Once the filter is applied, find your location and select the API domain. If you are based in Germany, for example, your production URL would be `https://api012.successfactors.eu/`.
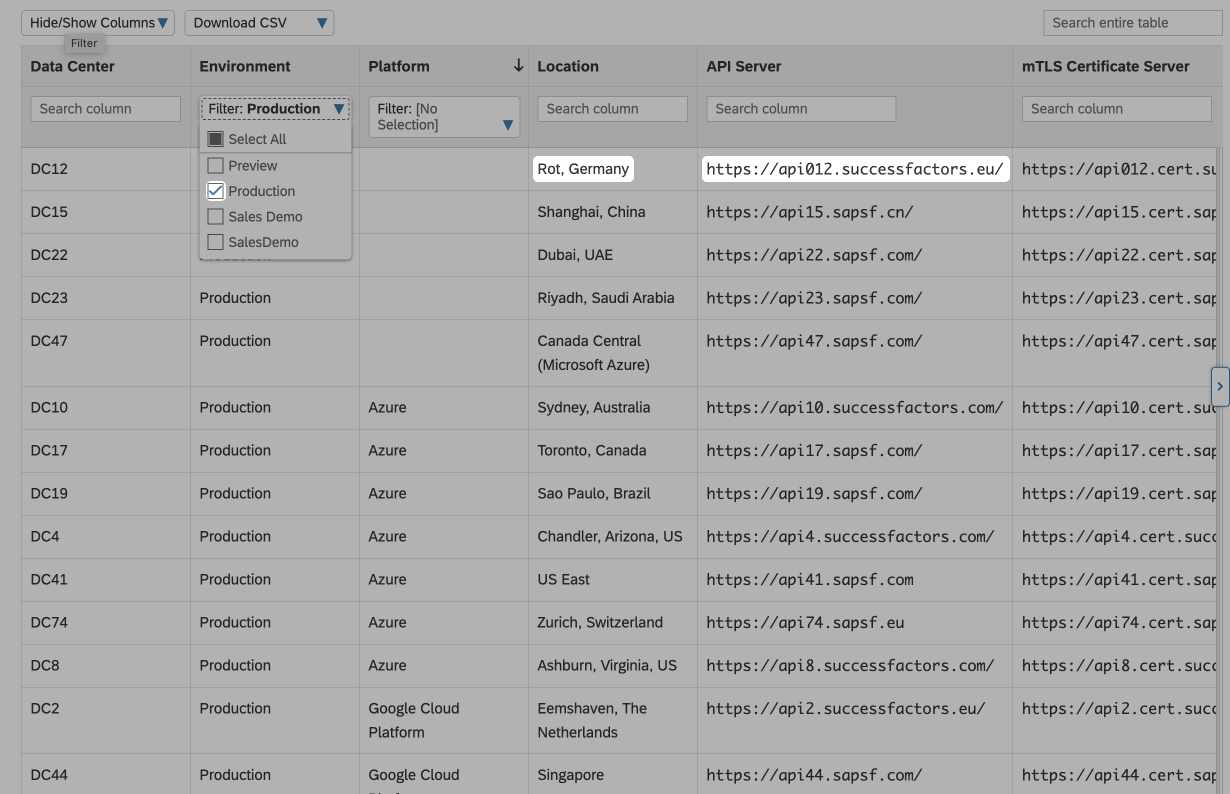 The resulting API server URL often looks similar to the SuccessFactors domain you log in on. The API for `pmsalesdemo8.successfactors.com`, for example, is located at `apisalesdemo8.successfactors.com`. If you are unsure which data center to use, contact your SAP SuccessFactors representative.
## Find your Company ID
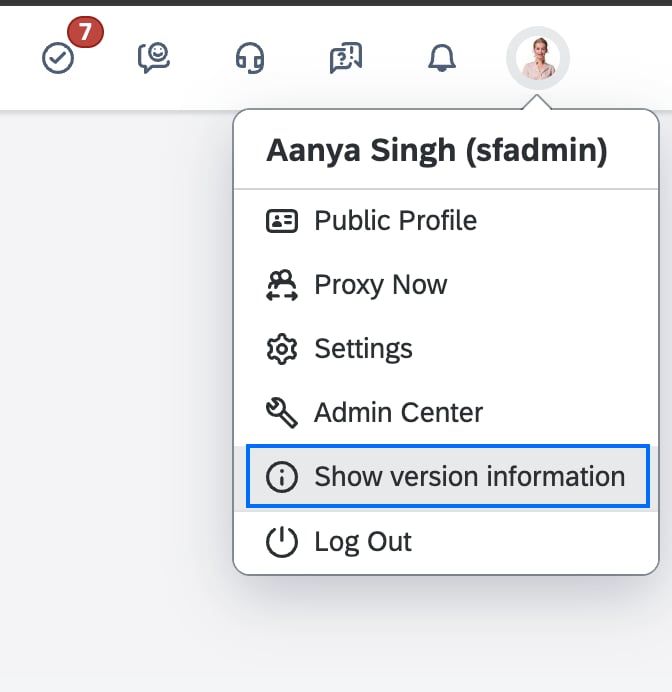
1. Click the **profile picture in the top right**, then click **Show version information**.
The resulting API server URL often looks similar to the SuccessFactors domain you log in on. The API for `pmsalesdemo8.successfactors.com`, for example, is located at `apisalesdemo8.successfactors.com`. If you are unsure which data center to use, contact your SAP SuccessFactors representative.
## Find your Company ID
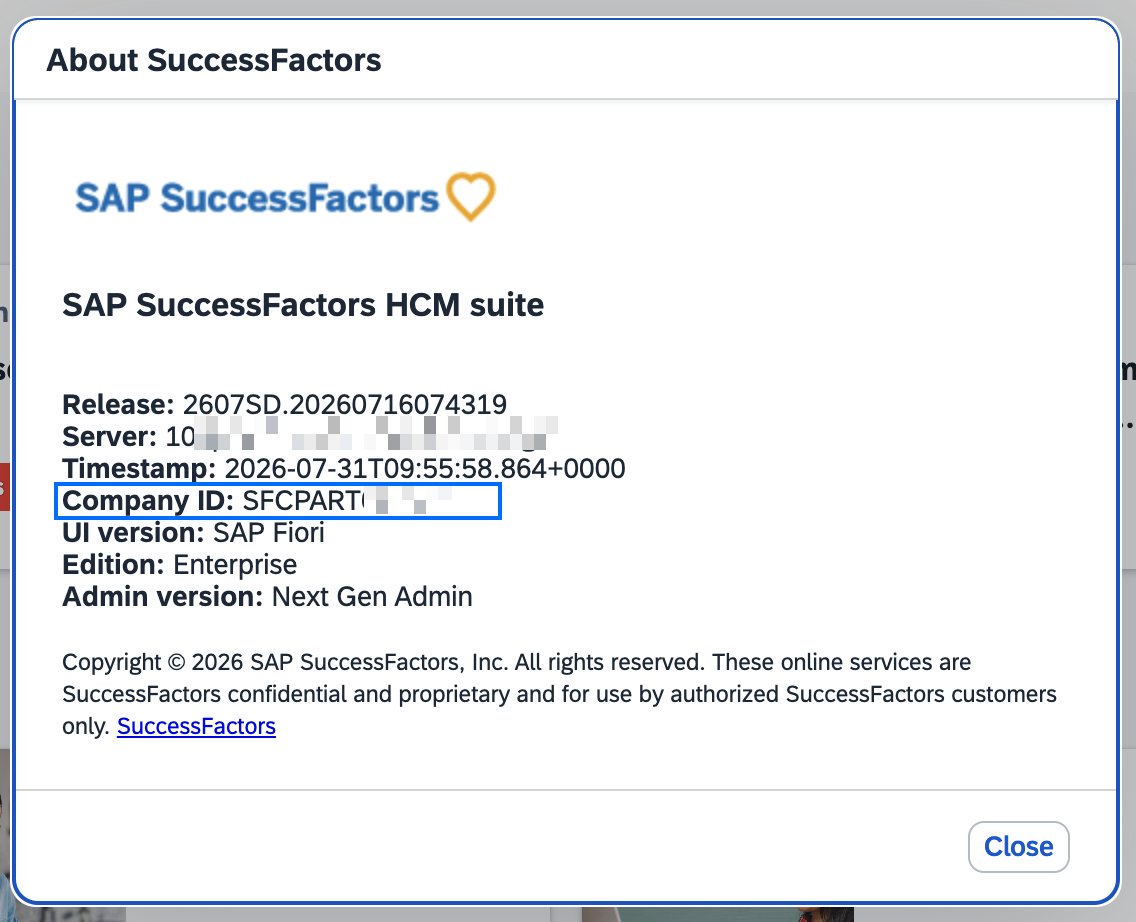
1. Click the **profile picture in the top right**, then click **Show version information**.
 2. Copy the value right next to **Company ID**.
 ## Create a new user
1. In the admin center, go to the search console, type in "Import Employee Data", and click the action that appears.
## Create a new user
1. In the admin center, go to the search console, type in "Import Employee Data", and click the action that appears.
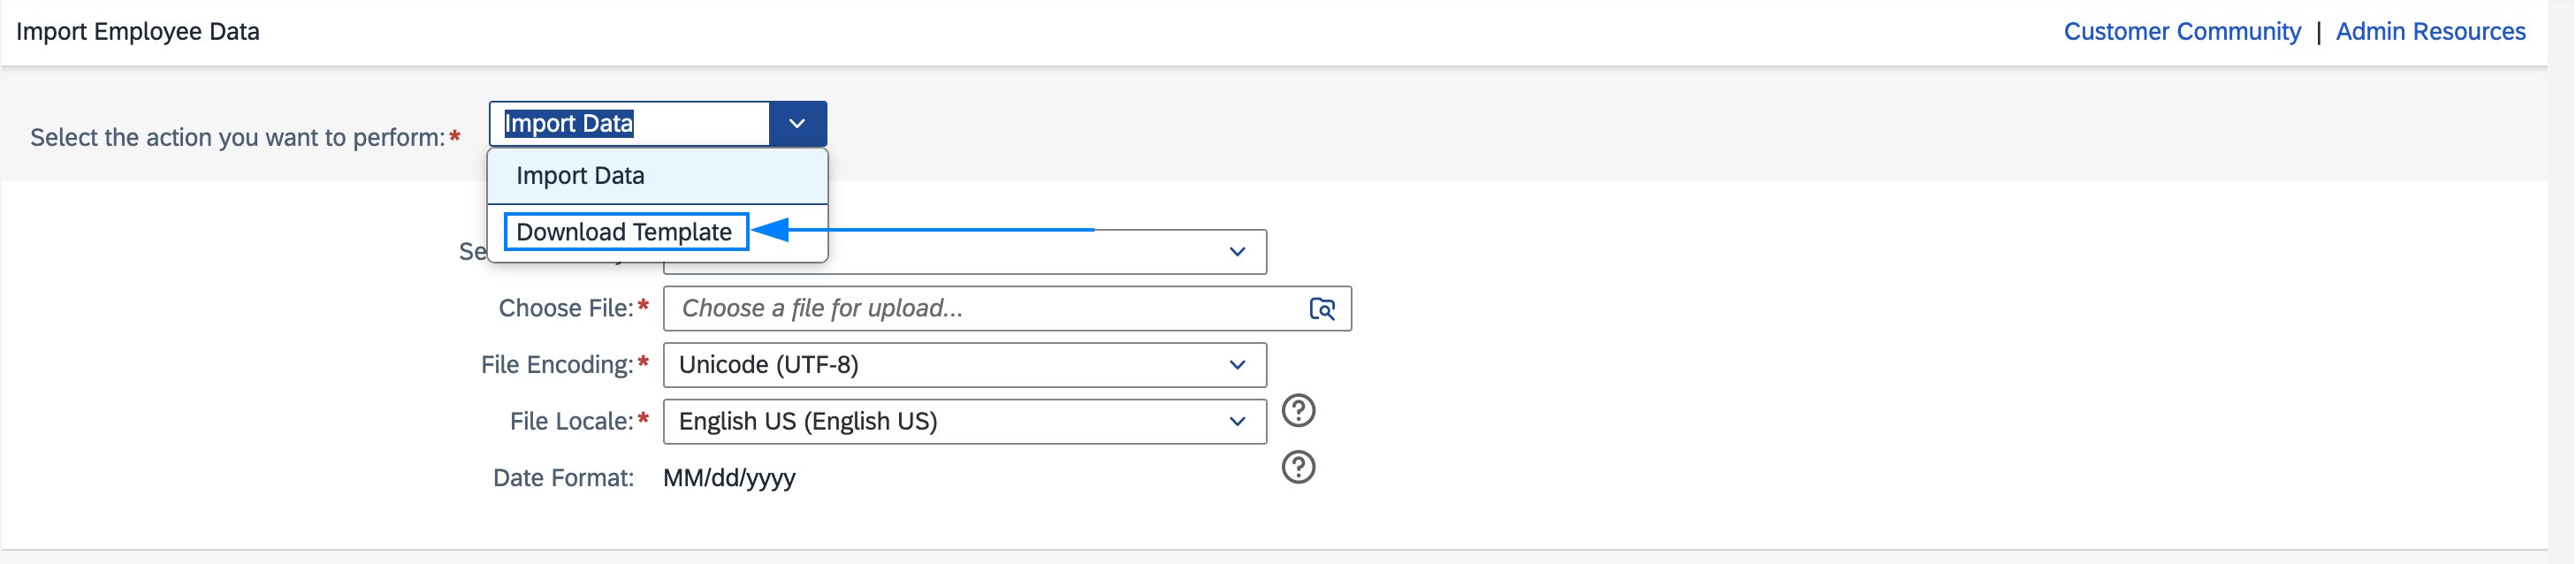
 2. Click **Import data**, then select **Download Template**.
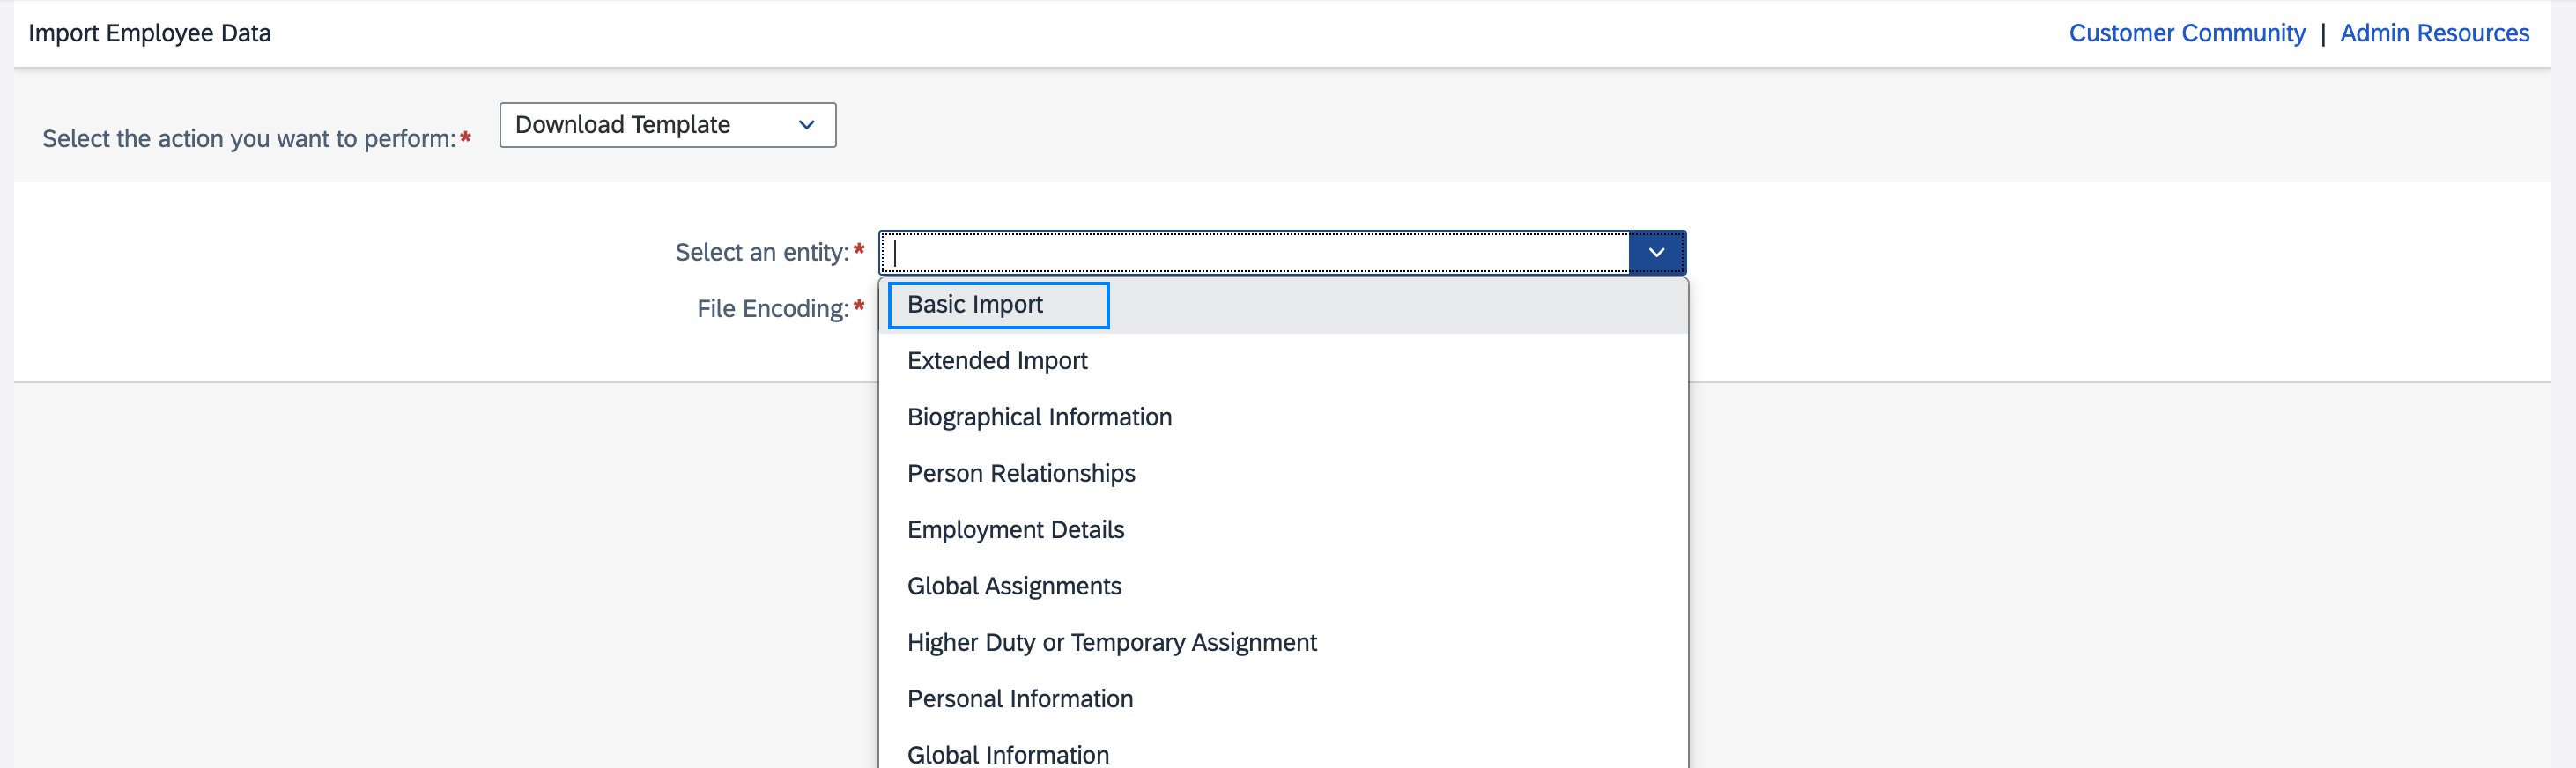
 3. Click the field next to **Select an entity**, then click **Basic Import**.
 4. Click the **Generate Template** button.
 5. You receive a `.csv` file to download. It likely contains two rows. Add an additional row and fill out at least these fields:
* **Status**: active
* **User ID**: SFAPI\_INTEGRATION (for example; any value possible)
* **Username**: SFAPI\_INTEGRATION (for example; any value possible)
* **First name**: API (for example; any value possible)
* **Last name**: Integration (for example; any value possible)
* **Email**: `integration+user@example.com` (any value possible; doesn't have to be a valid email)
* **Manager**: NO\_MANAGER
* **HR**: NO\_HR
* **Default locale**: en\_US
5. You receive a `.csv` file to download. It likely contains two rows. Add an additional row and fill out at least these fields:
* **Status**: active
* **User ID**: SFAPI\_INTEGRATION (for example; any value possible)
* **Username**: SFAPI\_INTEGRATION (for example; any value possible)
* **First name**: API (for example; any value possible)
* **Last name**: Integration (for example; any value possible)
* **Email**: `integration+user@example.com` (any value possible; doesn't have to be a valid email)
* **Manager**: NO\_MANAGER
* **HR**: NO\_HR
* **Default locale**: en\_US
 Generate your own `.csv` template rather than reusing an example file, because your SuccessFactors instance is configured differently.
6. Click **Import Data** to switch back.
Generate your own `.csv` template rather than reusing an example file, because your SuccessFactors instance is configured differently.
6. Click **Import Data** to switch back.
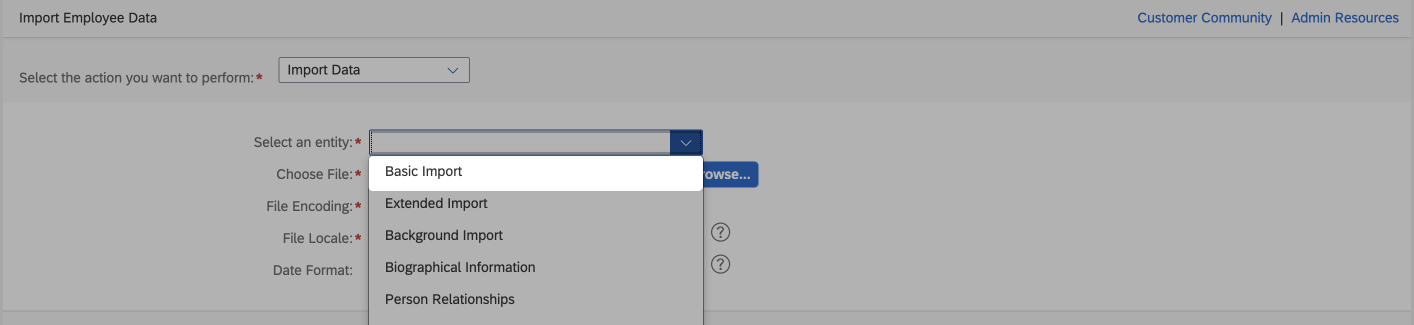
 7. Click the field next to **Select an entity**, then click **Basic Import**.
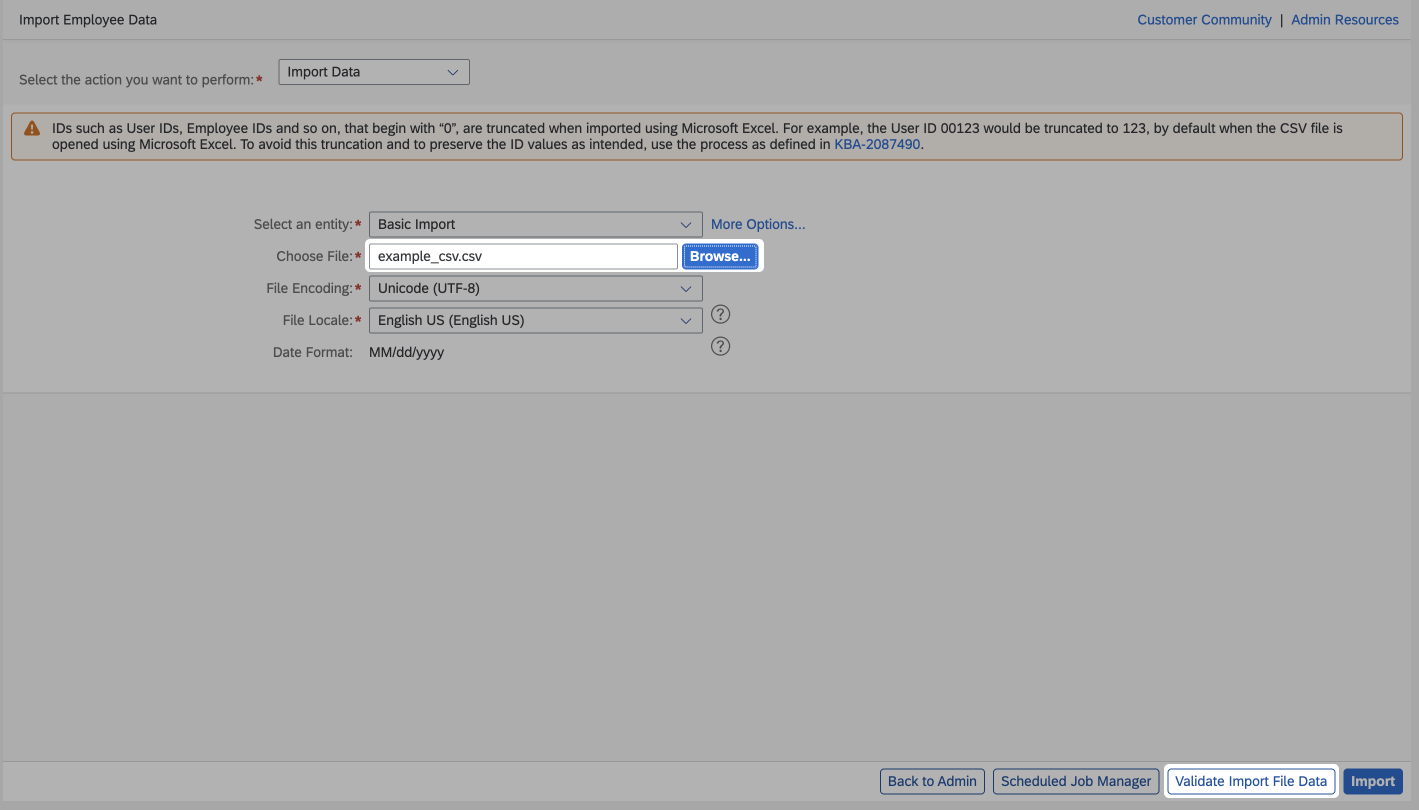
 8. Click **Browse**, select your `.csv` file, then click the **Validate Import File Data** button.
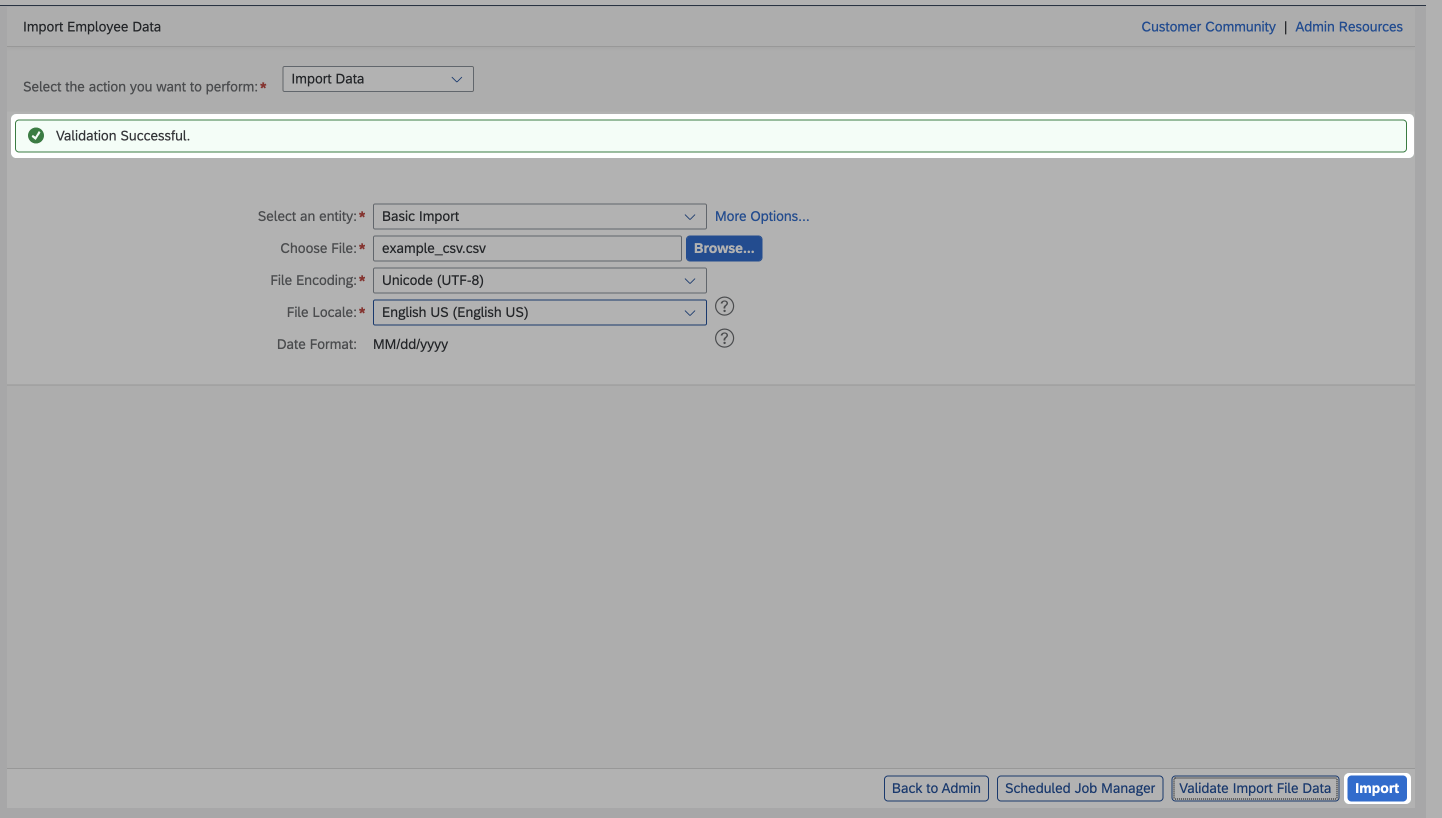
 9. If you see the **Validation Successful** dialog, click the **Import** button.
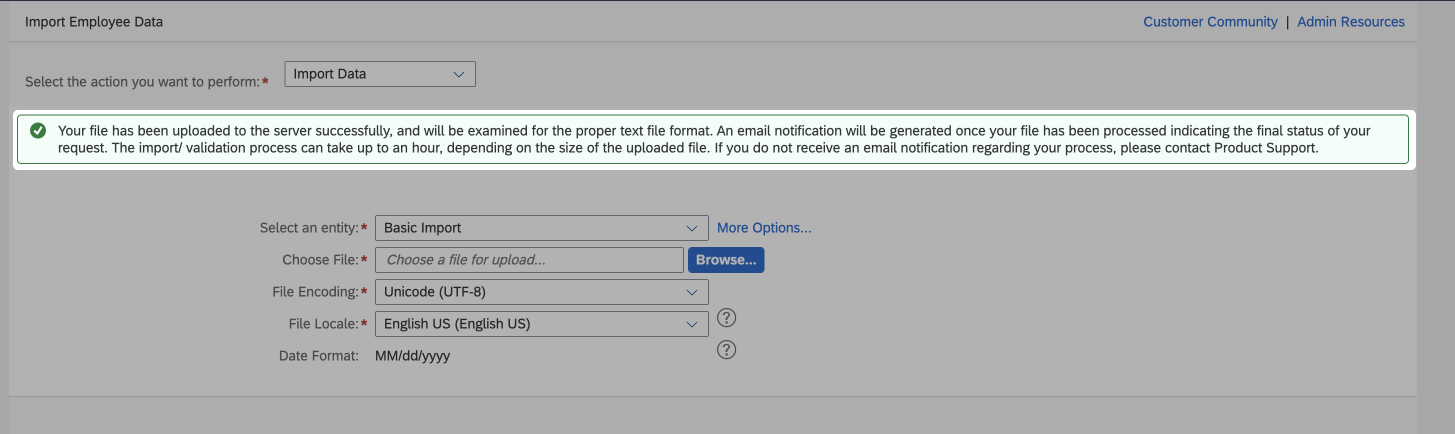
 10. You should now see a success dialog.
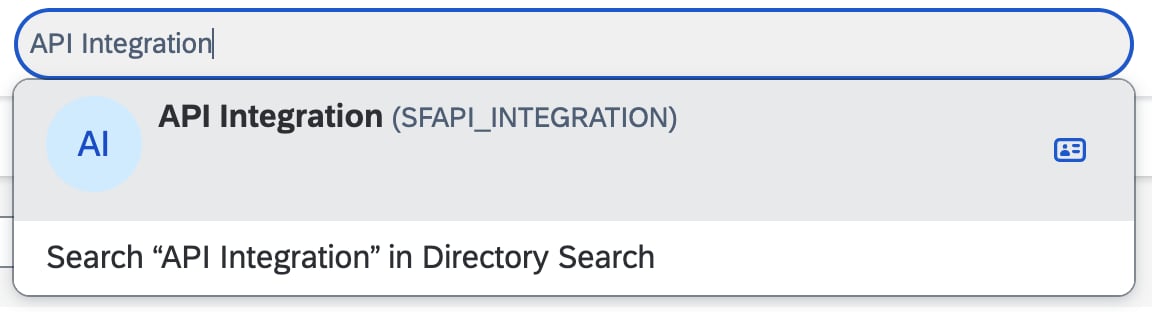
 11. Keep the `.csv` file open in the background; you need to reference it later. You can confirm the creation succeeded by searching for the employee name or username under the **People** section. The new user can take a few minutes to show up in the search.
 ## Create a permission group
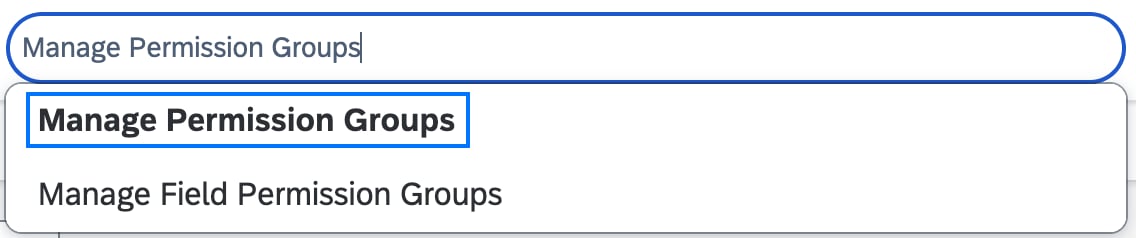
1. Go to your search bar, enter "Manage Permission Groups", and click the action.
## Create a permission group
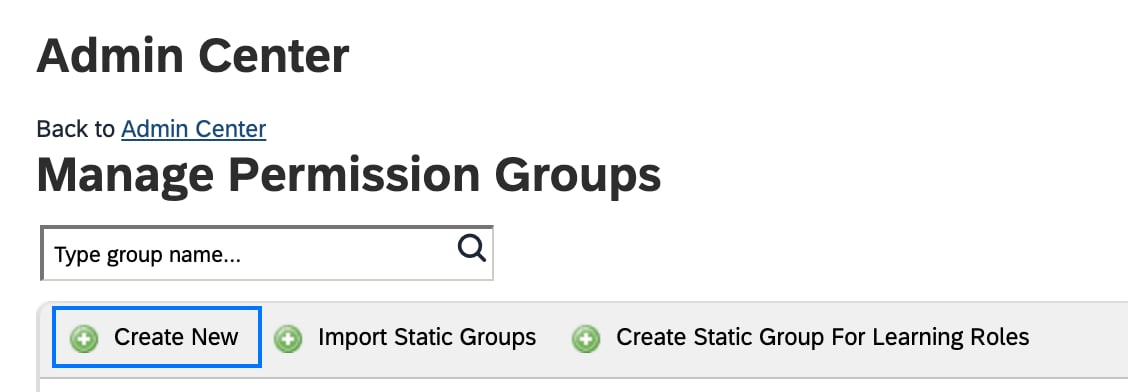
1. Go to your search bar, enter "Manage Permission Groups", and click the action.
 2. On the new page, click the **Create New** button.
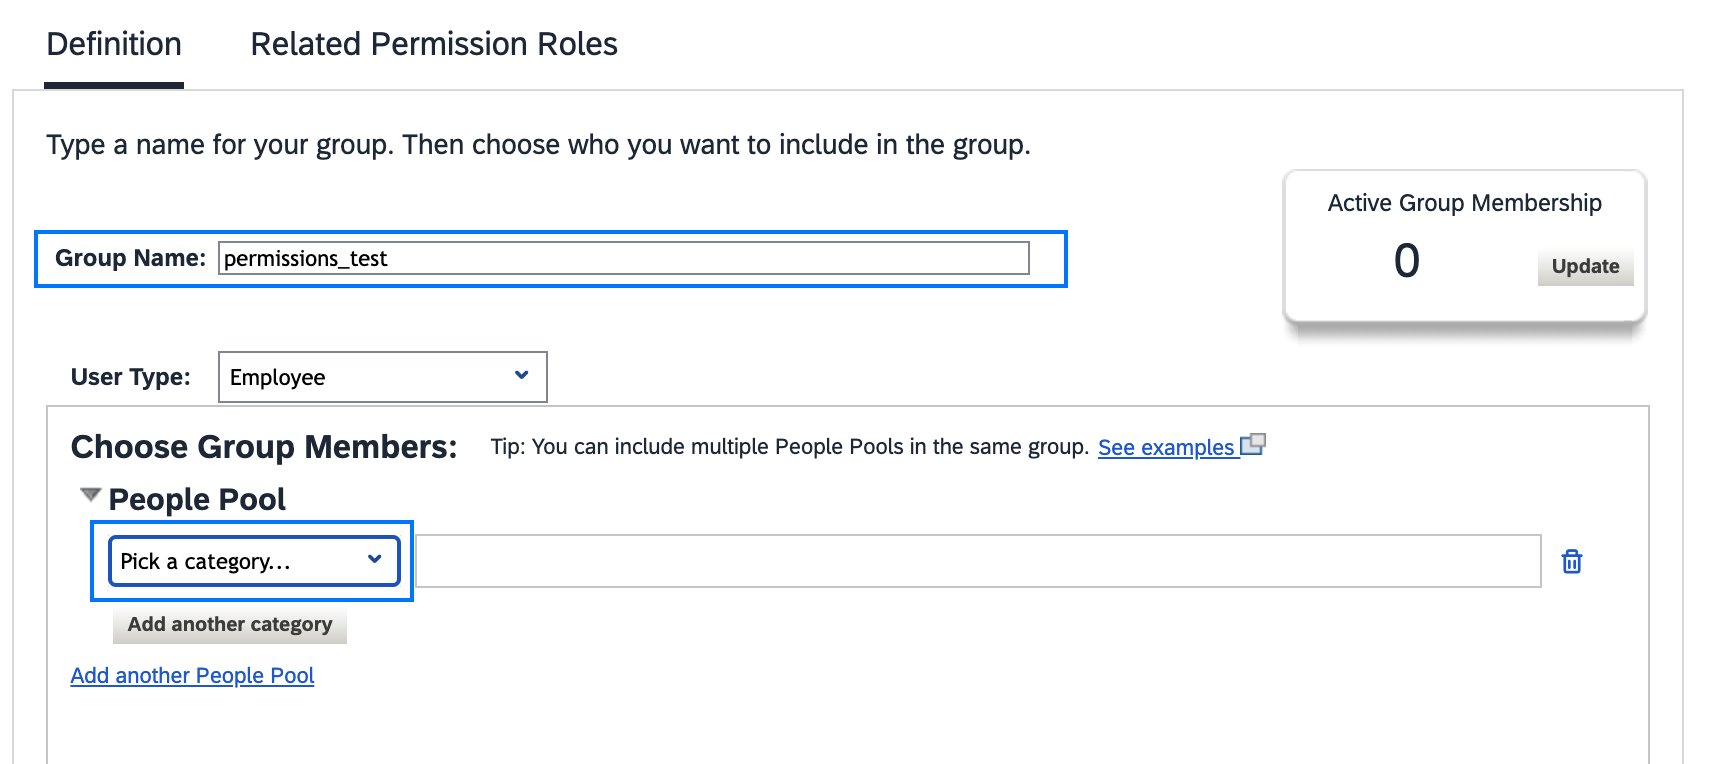
 3. Give the group a **name** and click **Pick a category**. Select the category option **Username**.
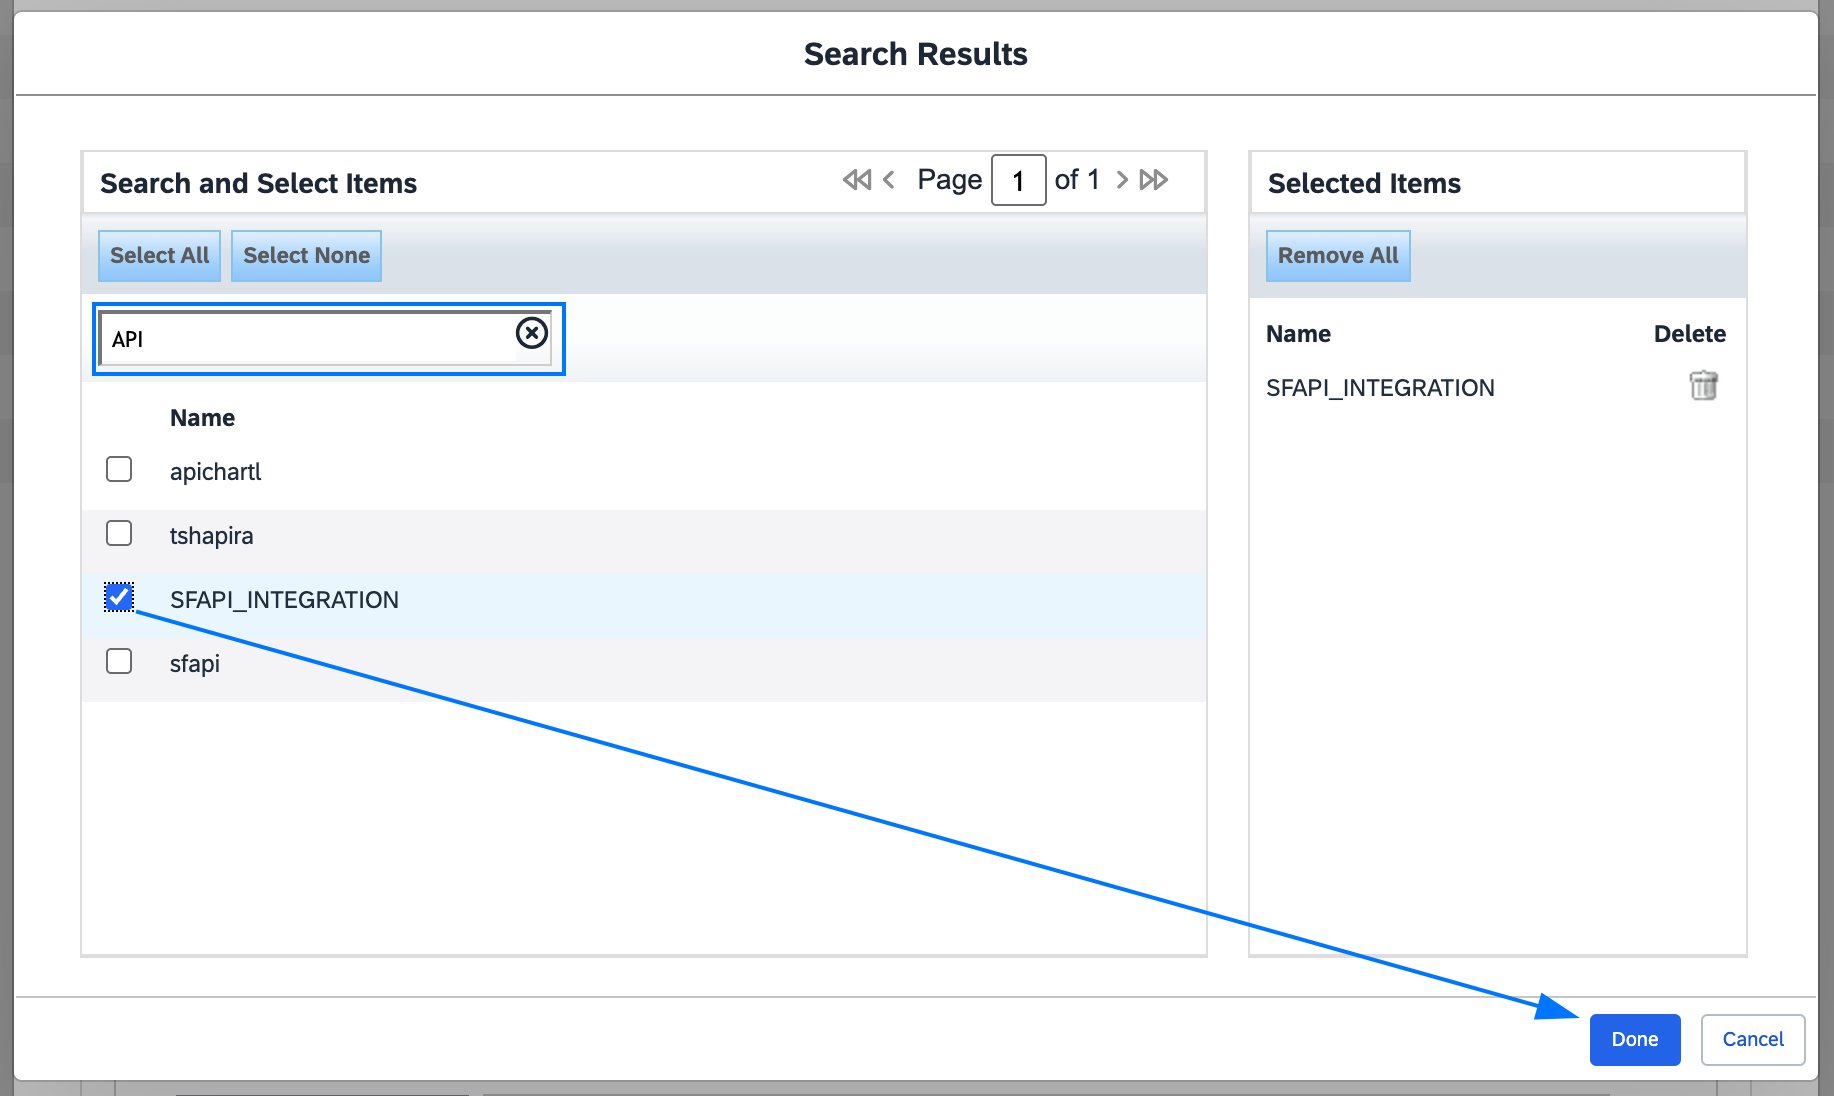
 4. Search for the user you created earlier by entering its username, tick the box next to it, and click **Done**.
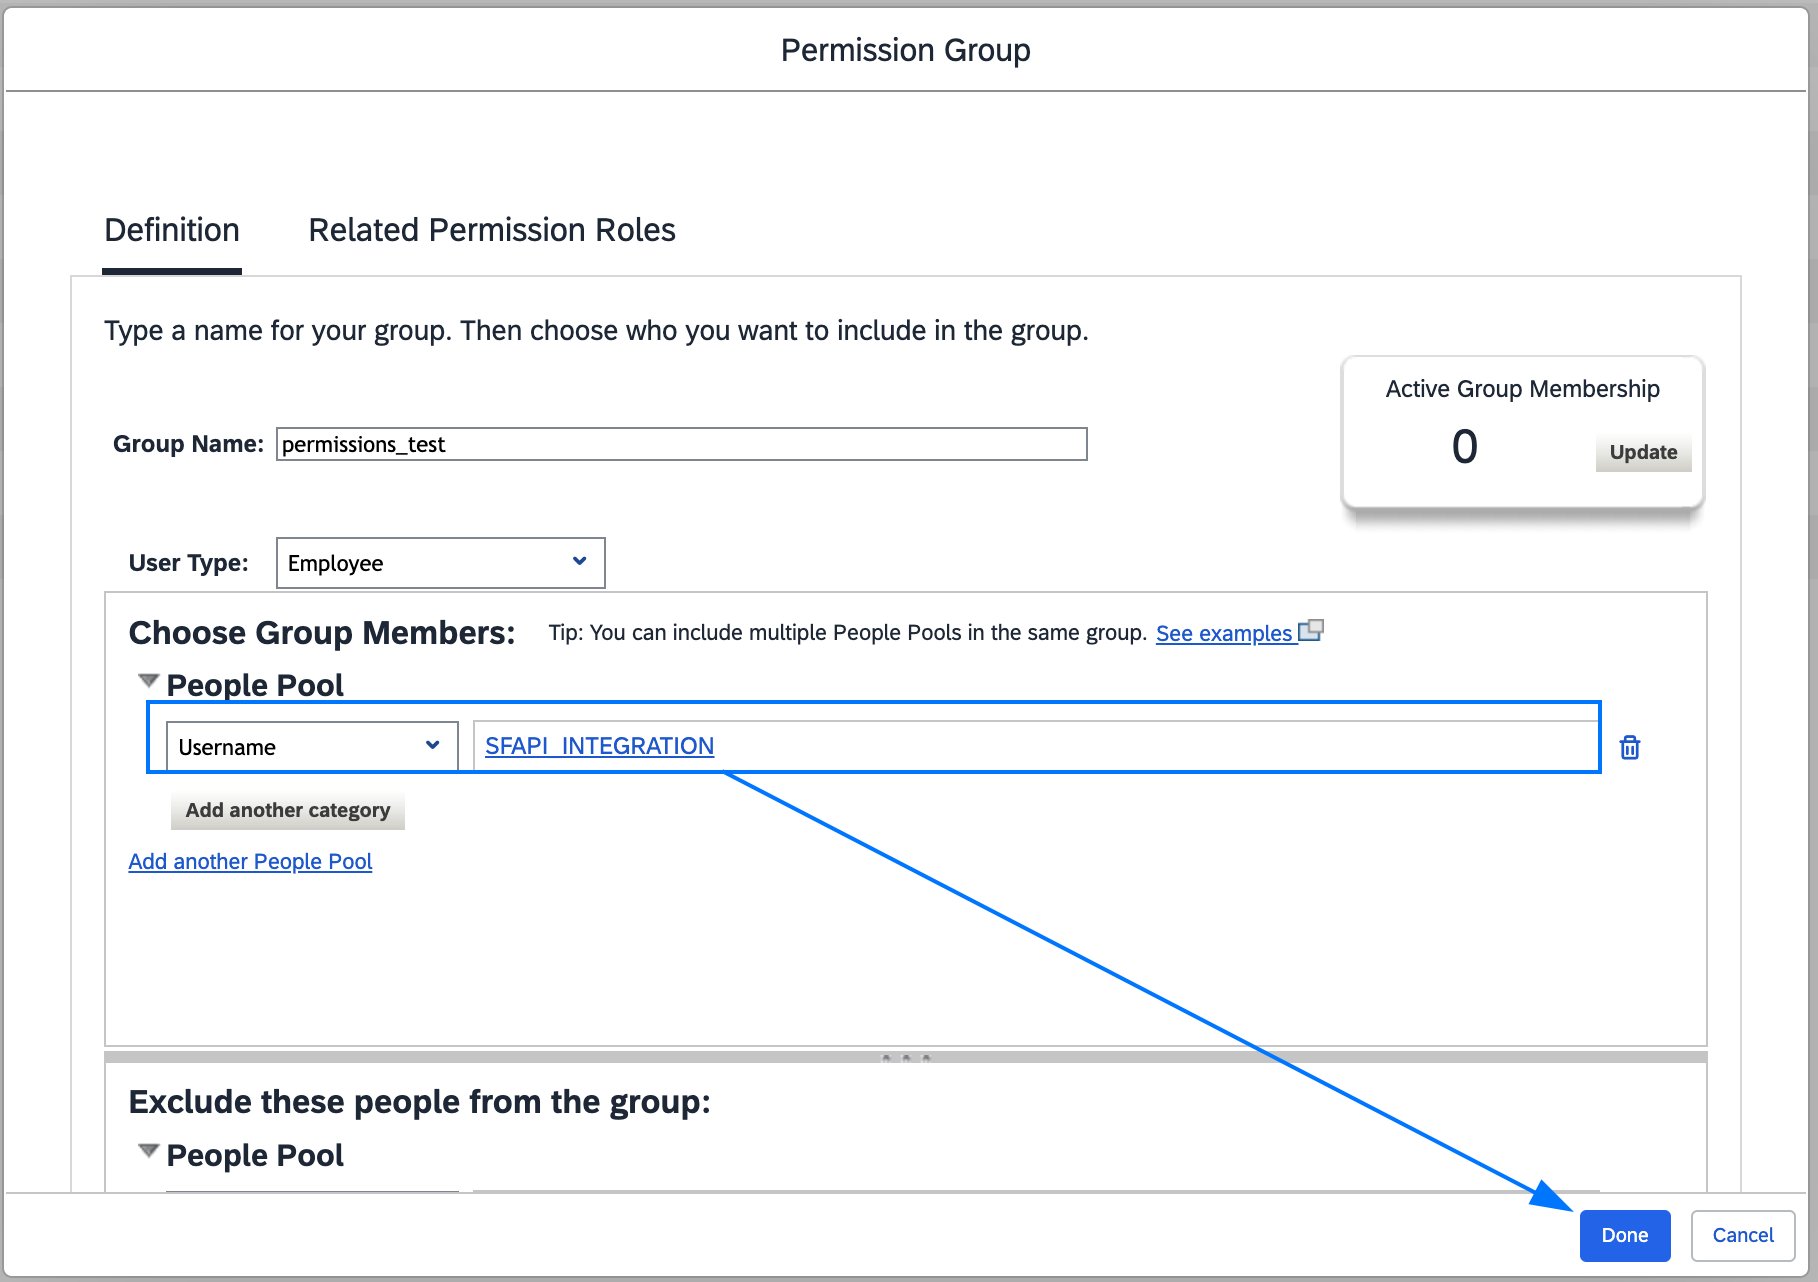
 5. You should now see your user in the people pool. Click **Done**.
 ## Create a permission role
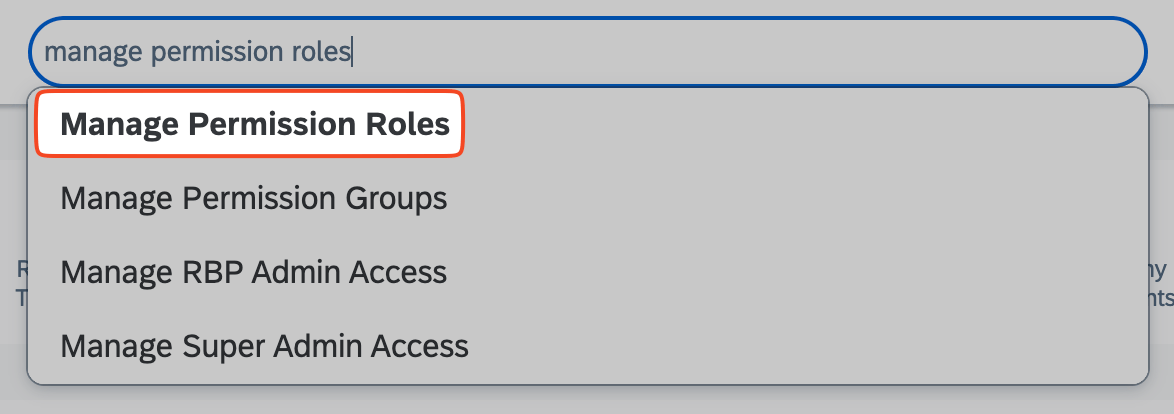
1. Go to the search bar, enter "Manage Permission Roles", and click the action with the same name.
## Create a permission role
1. Go to the search bar, enter "Manage Permission Roles", and click the action with the same name.
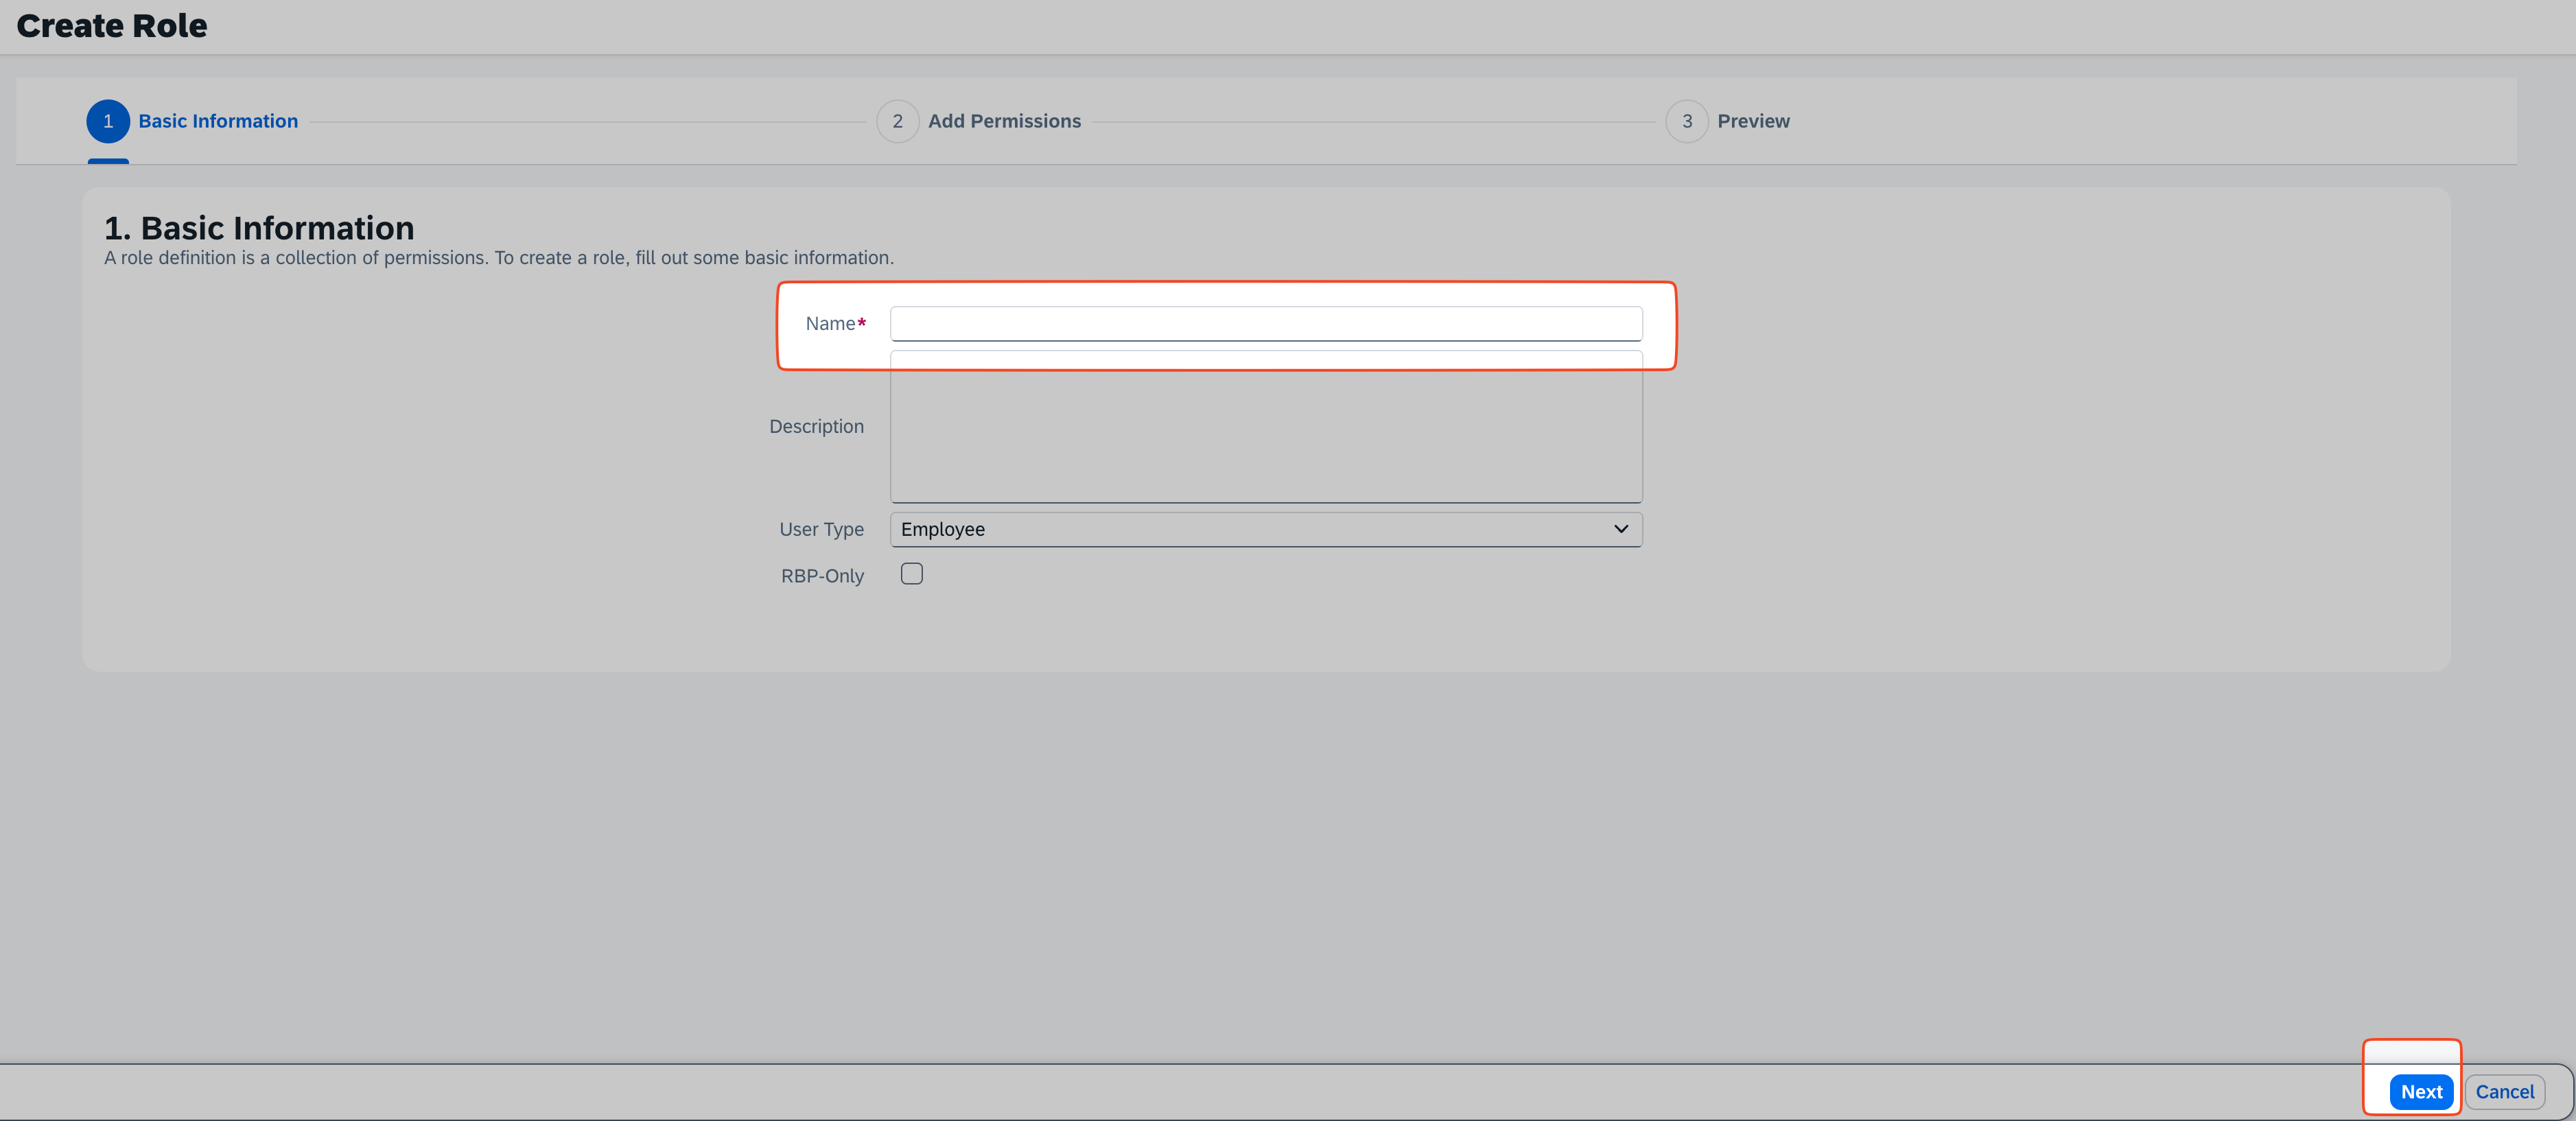
 2. On the new page, click **Create**.
 3. Enter a **Name** for the permission role and click **Next**.
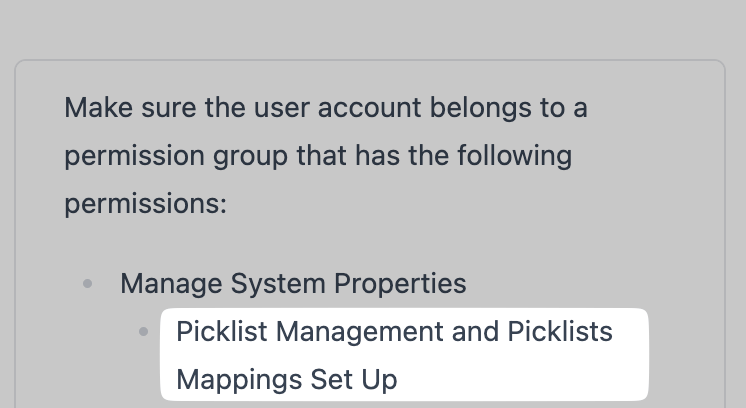
 4. Now assign the correct permissions to the role. The needed permissions are listed in the connection pop-up.
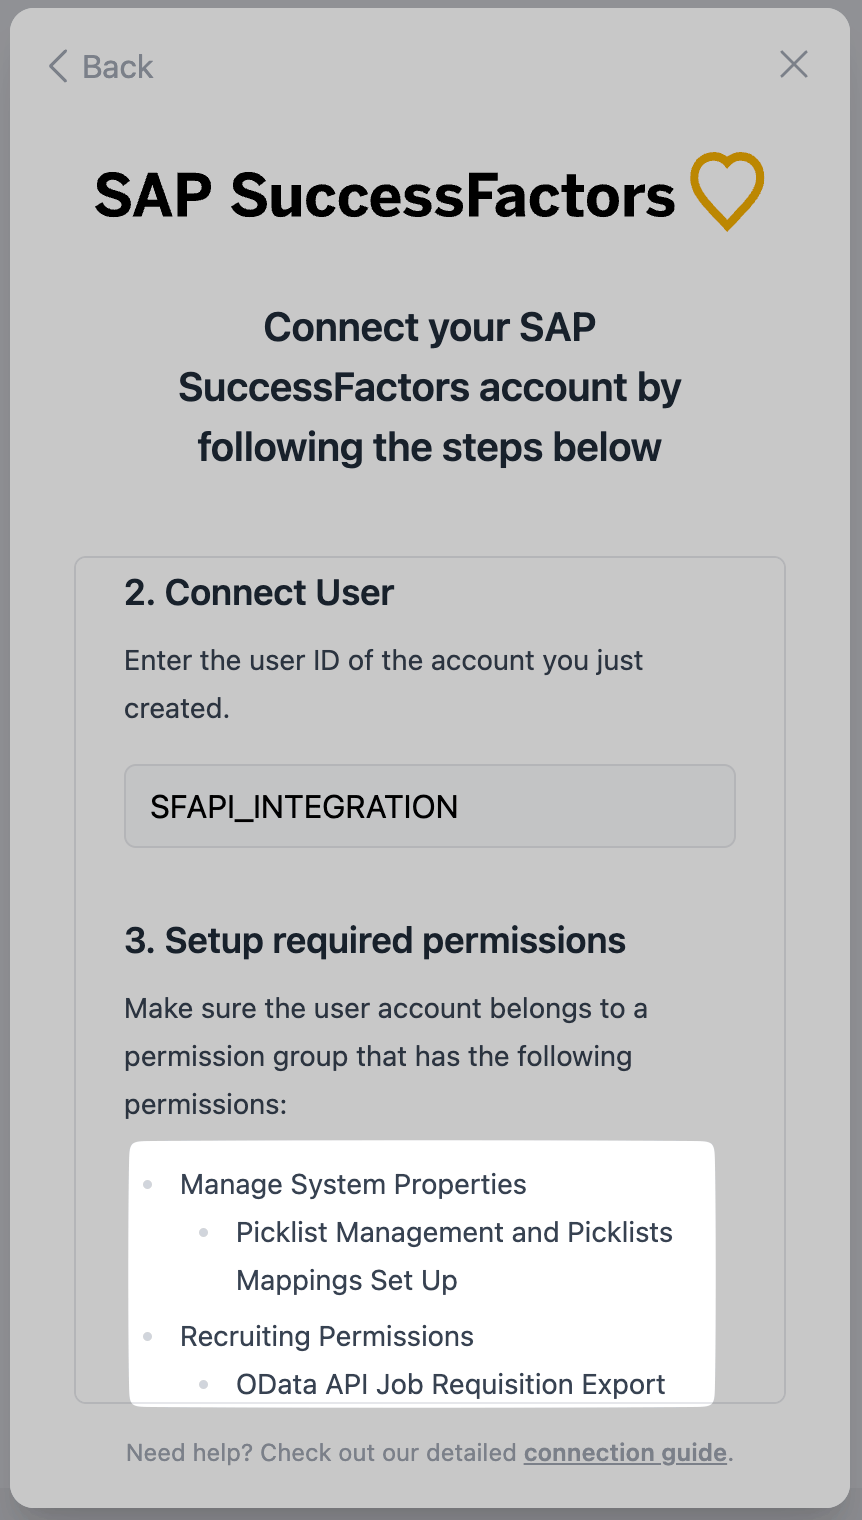 This is just an example. To see the permissions required for you, open the connection pop-up yourself.
5. For each bullet, find the permission category in the sidebar. For example, for "Manage System Properties", find the corresponding permission group in the sidebar of the SuccessFactors UI. You can find these more easily by pressing **Ctrl + F** and pasting the permission name.
This is just an example. To see the permissions required for you, open the connection pop-up yourself.
5. For each bullet, find the permission category in the sidebar. For example, for "Manage System Properties", find the corresponding permission group in the sidebar of the SuccessFactors UI. You can find these more easily by pressing **Ctrl + F** and pasting the permission name.
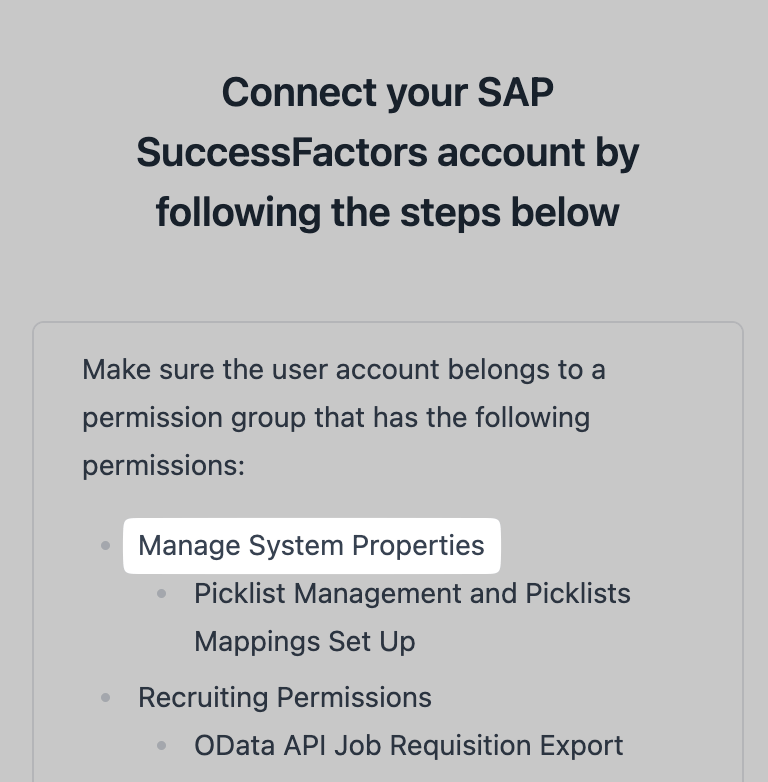
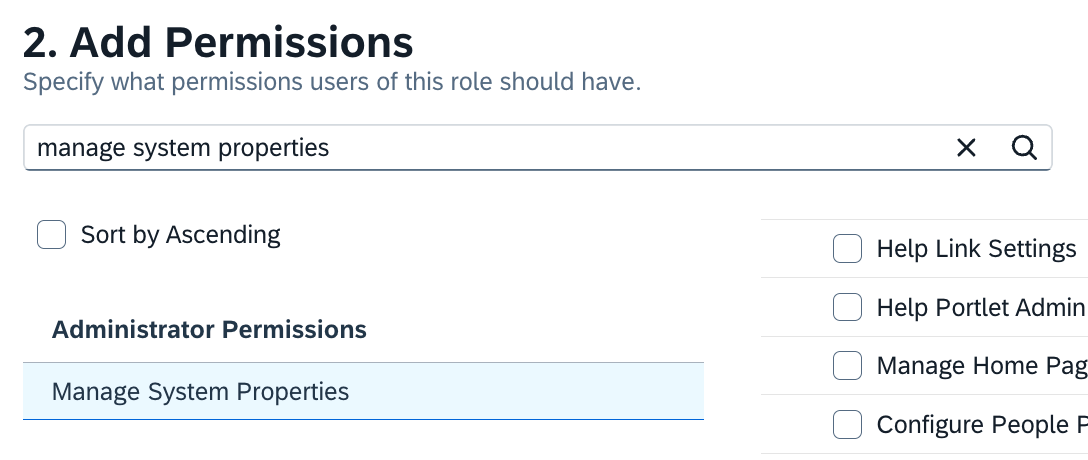 6. For each sub-bullet, check the matching permission in the category.
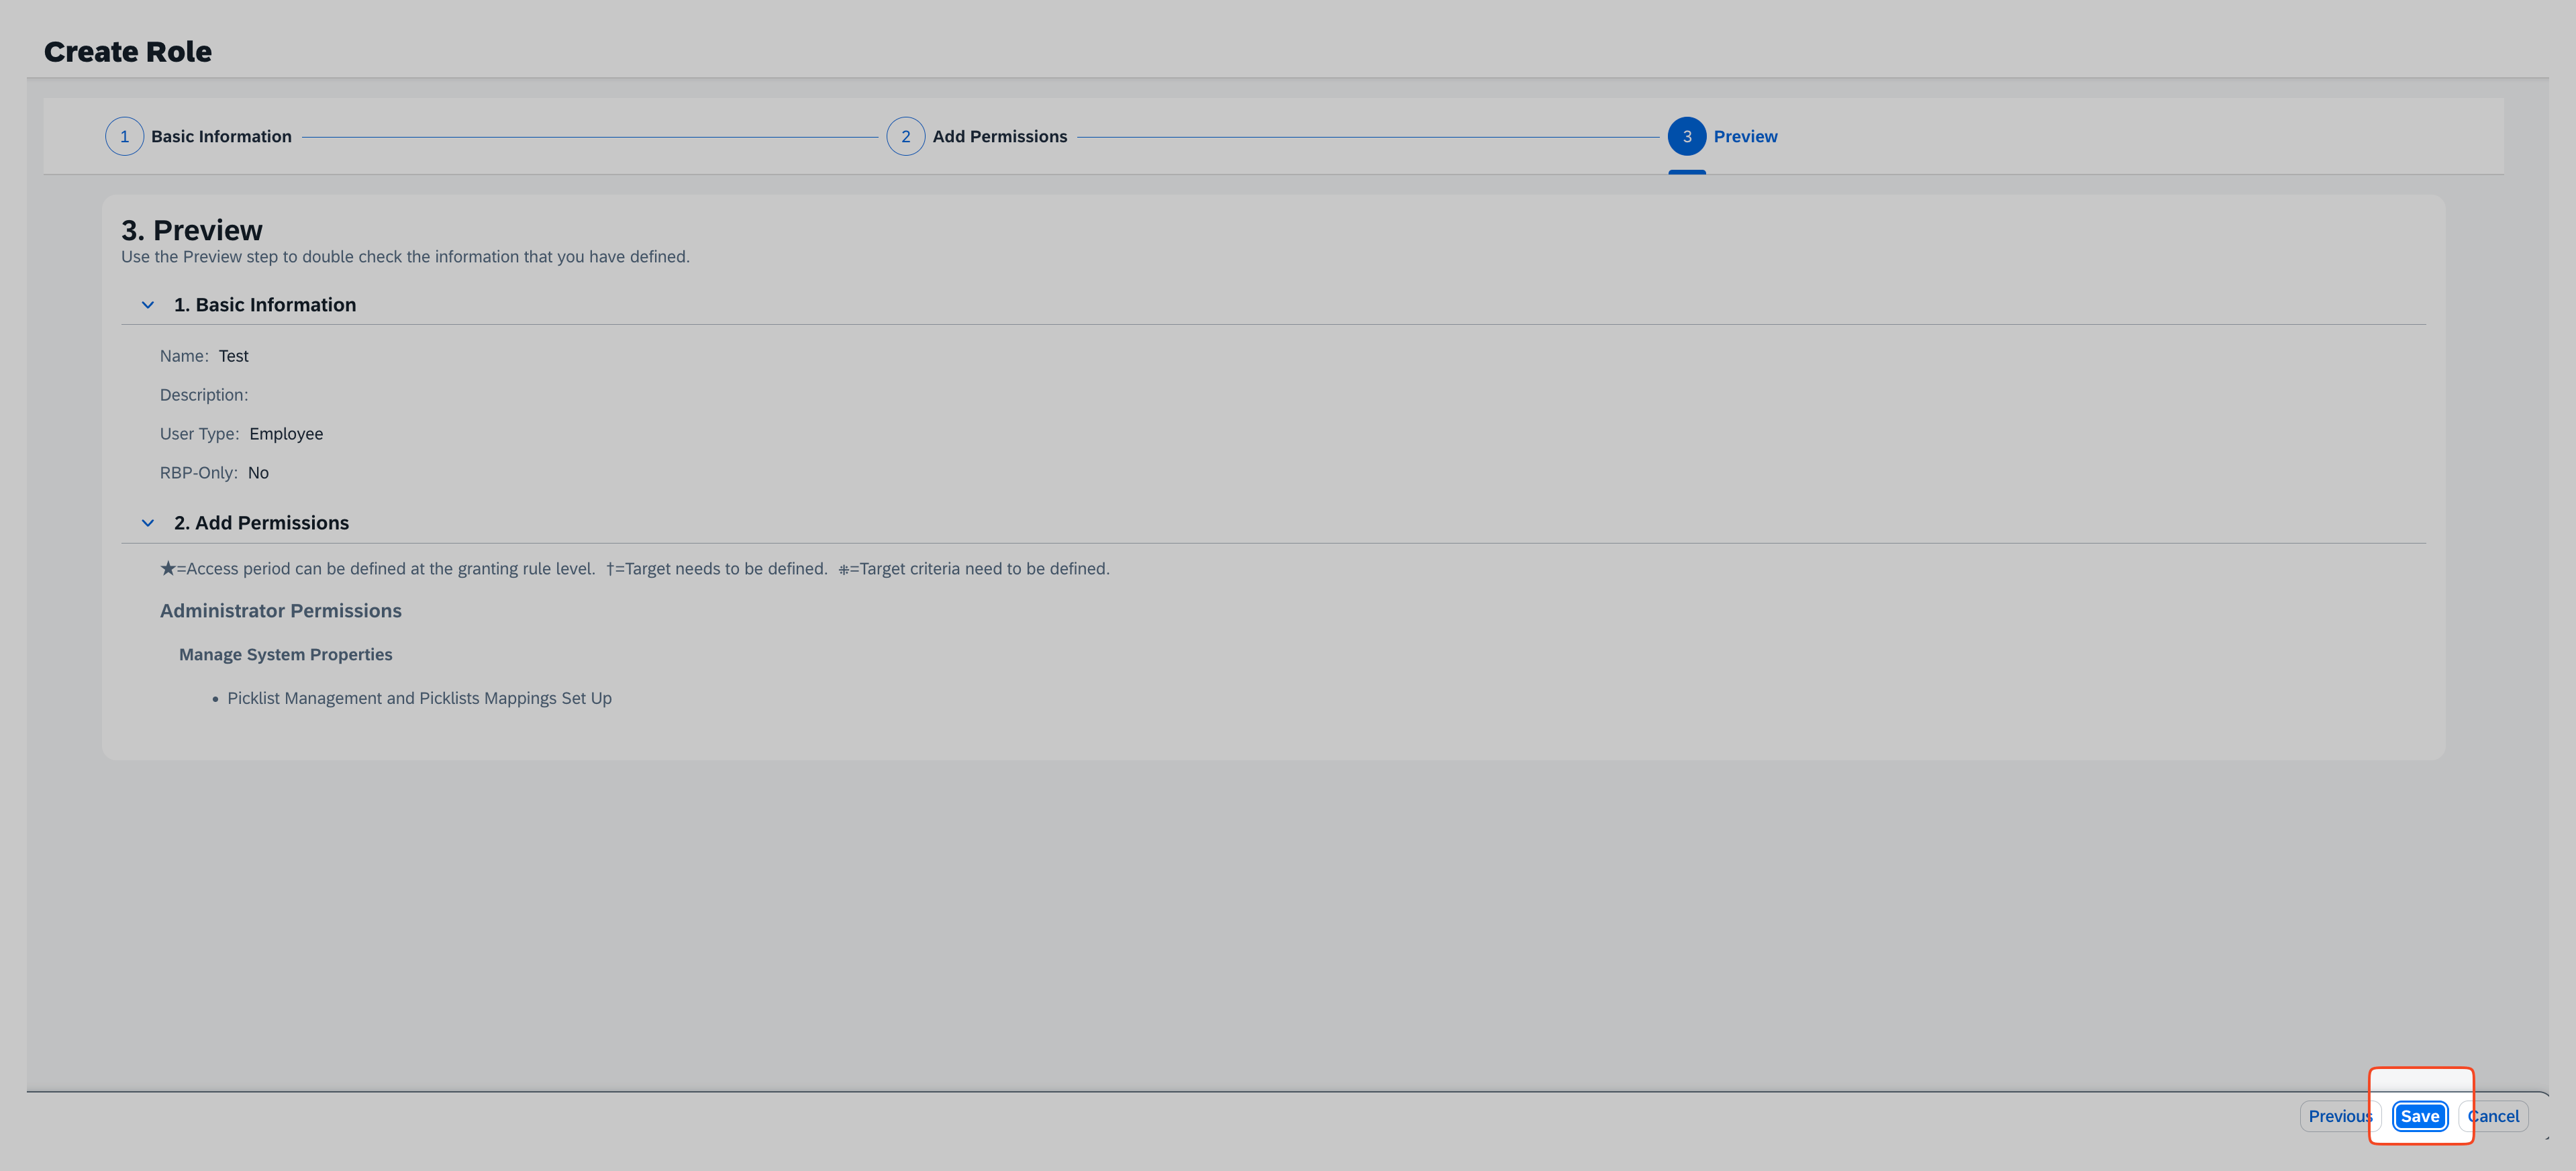
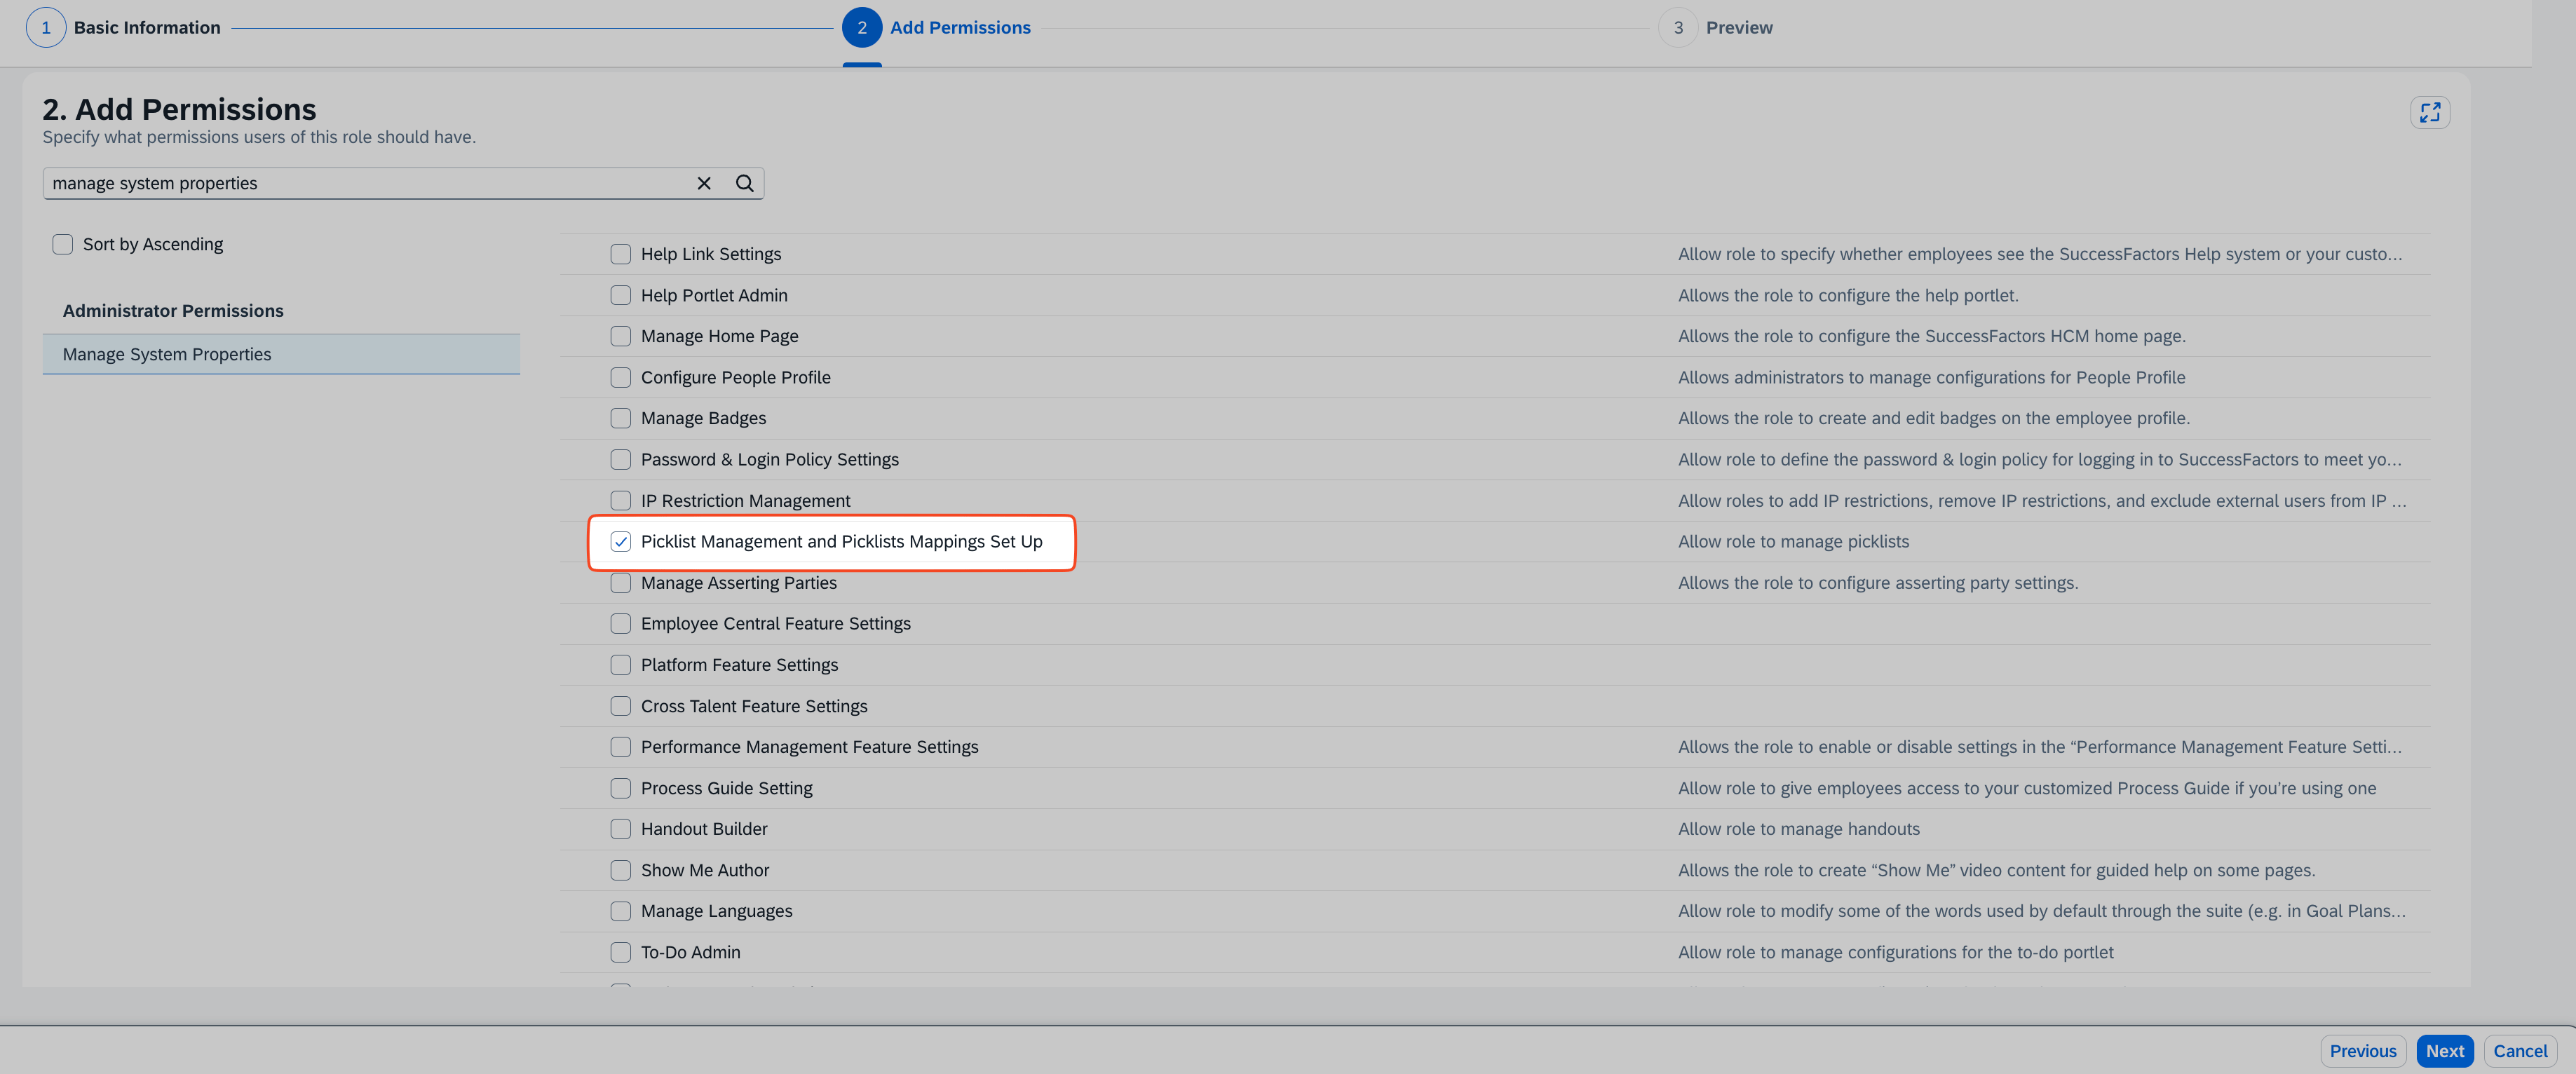 7. When you have checked all necessary permissions, click **Next**. On the next page, click **Save**.
 8. In the new window, click **Yes**.
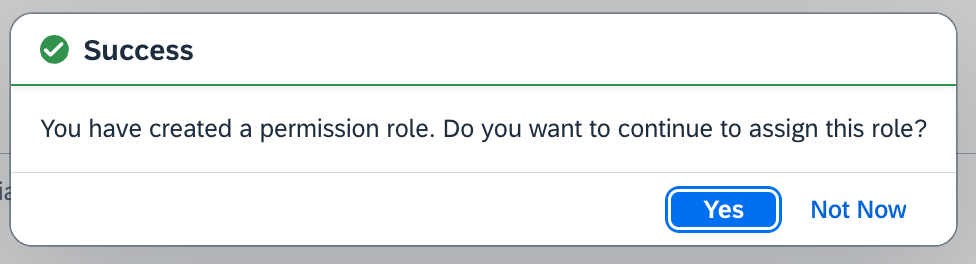 9. Add a **Name** to the role assignment and click **Next**.
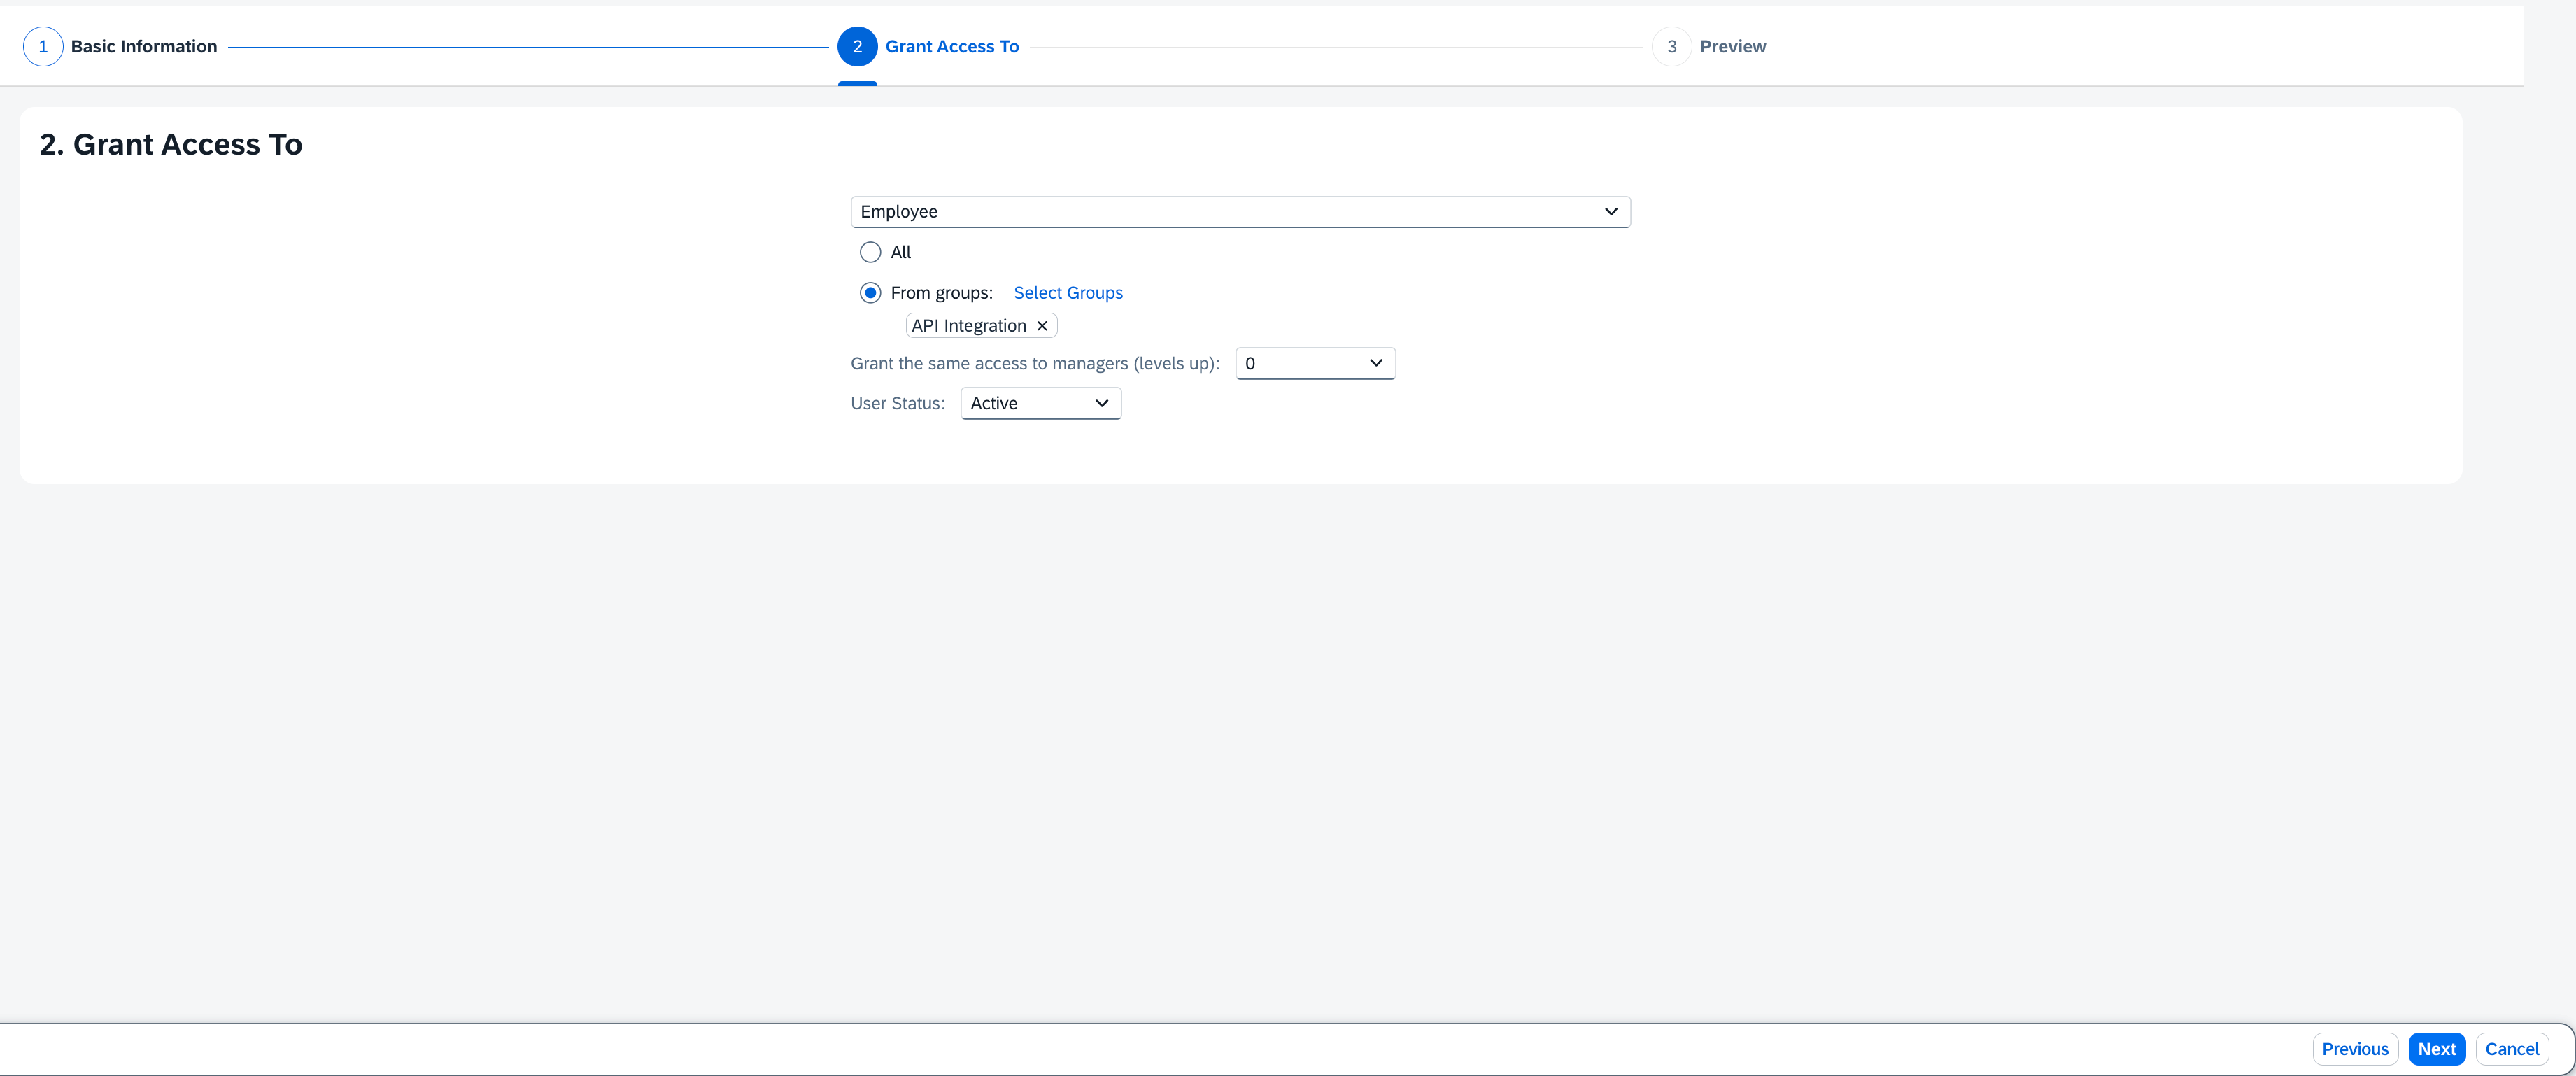
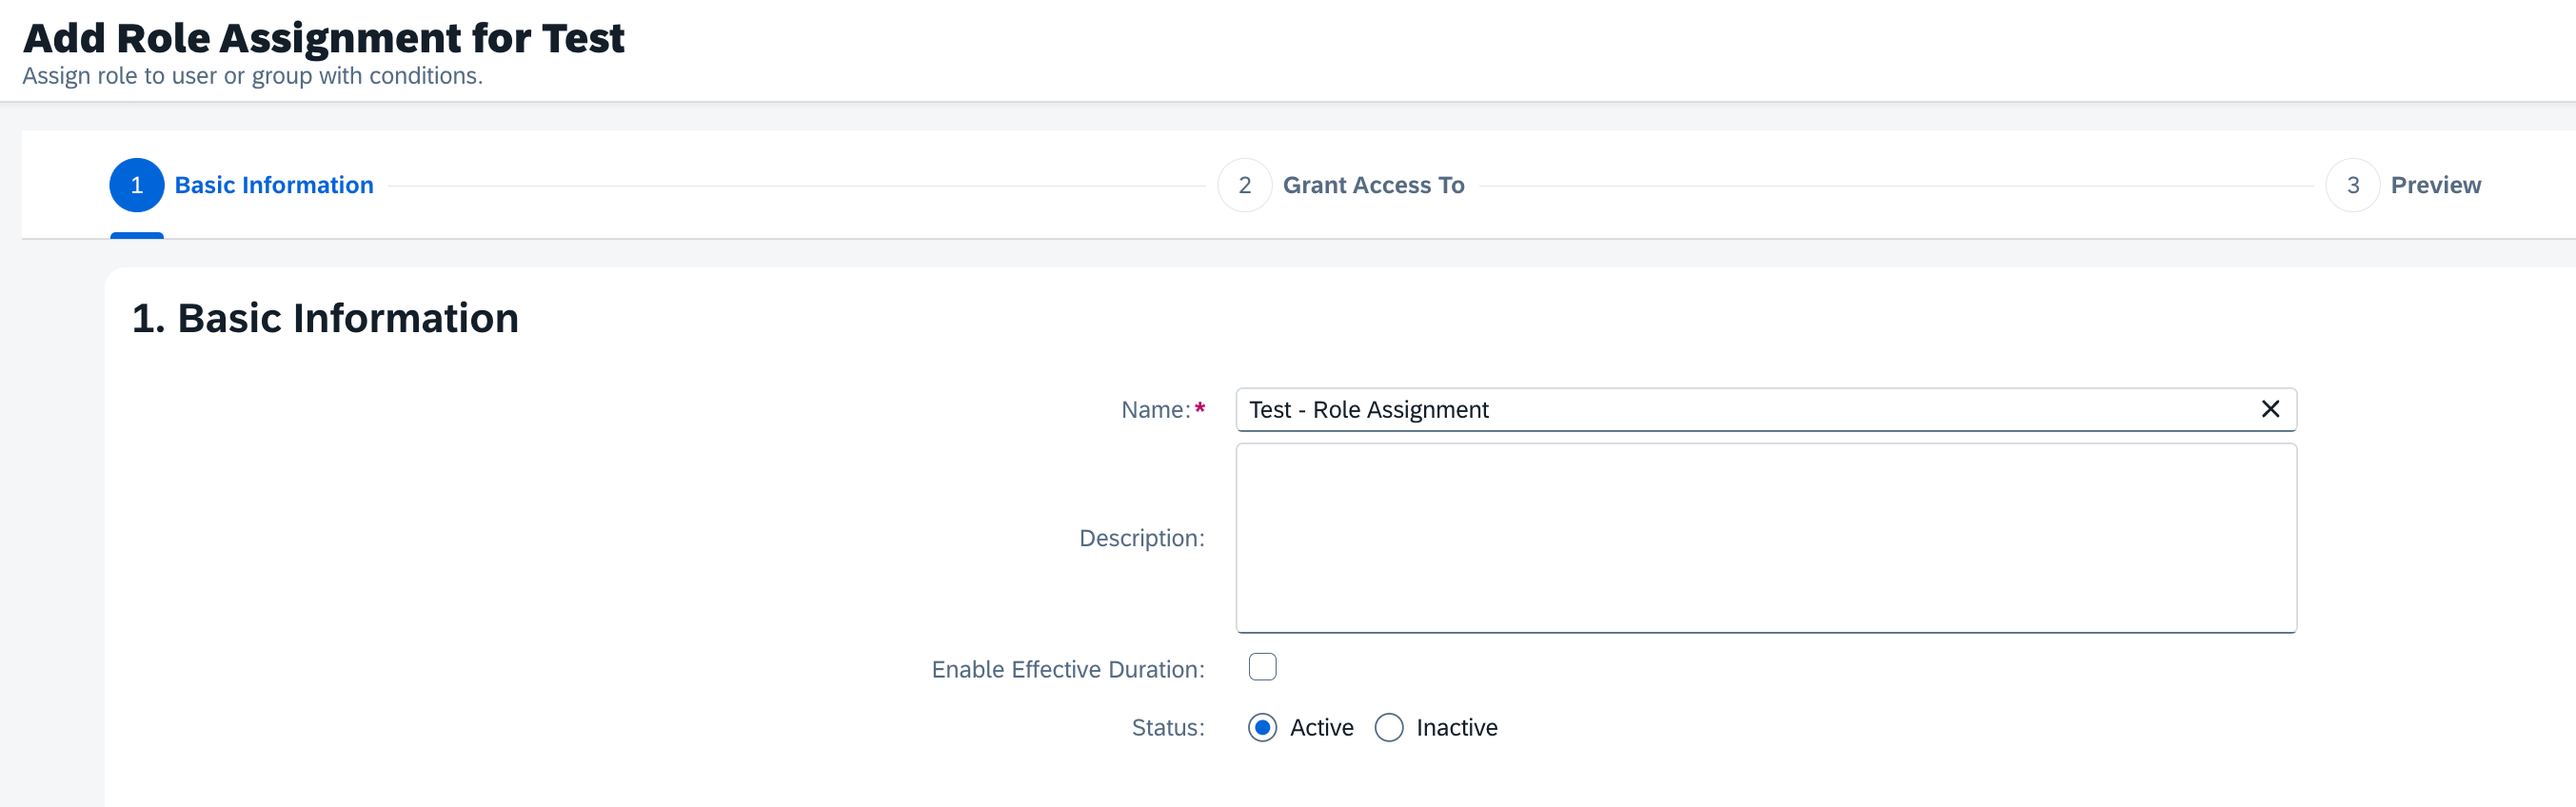 10. In the **Grant Access To** tab, click **Select Groups**.
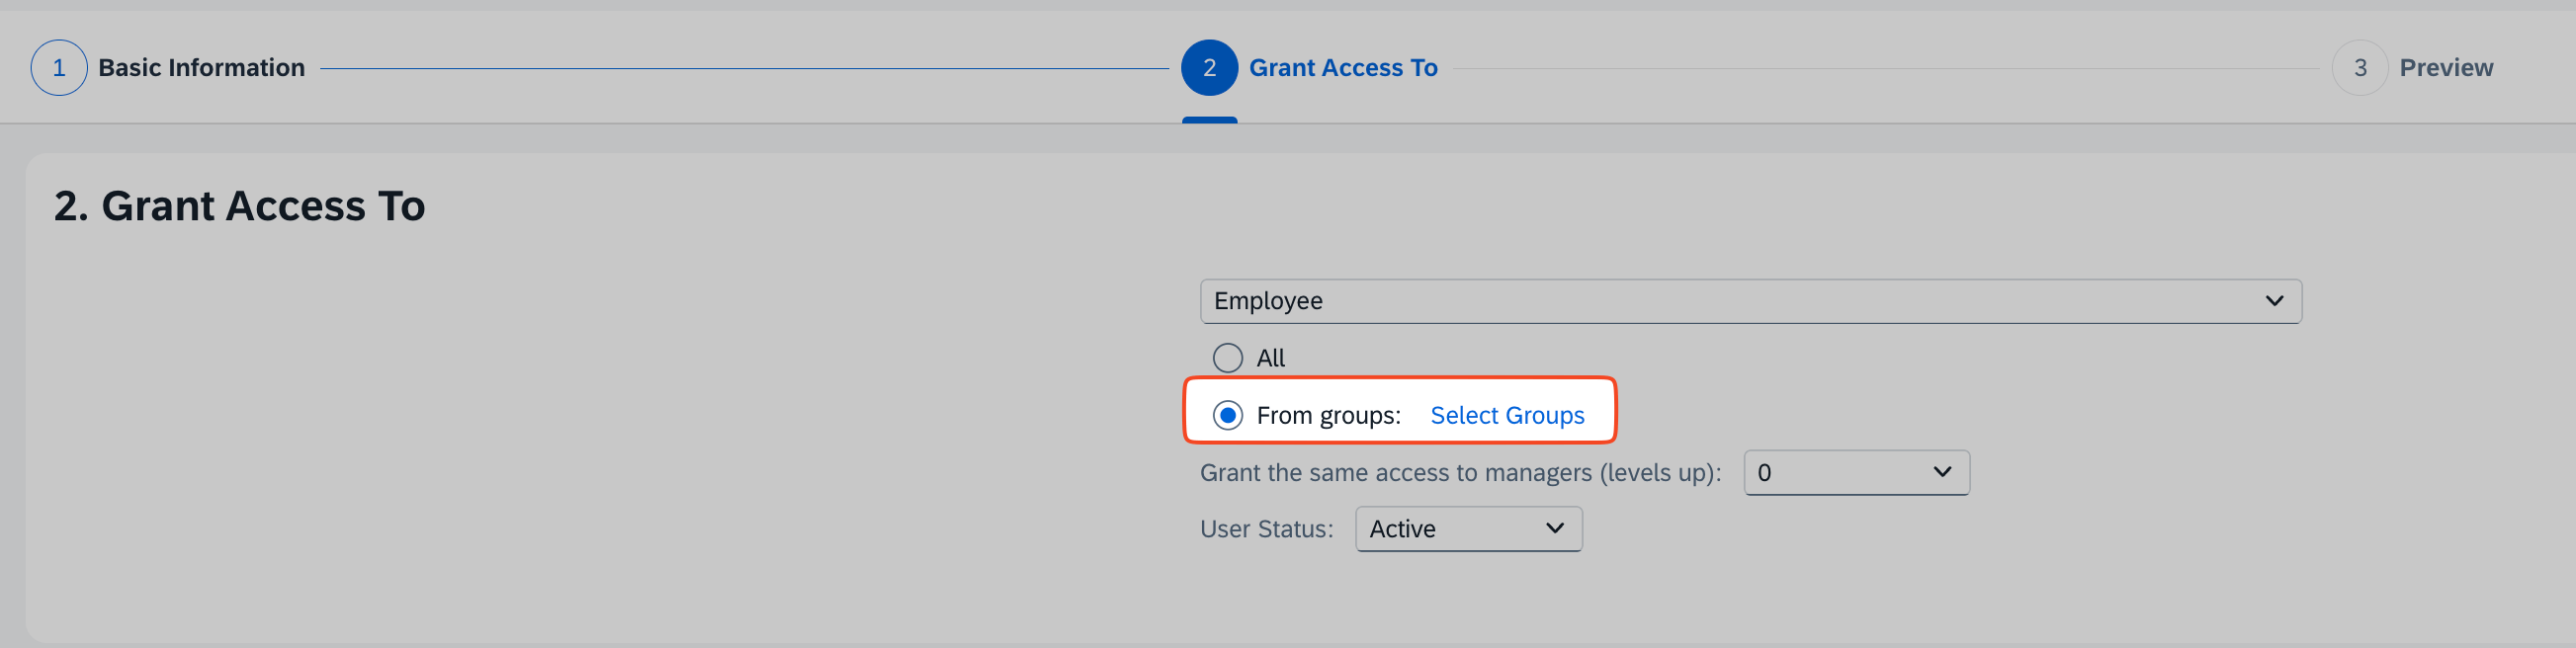 11. Enter the name of your permission group, select it, and click **Select**.
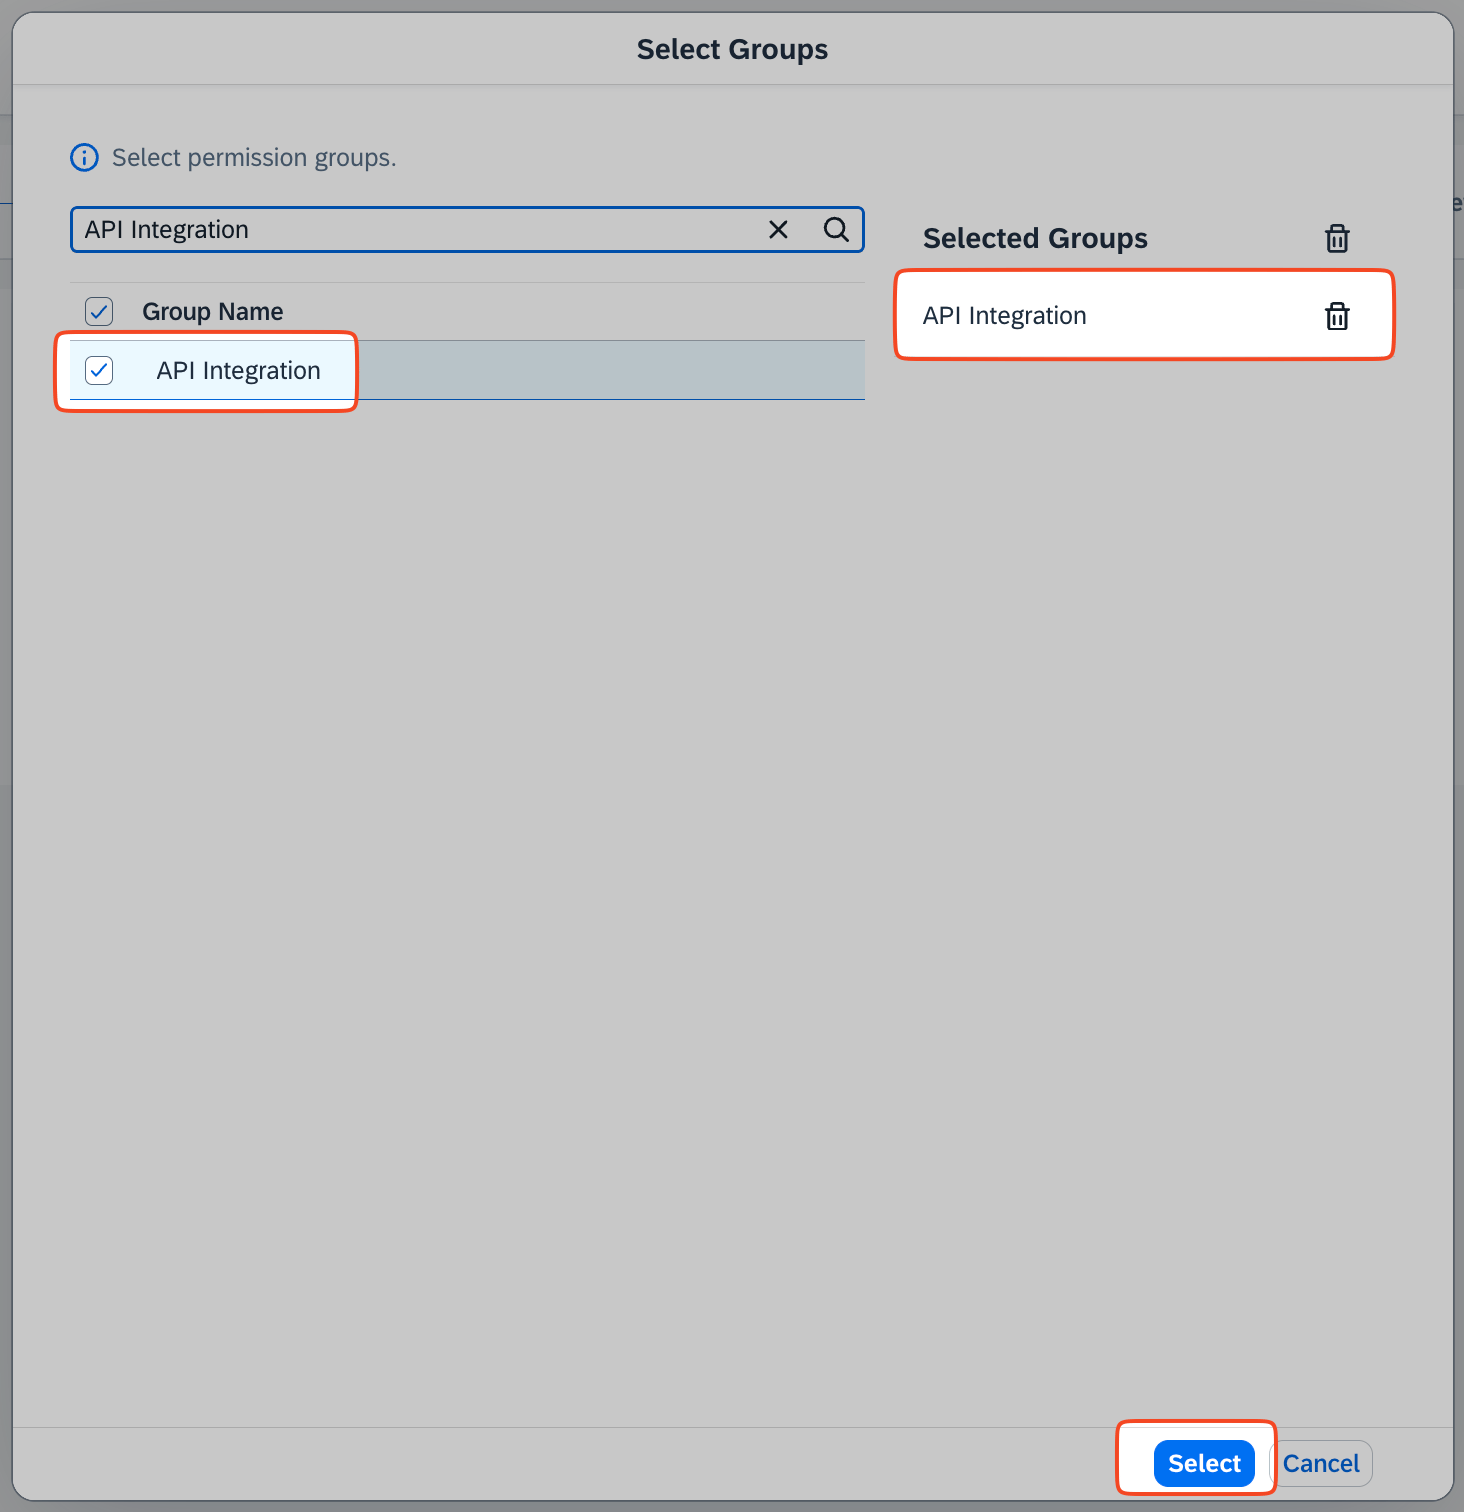 12. You should now see your permission group. Click **Next** again.
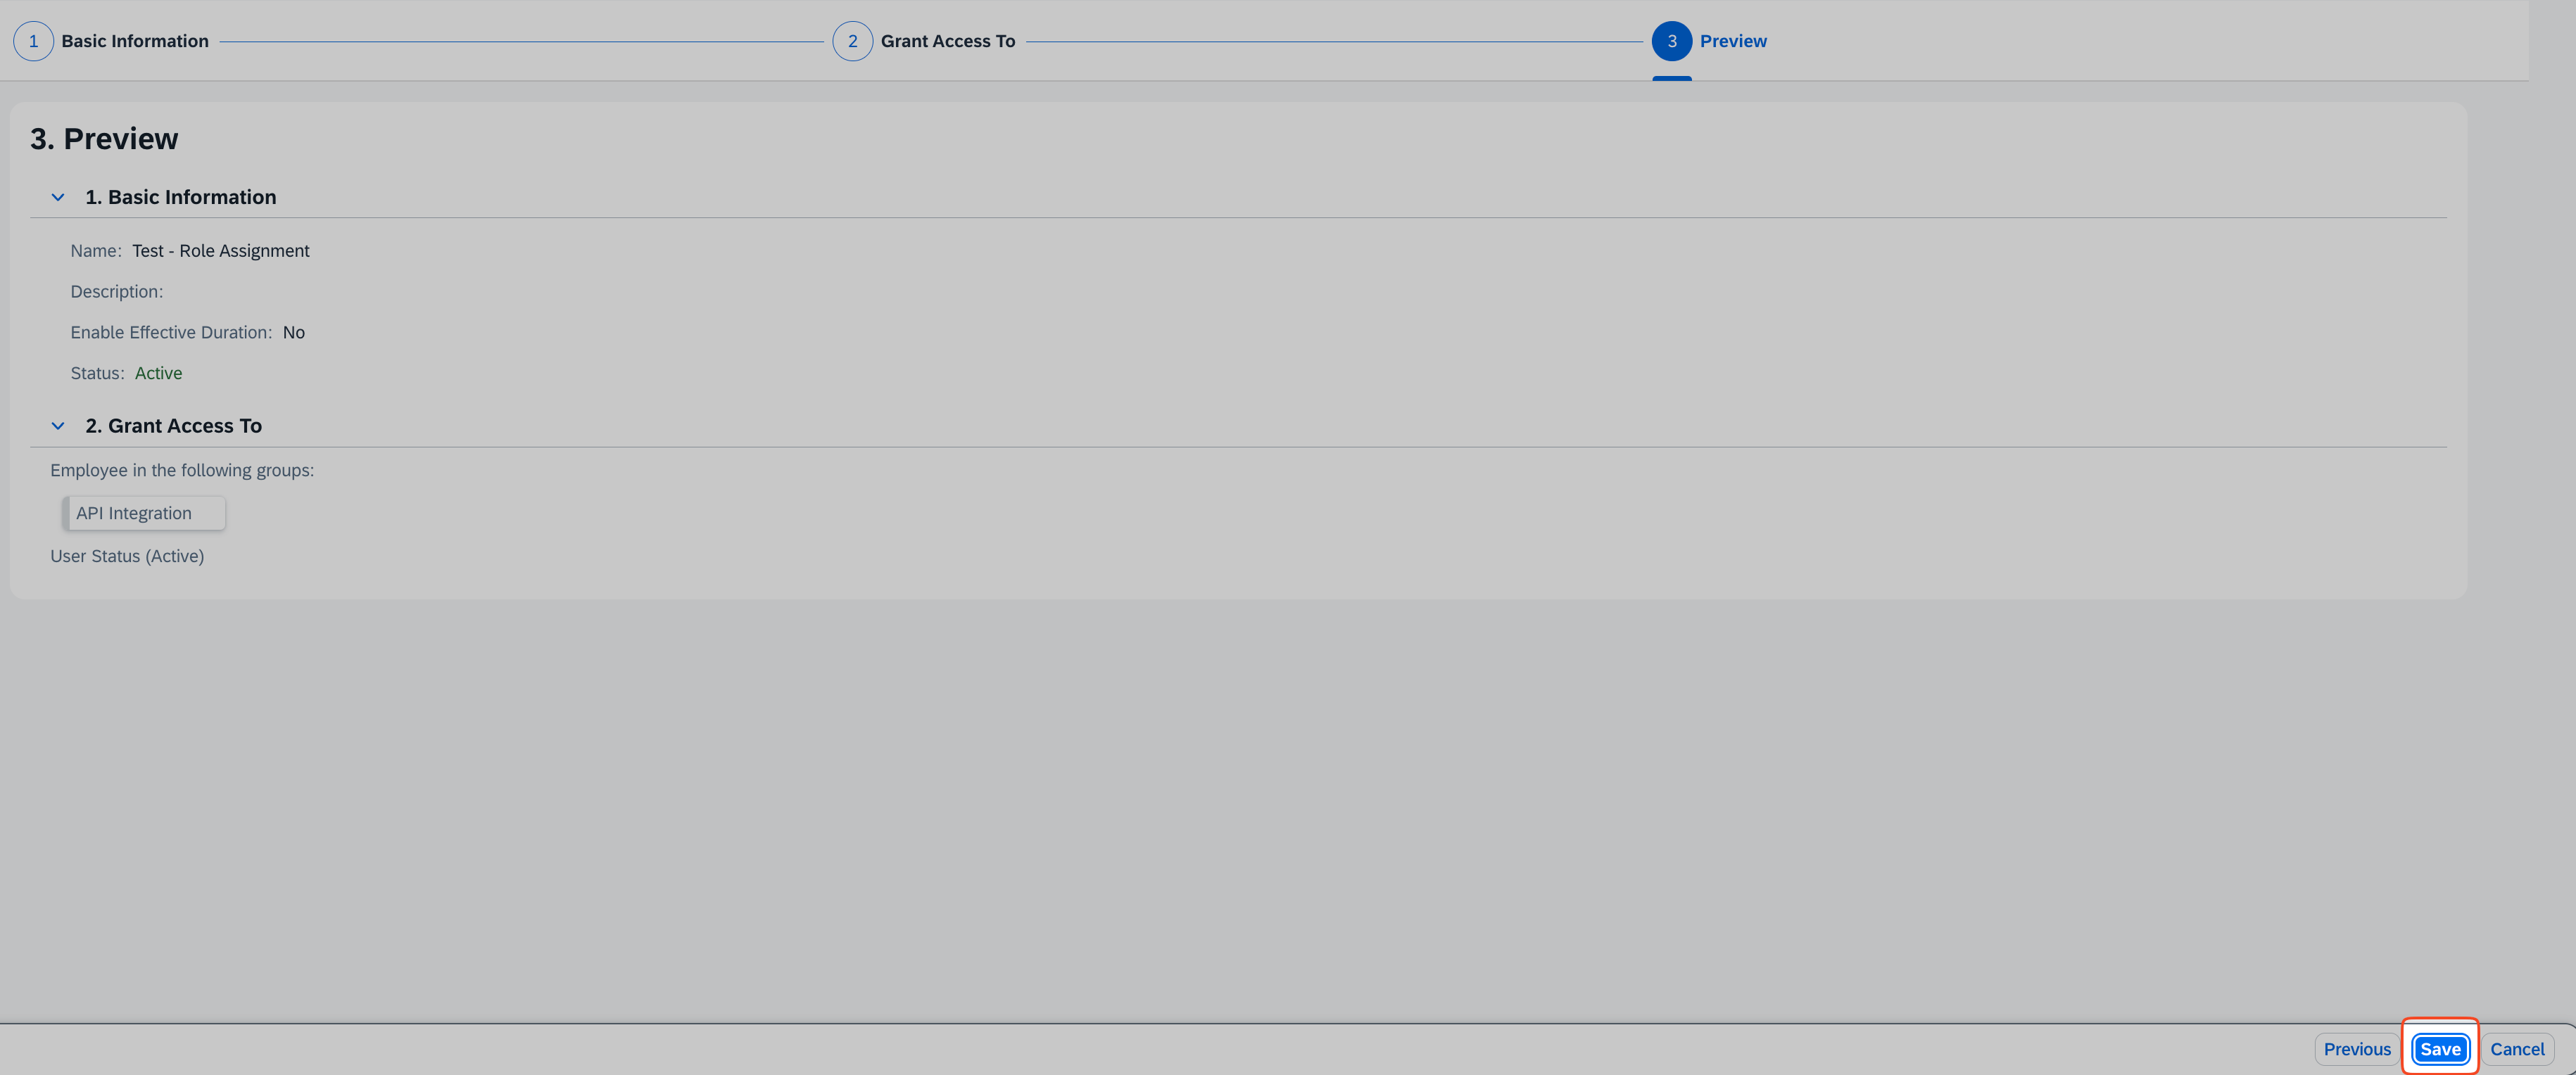
 13. At last, click **Save**.
 ## Generate OAuth2 client credentials
1. Go to your search bar, enter "Manage OAuth2 Client Applications", and click the action.
## Generate OAuth2 client credentials
1. Go to your search bar, enter "Manage OAuth2 Client Applications", and click the action.
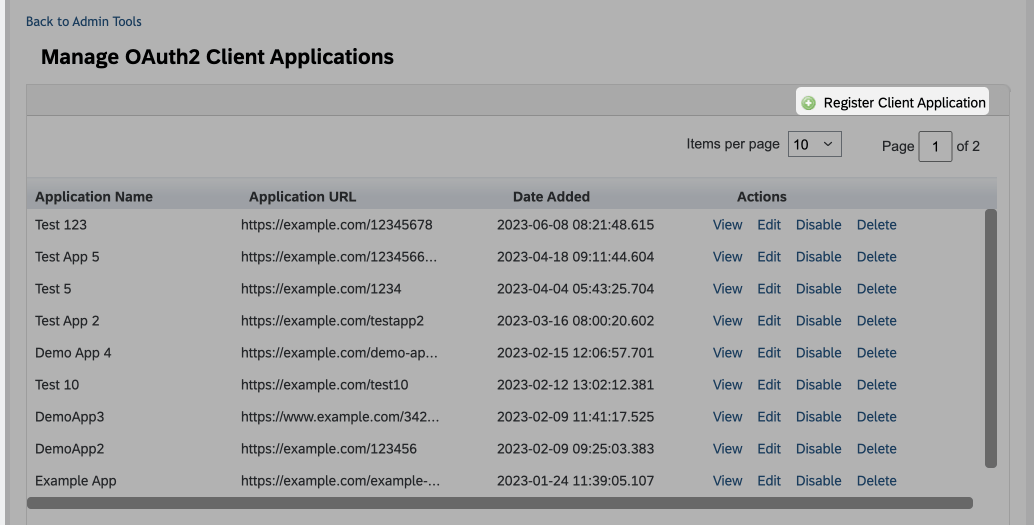
 2. In the new window, click **Register Client Application**.
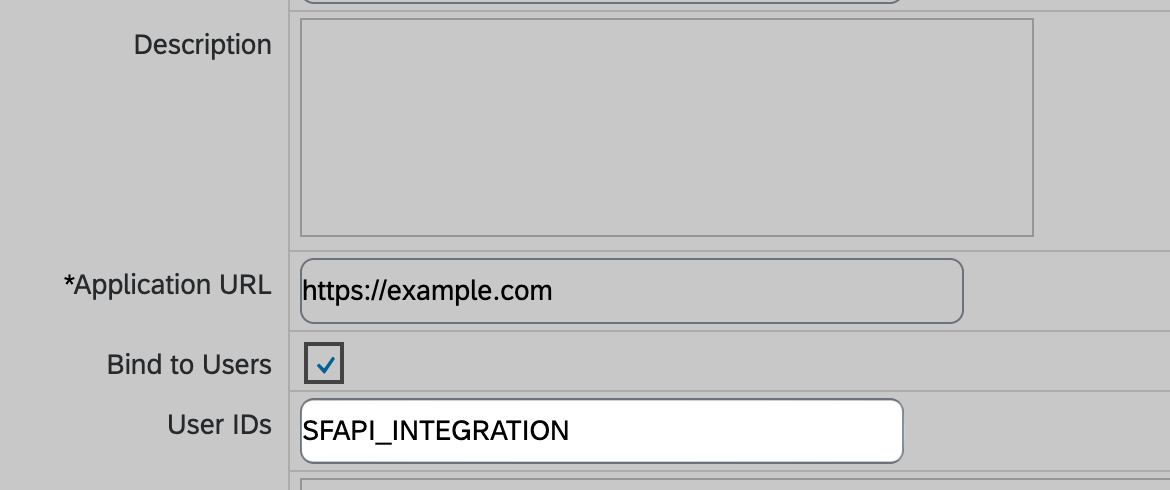
 3. Enter a **name** and a **valid URL** for the application (this can be any URL, as long as it starts with `https://`), check the **Bind to Users** checkbox, and click **OK**.
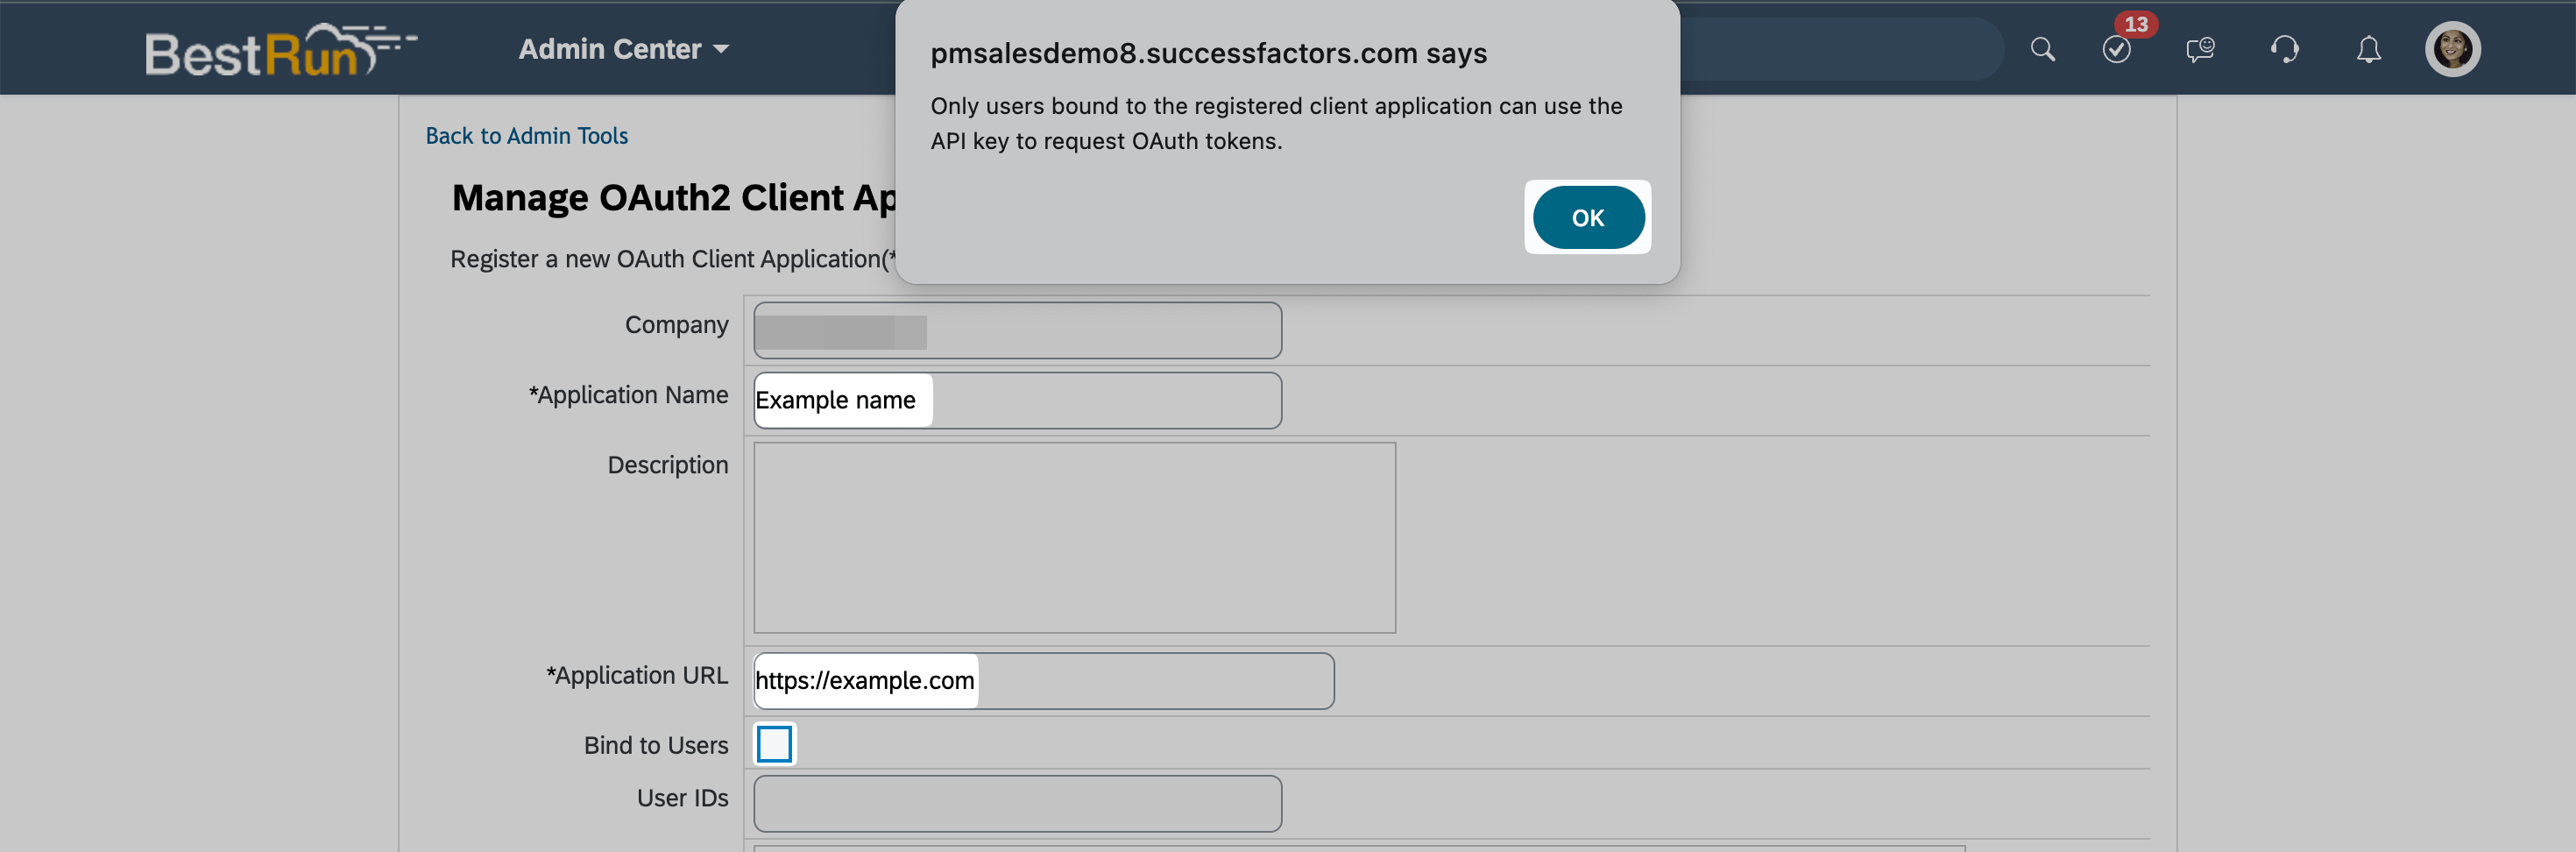 4. Enter the **User ID** of the user you created earlier.
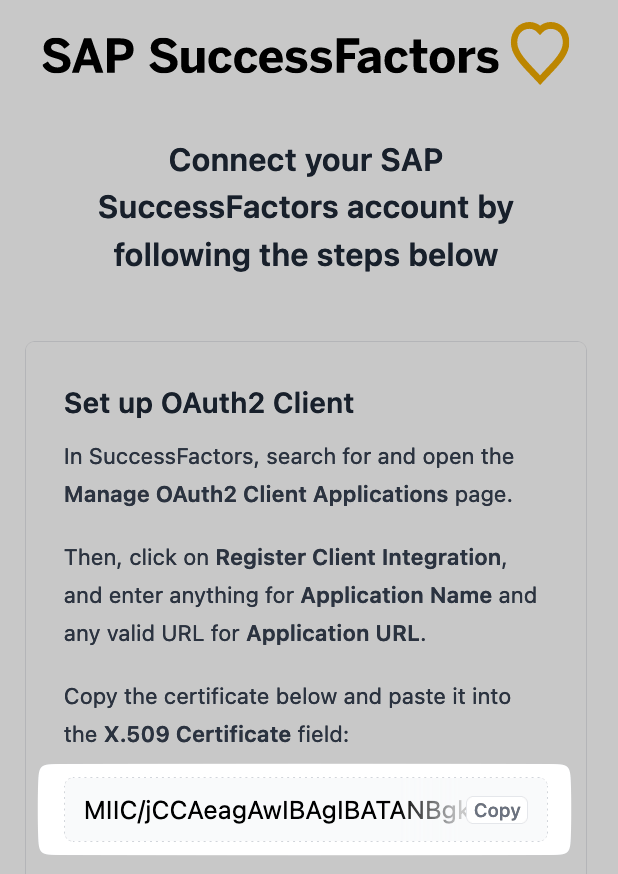
 5. Do not click "Generate X.509 Certificate". Instead, **copy** the certificate from the connection pop-up.
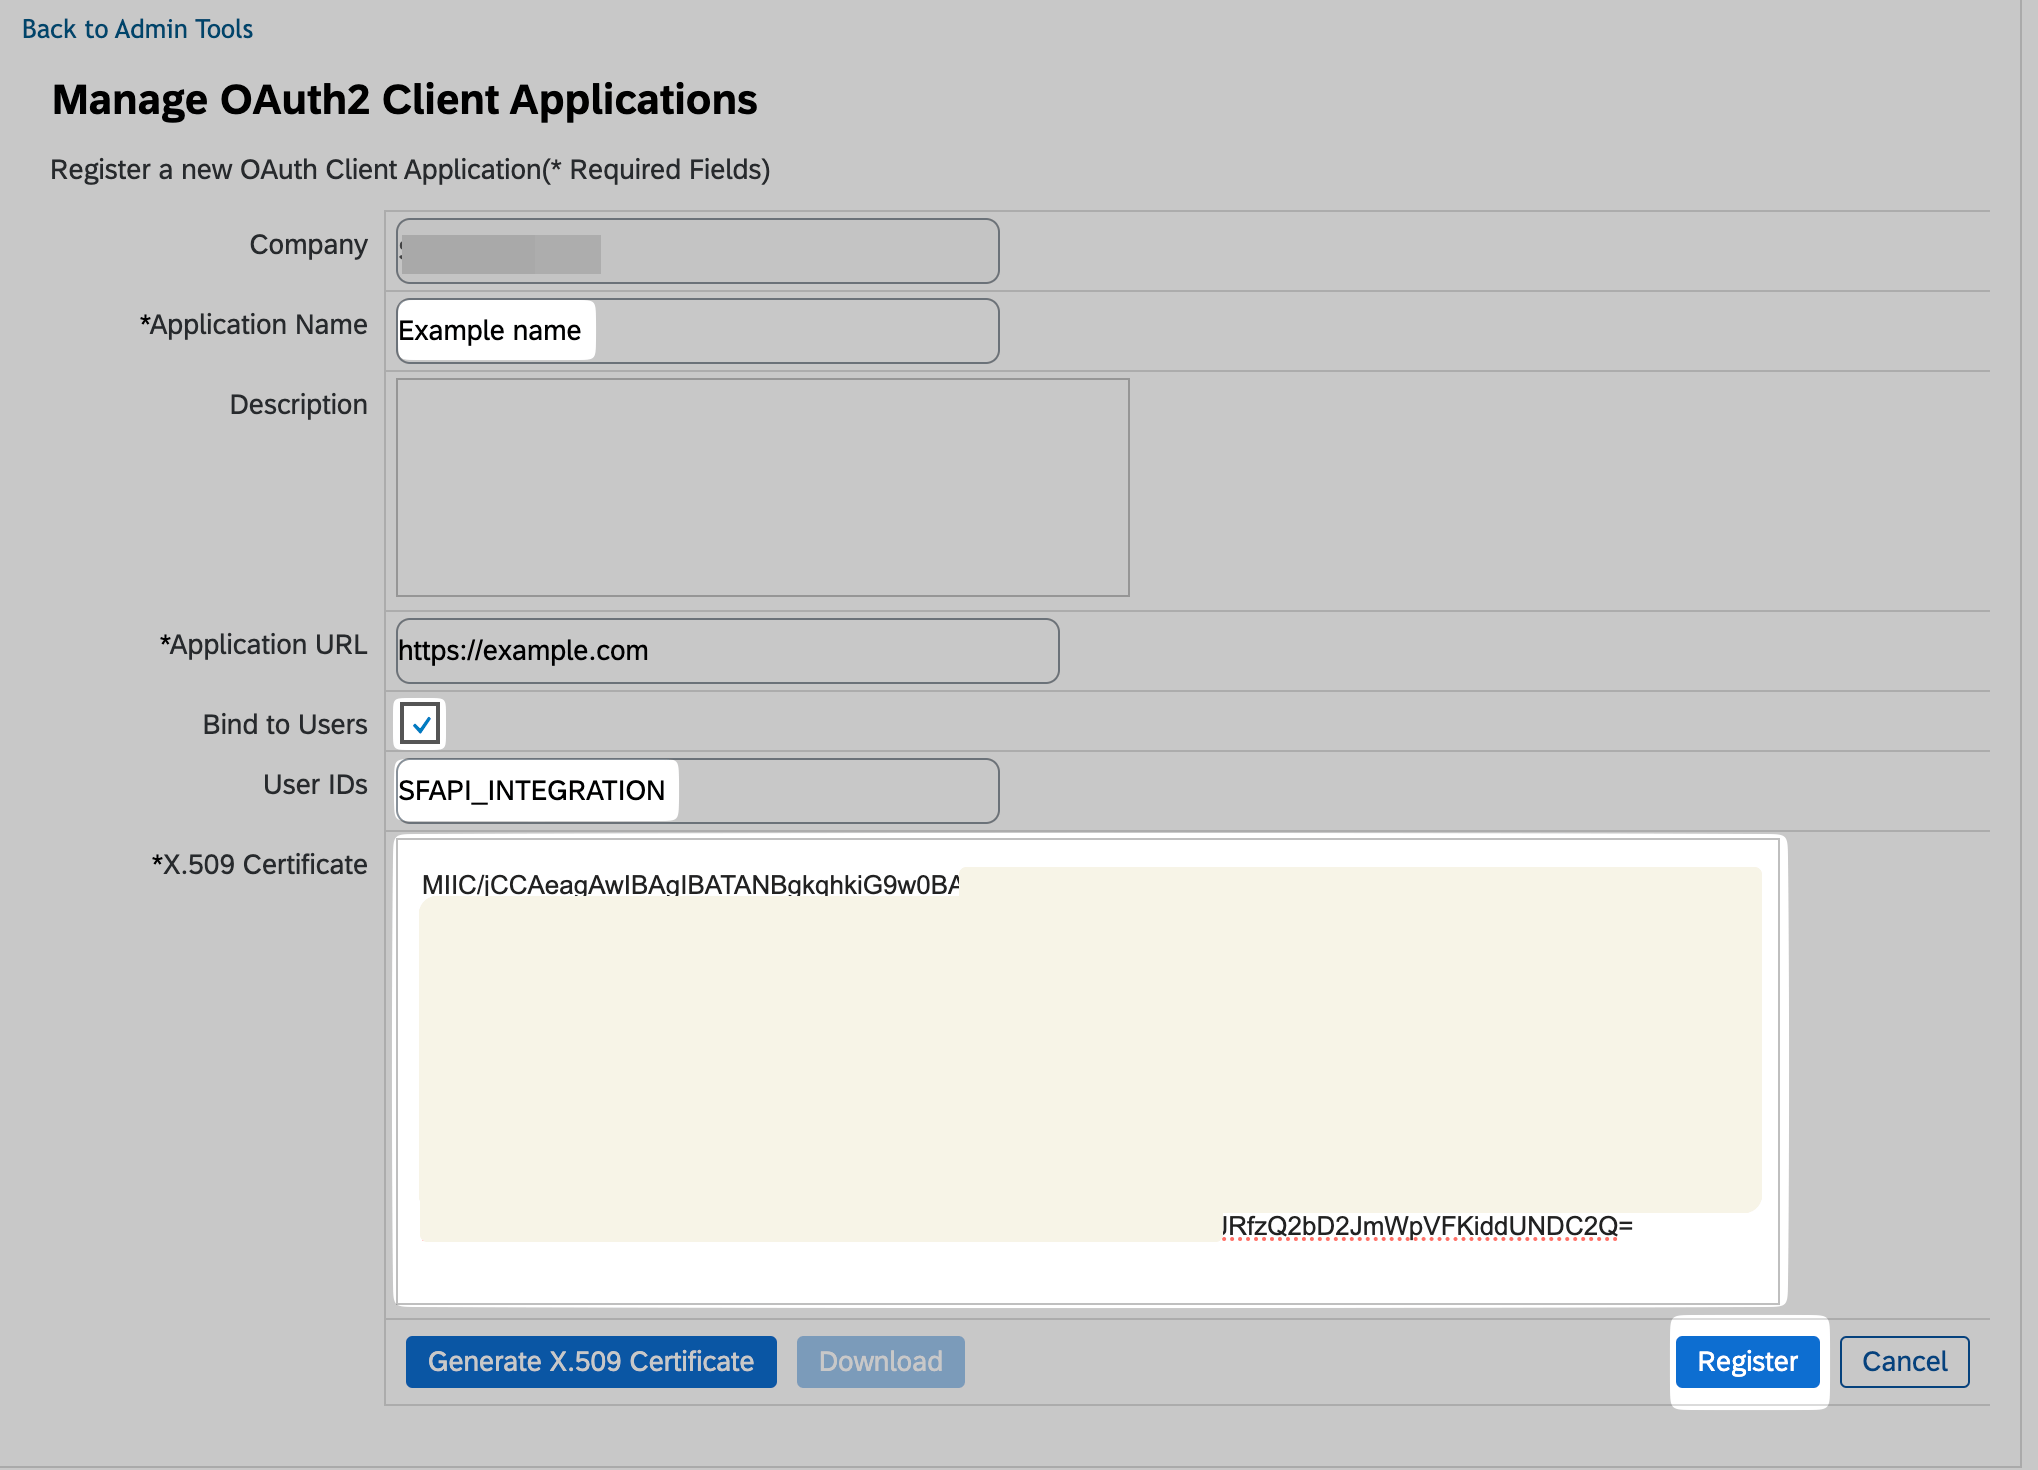
 6. Paste the certificate and click **Register**.
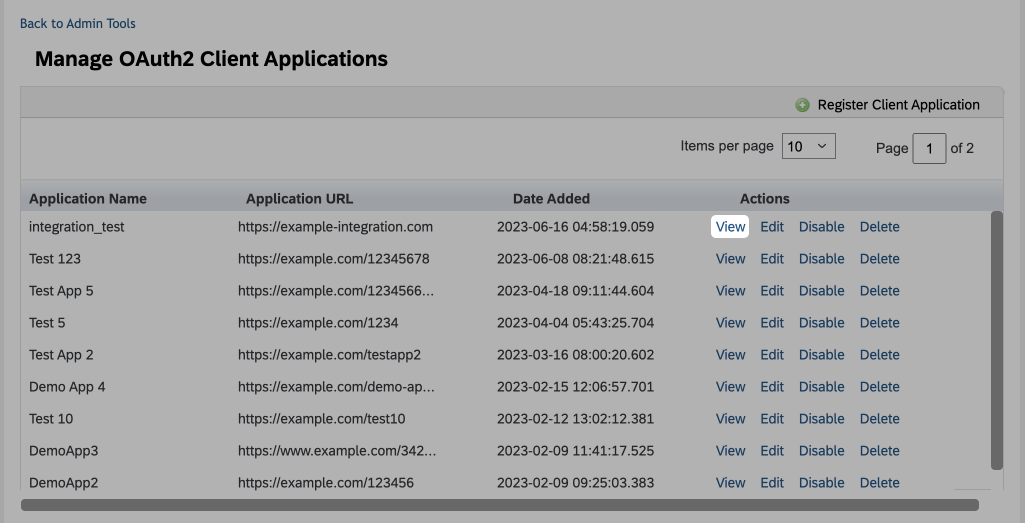
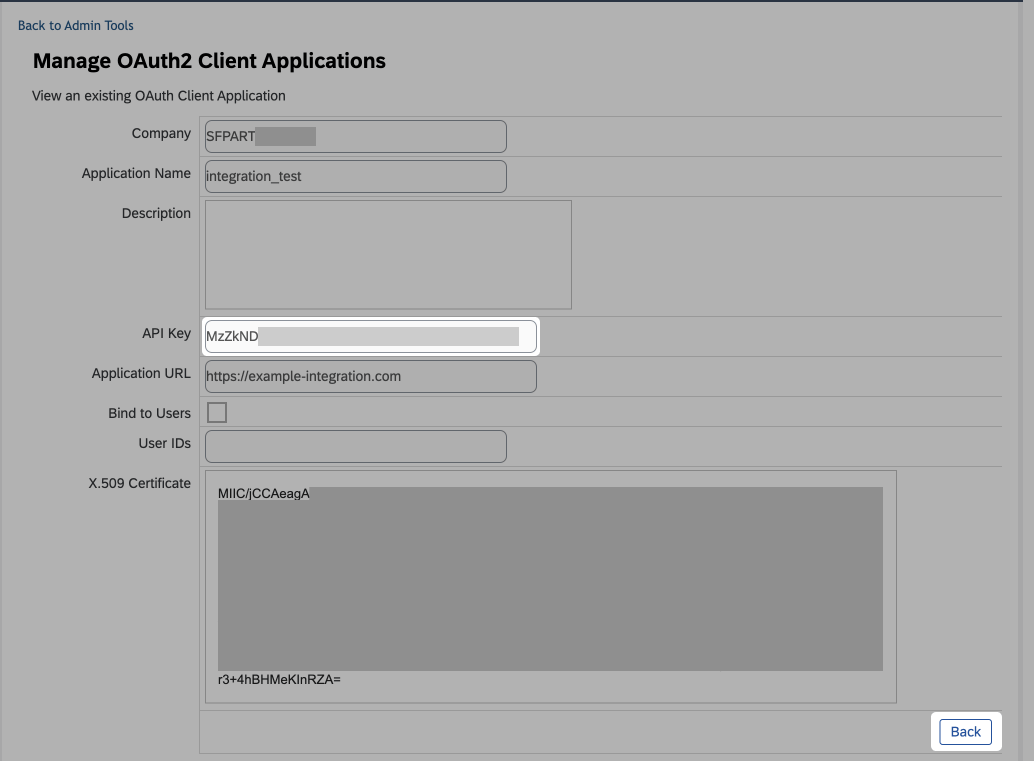
 7. Click **View** in the row at the very top.
 8. Get the API key.
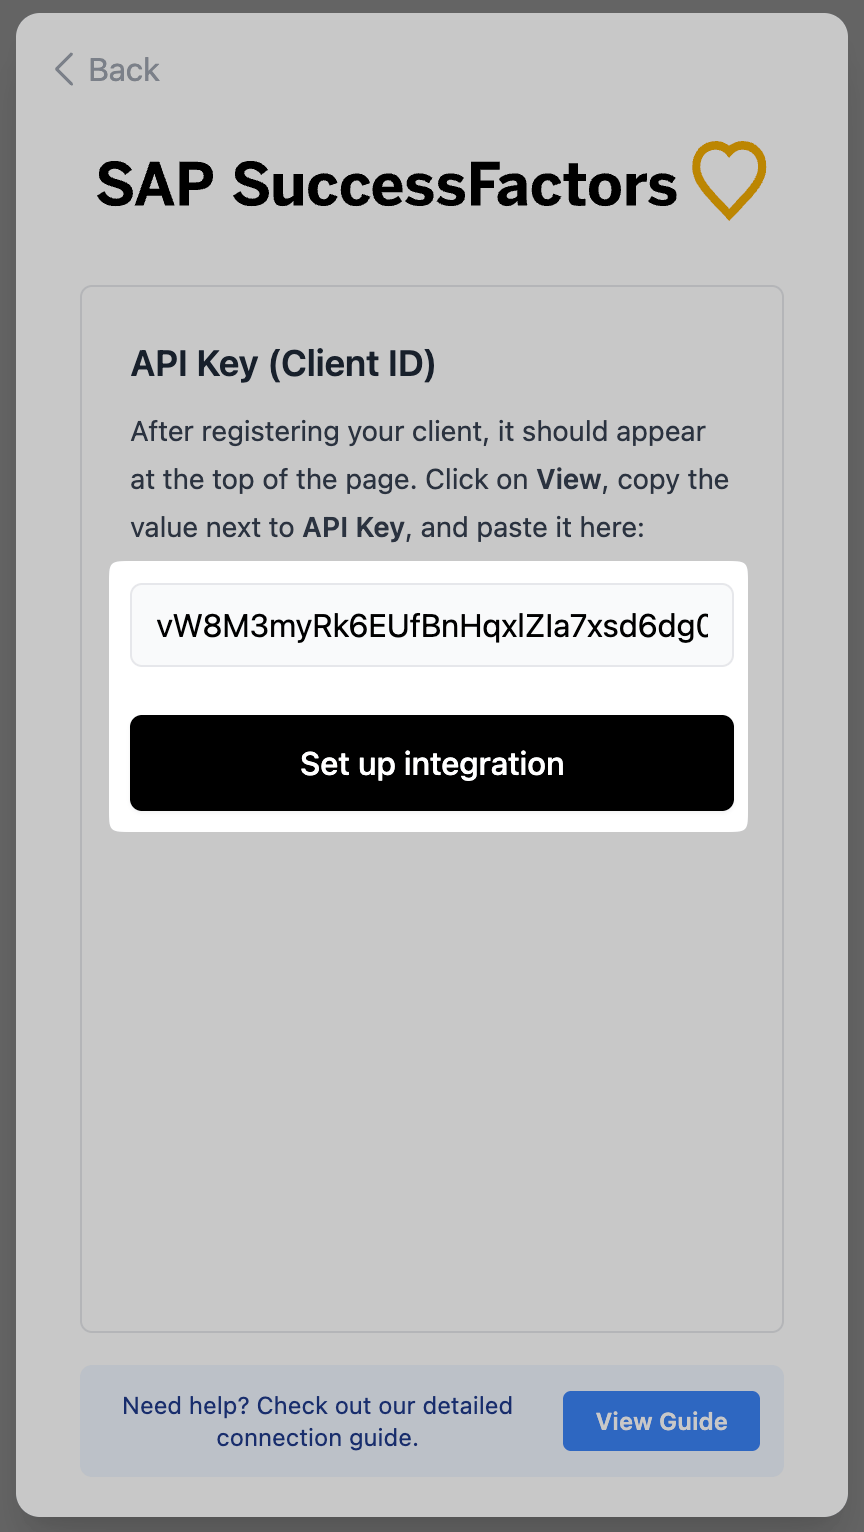
 9. Paste the API key into the connection pop-up and click **Set up integration**.
 ## Setting up the integration
1. Navigate to the **Integrations** tab on the Juicebox platform.
2. Select **SAP SuccessFactors** and click **Activate**. You can also use the search bar at the top.
3. Follow the instructions in the connection pop-up, entering your API domain, Company ID, and API key from the sections above when prompted.
4. After you have clicked through the remaining pages of the pop-up, the configuration will be completed. If successful, you will see a green **Connected** button in your Integrations marketplace.
Congratulations! You have successfully integrated SAP SuccessFactors and Juicebox.
It may take a few minutes for all data to sync between Juicebox and SAP SuccessFactors.
## Support
For an overview of all integration features, see [ATS Integrations](/ats-integrations). If you're facing any issues with your integration, contact our support team at [support@juicebox.ai](mailto:support@juicebox.ai).
## Setting up the integration
1. Navigate to the **Integrations** tab on the Juicebox platform.
2. Select **SAP SuccessFactors** and click **Activate**. You can also use the search bar at the top.
3. Follow the instructions in the connection pop-up, entering your API domain, Company ID, and API key from the sections above when prompted.
4. After you have clicked through the remaining pages of the pop-up, the configuration will be completed. If successful, you will see a green **Connected** button in your Integrations marketplace.
Congratulations! You have successfully integrated SAP SuccessFactors and Juicebox.
It may take a few minutes for all data to sync between Juicebox and SAP SuccessFactors.
## Support
For an overview of all integration features, see [ATS Integrations](/ats-integrations). If you're facing any issues with your integration, contact our support team at [support@juicebox.ai](mailto:support@juicebox.ai).