> ## Documentation Index
> Fetch the complete documentation index at: https://docs.juicebox.ai/llms.txt
> Use this file to discover all available pages before exploring further.
# Sequences
> A step-by-step guide on how to set up sequences, reach out to candidates, and track your success.
## Introduction
In Juicebox, you can send emails via a connected email address, or create tasks to integrate a multi-channel outreach strategy with steps like LinkedIn Connection Request, LinkedIn InMail, or a phone call.
If you'd like to utilize sequences across Juicebox, please ensure an email is integrated via the **Integrations** tab on the left-hand menu. For additional information on how to connect an email, plus our email configuration settings, please refer to our [Email Integrations](/email-integrations) article.
## Sequences overview
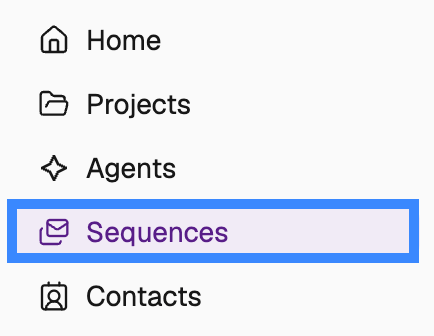
To navigate to sequences, select the **Sequences** tab on the left-hand menu.
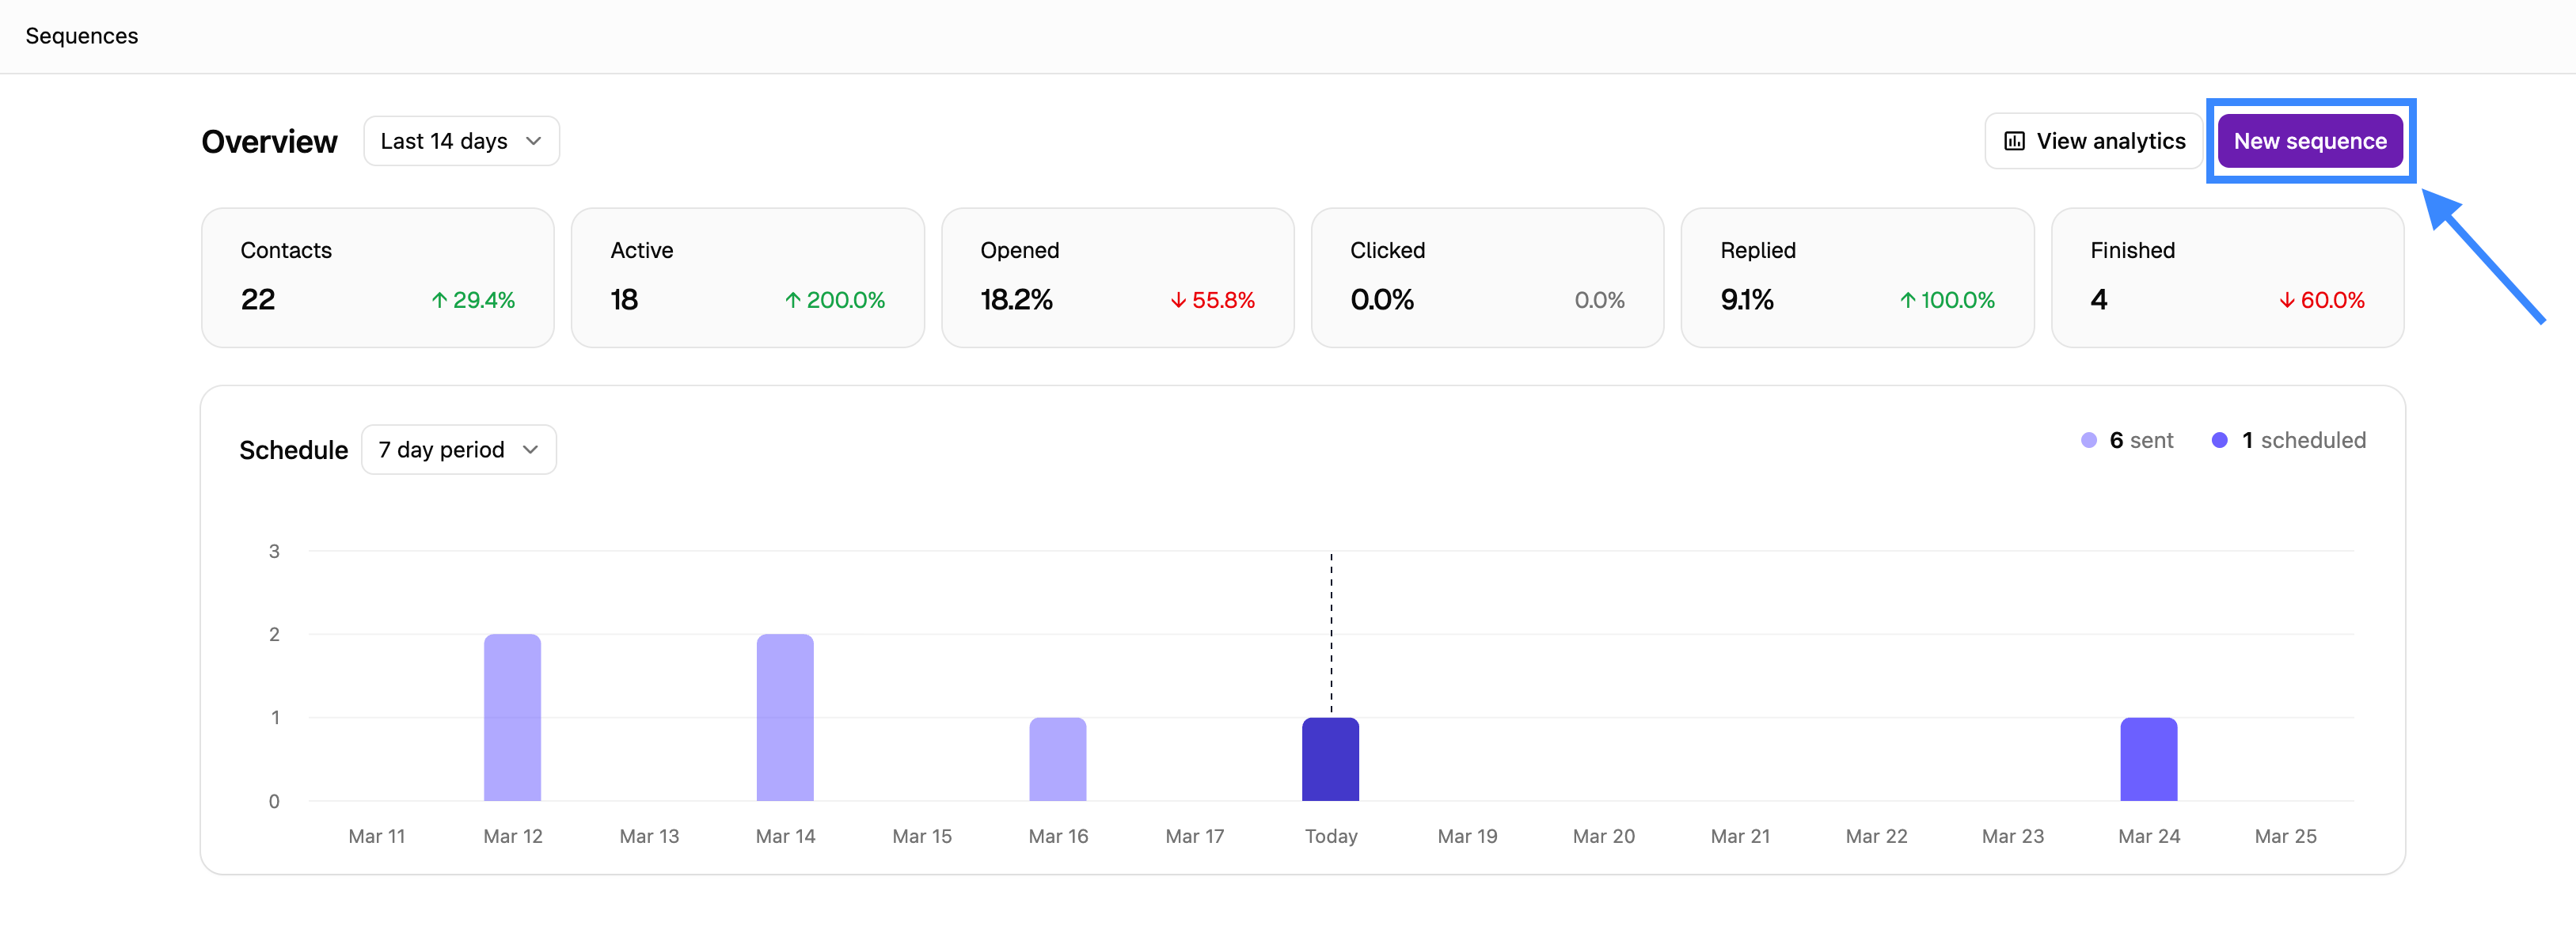
 From the Sequences page, you can create a new sequence, track overall or individual sequence performance, and view the total number of scheduled steps queued for a certain day.
## Creating a sequence
To create a sequence, select the **New sequence** button in the top-right corner of the Sequences page.
From the Sequences page, you can create a new sequence, track overall or individual sequence performance, and view the total number of scheduled steps queued for a certain day.
## Creating a sequence
To create a sequence, select the **New sequence** button in the top-right corner of the Sequences page.
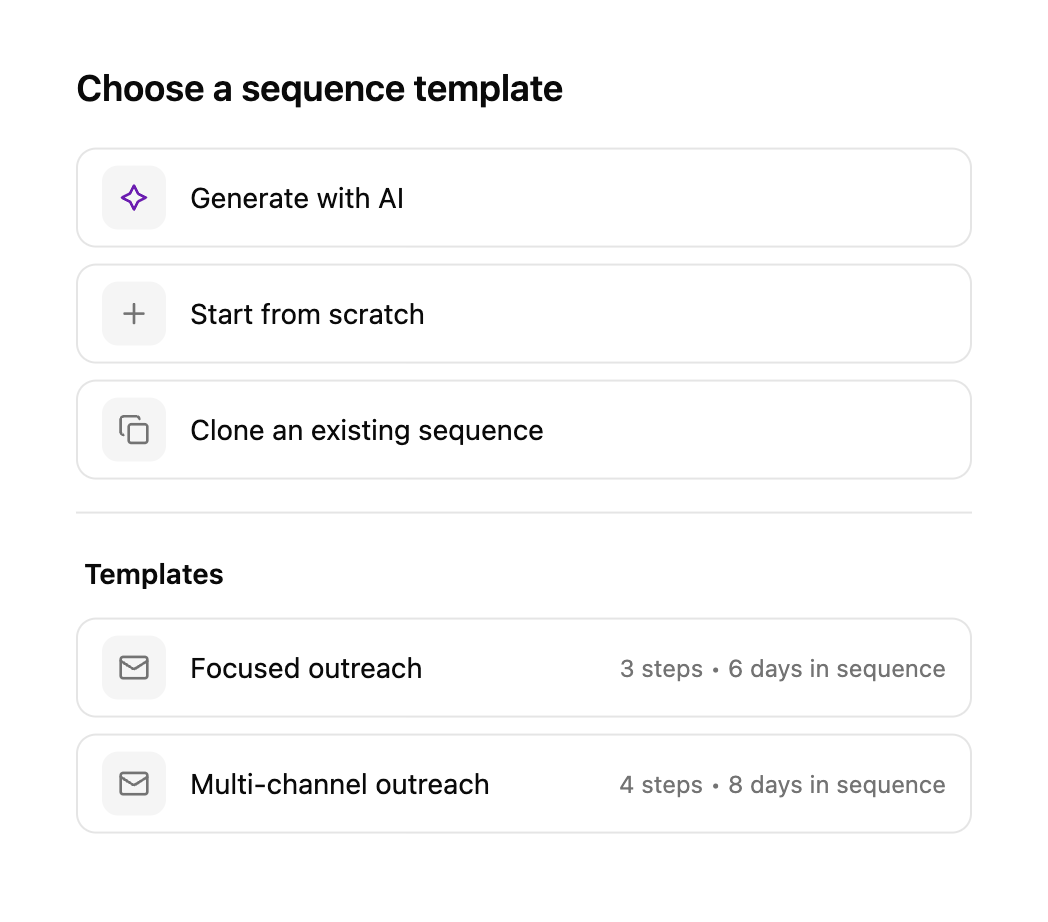
 When creating a sequence, you can choose to generate one with AI, start from scratch, clone an existing sequence, or use one of the Juicebox provided templates below.
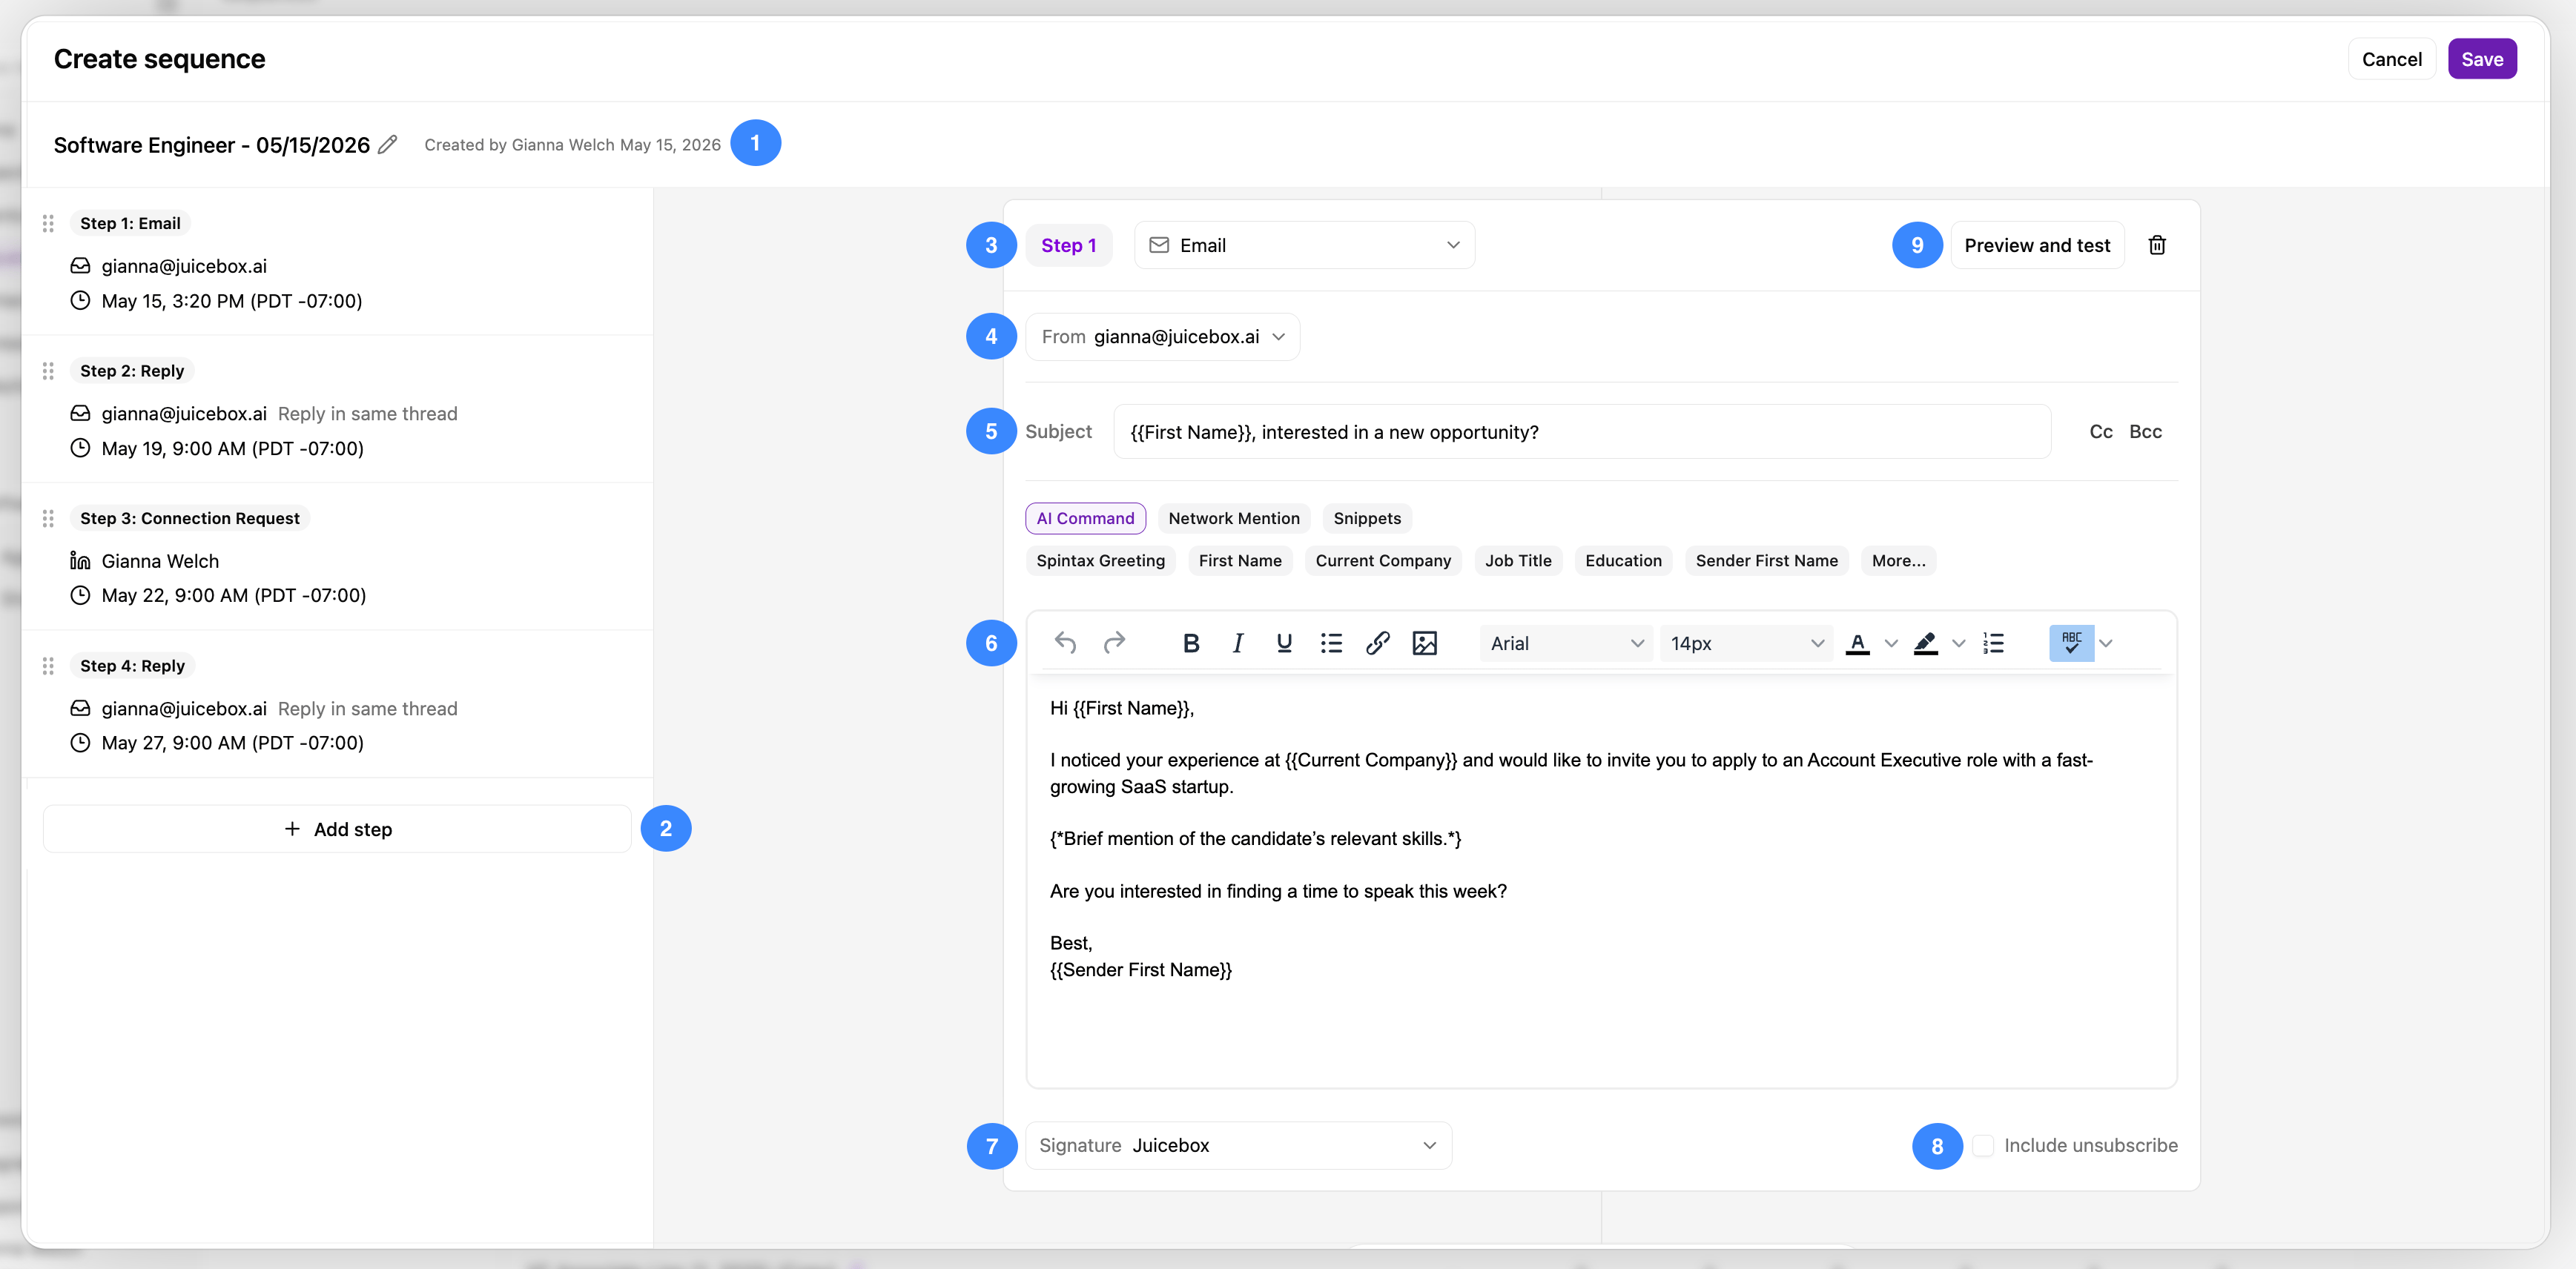
 No matter which method you choose, all emails are fully customizable, and within the sequence editor, you'll be able to:
1. Title the sequence
2. Edit the number of steps and each step's schedule cadence
3. Select the step type
4. Choose the sequence sender
5. Customize the subject line
6. Customize the email text
7. Include a signature
8. Include a candidate unsubscribe link
9. Preview and test your sequence
No matter which method you choose, all emails are fully customizable, and within the sequence editor, you'll be able to:
1. Title the sequence
2. Edit the number of steps and each step's schedule cadence
3. Select the step type
4. Choose the sequence sender
5. Customize the subject line
6. Customize the email text
7. Include a signature
8. Include a candidate unsubscribe link
9. Preview and test your sequence
 More information on each one of these features is outlined below.
### Title the sequence
After selecting the template you'd like to use, you can click the pencil icon in the top-right corner to give your sequence a name. For example, if you are using the sequence for a specific project, you can title the sequence after the project for ease of access!
More information on each one of these features is outlined below.
### Title the sequence
After selecting the template you'd like to use, you can click the pencil icon in the top-right corner to give your sequence a name. For example, if you are using the sequence for a specific project, you can title the sequence after the project for ease of access!
 ### Edit the number of steps and each step's schedule cadence
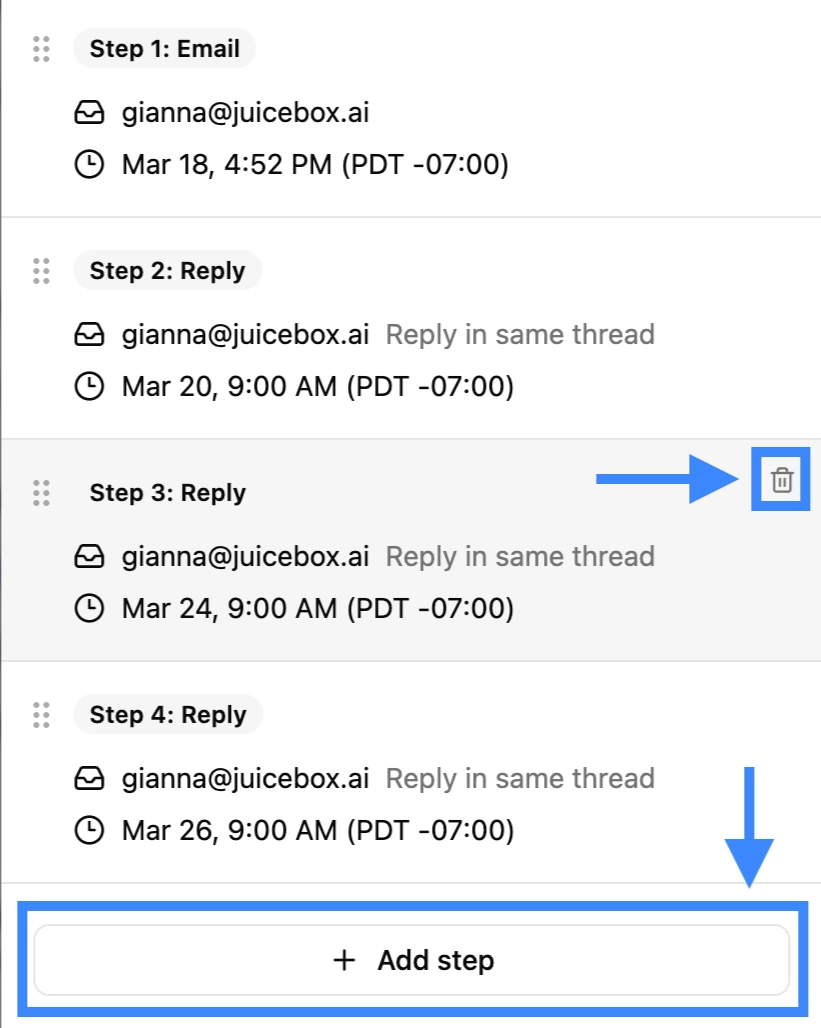
From the sequence overview on the left-hand side, you can add or remove a step. In the editor, you can also set each step's schedule cadence to determine when that step should be sent out.
**Add or remove a step**
Click **Add step** to add another step, or hover over a step to reveal the trash can icon and remove.
### Edit the number of steps and each step's schedule cadence
From the sequence overview on the left-hand side, you can add or remove a step. In the editor, you can also set each step's schedule cadence to determine when that step should be sent out.
**Add or remove a step**
Click **Add step** to add another step, or hover over a step to reveal the trash can icon and remove.
 **Schedule a step**
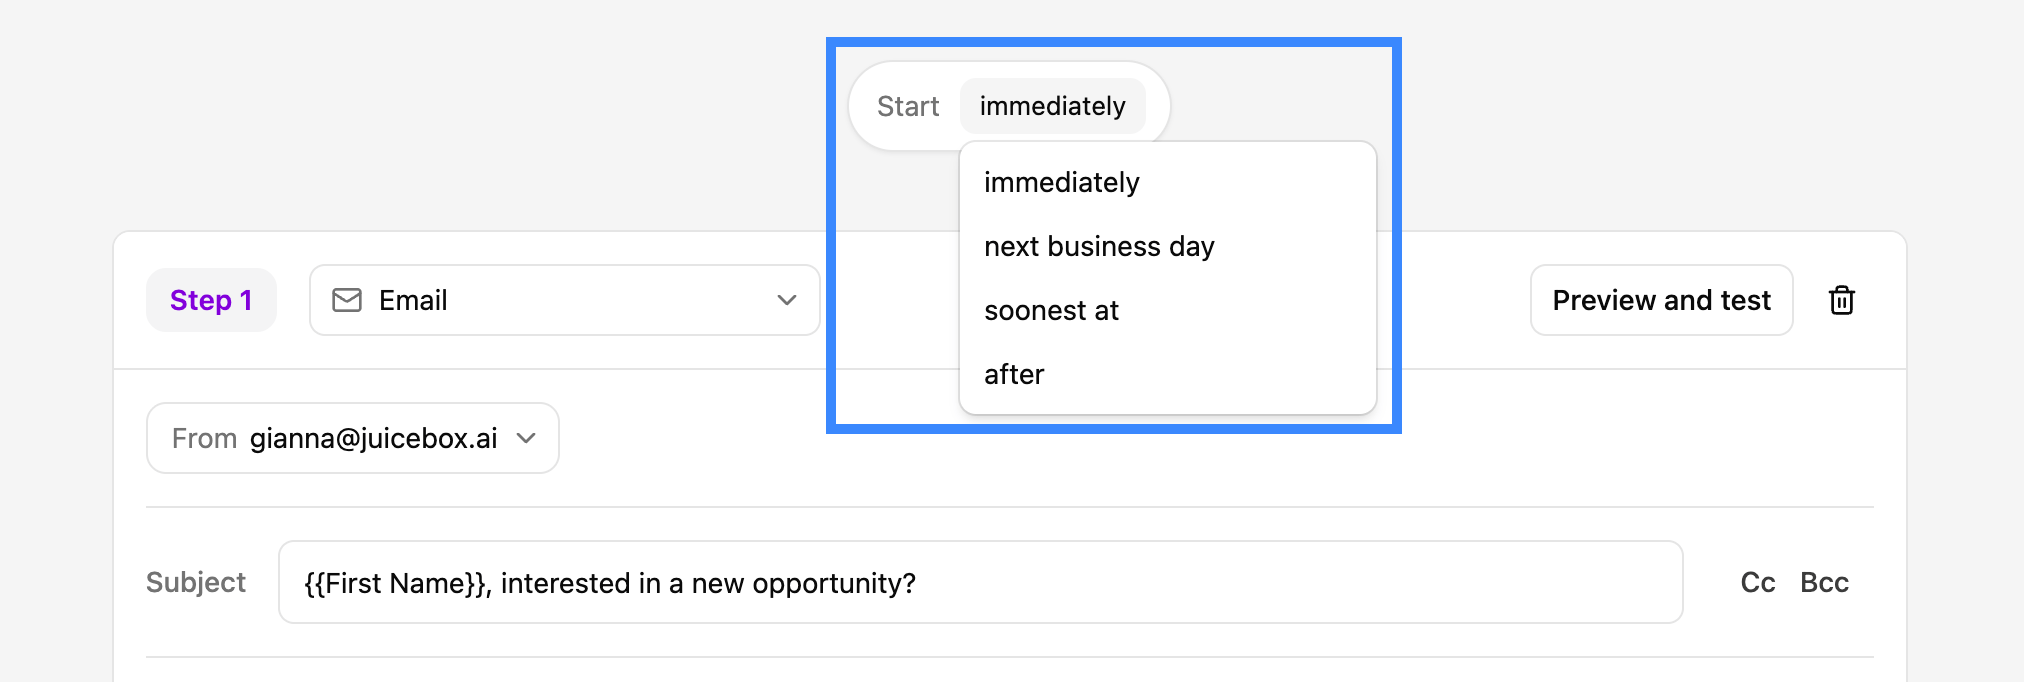
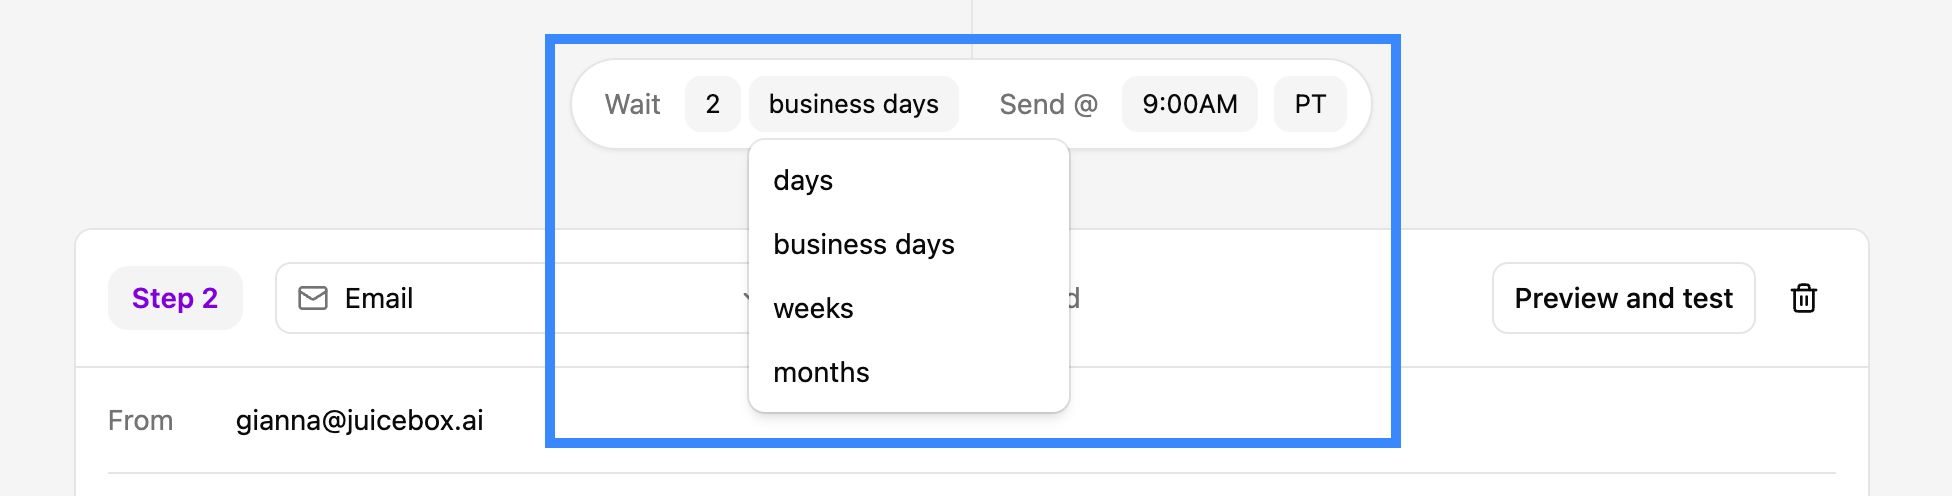
Above each step, you will be able to schedule the date and time at which that step will be sent out. Step 1 can be sent immediately or scheduled for another date and time. Steps 2+ can be scheduled for X amount of days, business days, weeks, months after.
**Schedule a step**
Above each step, you will be able to schedule the date and time at which that step will be sent out. Step 1 can be sent immediately or scheduled for another date and time. Steps 2+ can be scheduled for X amount of days, business days, weeks, months after.
 ### Select the step type
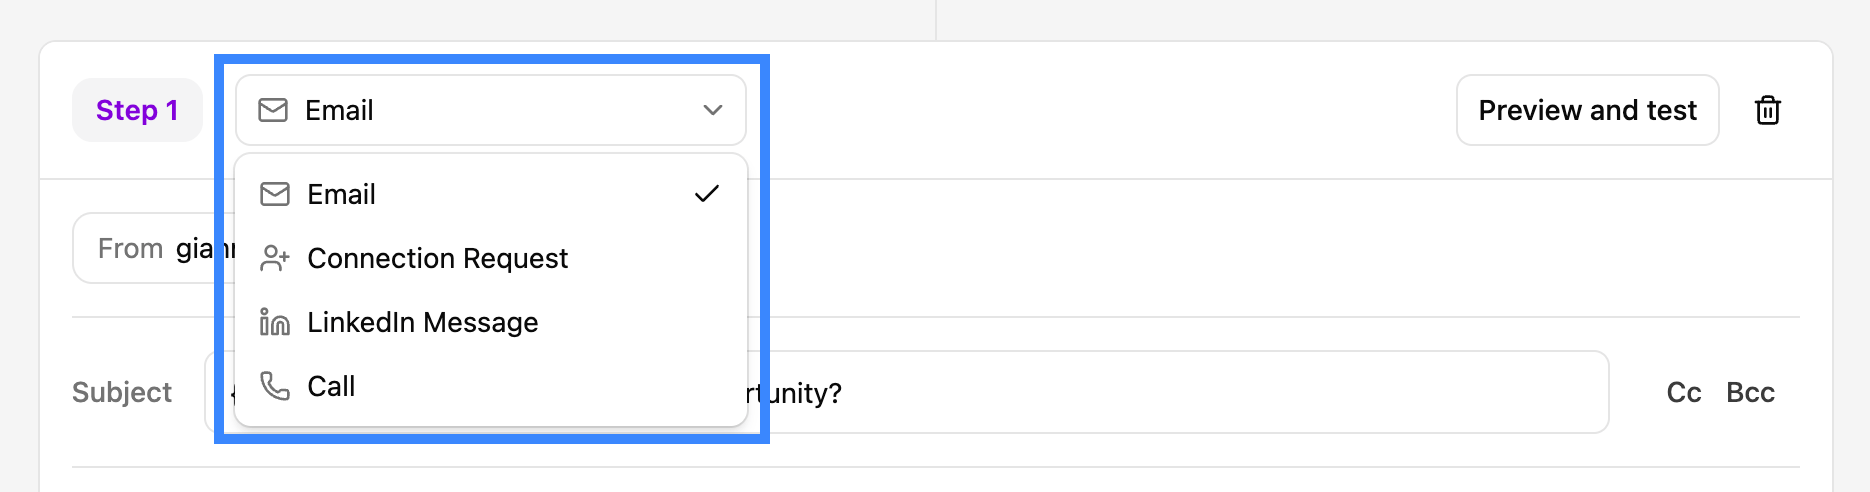
Next to the step number, you can select the type of step you would like to use. Each step can be set up as an email, LinkedIn Connection Request, LinkedIn Message, or Call.
### Select the step type
Next to the step number, you can select the type of step you would like to use. Each step can be set up as an email, LinkedIn Connection Request, LinkedIn Message, or Call.
 **Please note:** Only emails will be automated by Juicebox. Any other step will create a task in Juicebox, and when it's time, the sequence will pause until it is marked as completed.
### Choose the sequence sender
Any mailbox integrated across your team's account can be selected from the **From** dropdown in order to identify which email the sequence will come from. For more information on mailboxes, and mailbox access levels, please refer to our [Email Integrations](/email-integrations) article.
**Please note:** Only emails will be automated by Juicebox. Any other step will create a task in Juicebox, and when it's time, the sequence will pause until it is marked as completed.
### Choose the sequence sender
Any mailbox integrated across your team's account can be selected from the **From** dropdown in order to identify which email the sequence will come from. For more information on mailboxes, and mailbox access levels, please refer to our [Email Integrations](/email-integrations) article.
 To configure multi-sender for a sequence, you can select different mailboxes at the individual step level. For example, if I want step 1 to come from my mailbox and step 2 to come from my Hiring Manager's email, I would select my mailbox for step 1, and my Hiring Manager's mailbox for step 2.
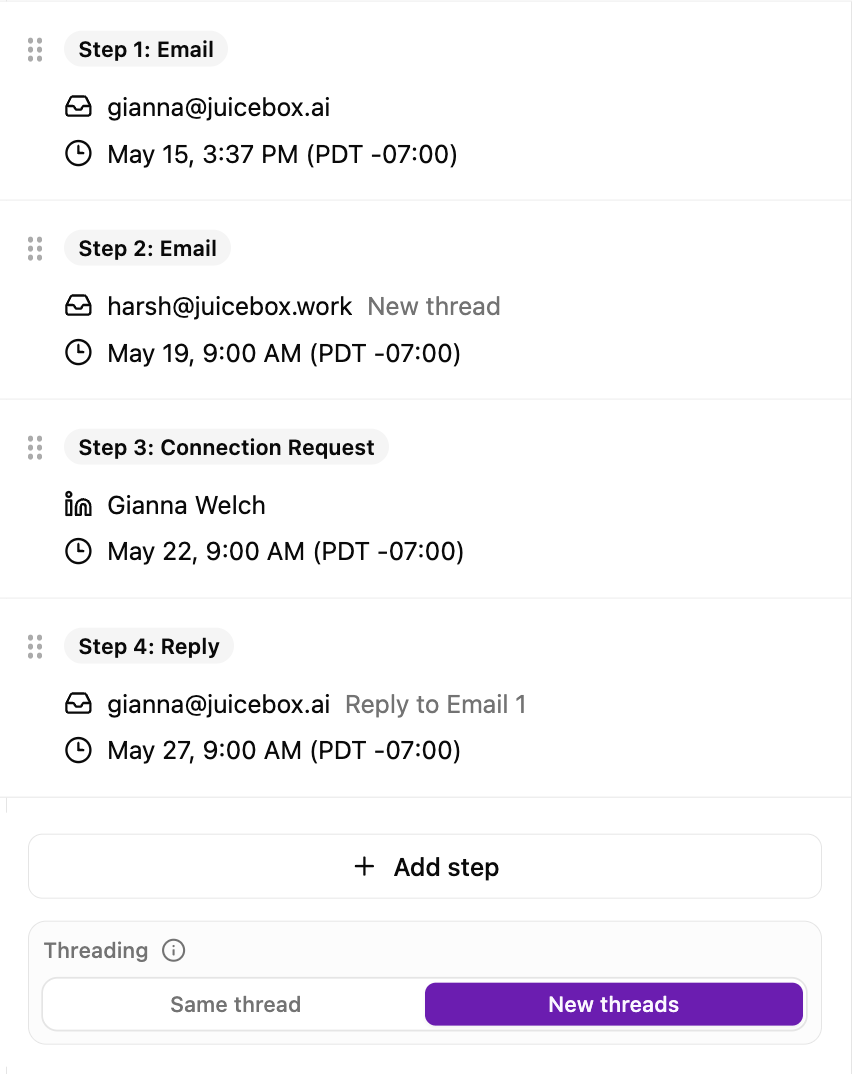 Once the sender's mailbox has been switched, you can choose whether emails sent from each individual mailbox should continue within the same thread or start a new one.
If you choose the same thread, all senders will participate in the same email thread and each additional sender in the sequence will be CC'd for awareness. If you choose a new thread, each unique sender will start their own separate email thread with a unique subject line that you can customize.
### Customize the subject line
Change the subject line, and/or add in a CC / BCC email address next to **Subject**.
Once the sender's mailbox has been switched, you can choose whether emails sent from each individual mailbox should continue within the same thread or start a new one.
If you choose the same thread, all senders will participate in the same email thread and each additional sender in the sequence will be CC'd for awareness. If you choose a new thread, each unique sender will start their own separate email thread with a unique subject line that you can customize.
### Customize the subject line
Change the subject line, and/or add in a CC / BCC email address next to **Subject**.
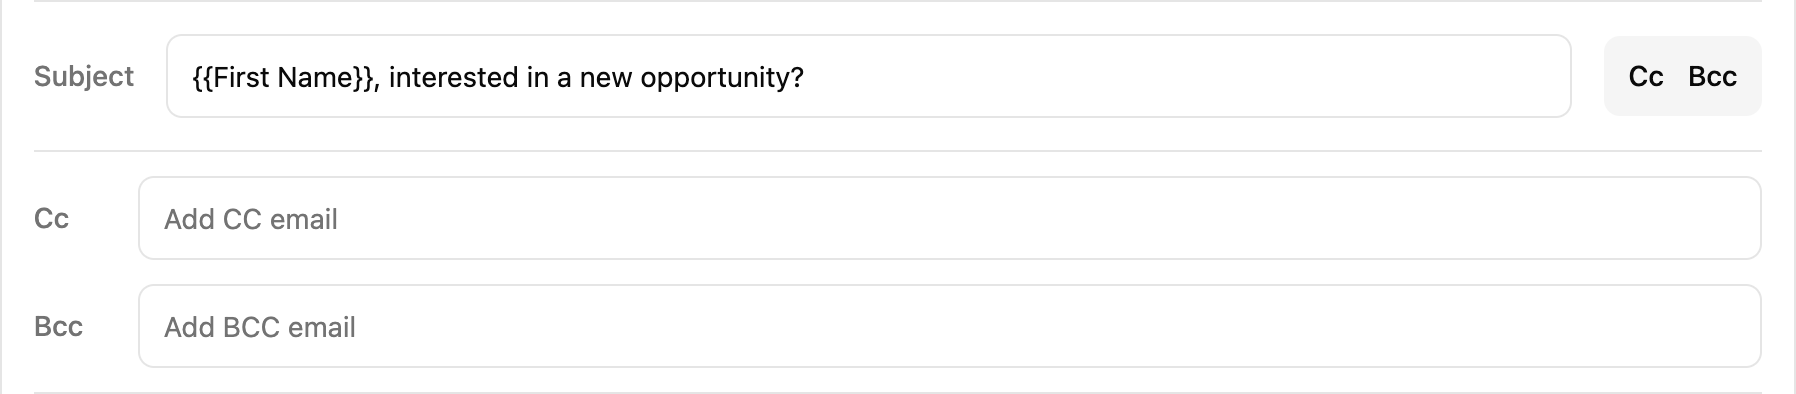 Personalized subject lines tend to receive higher open rates, so be sure to utilize a variable, like `{{First Name}}`, to grab the candidate's attention!
### Customize the email text
Craft your outreach message by using AI commands, variables, and project details. Templates can also be edited to fit your own tone of voice or formatted to include any bold text, hyperlinks (e.g., scheduling links) and images.
Personalized subject lines tend to receive higher open rates, so be sure to utilize a variable, like `{{First Name}}`, to grab the candidate's attention!
### Customize the email text
Craft your outreach message by using AI commands, variables, and project details. Templates can also be edited to fit your own tone of voice or formatted to include any bold text, hyperlinks (e.g., scheduling links) and images.
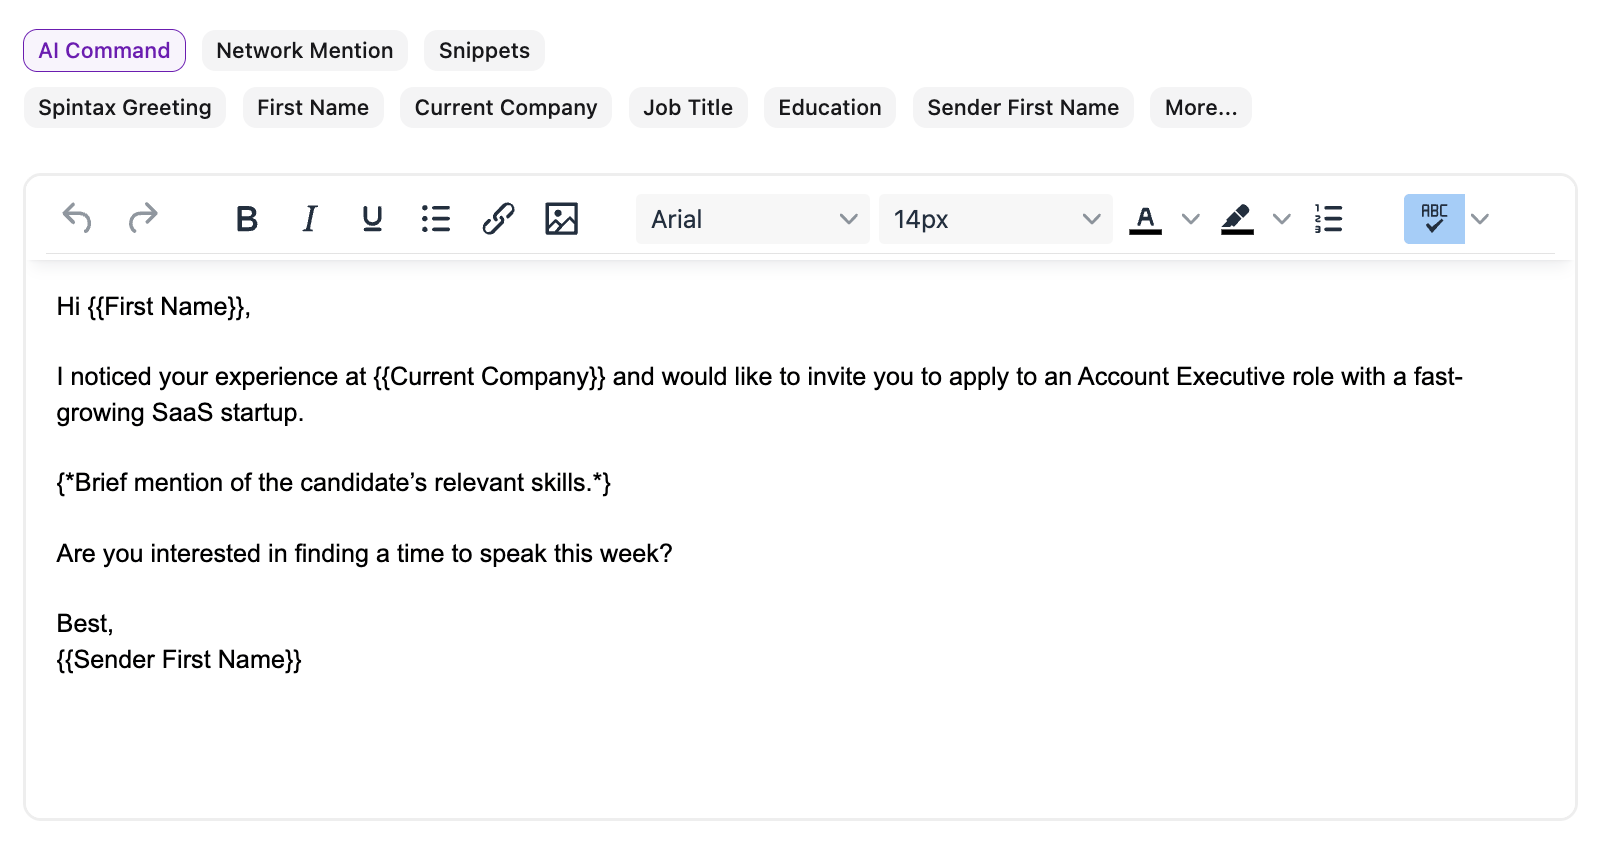 **AI Commands**
AI Commands are custom personalizations for each profile, that will update to include a one or two sentence overview on the candidate's work experience, skills, etc when sent. In the image above, `{Brief mention of the candidate's relevant skills.}` is the AI Command used to help personalize all outreach efforts in bulk.
**AI Commands**
AI Commands are custom personalizations for each profile, that will update to include a one or two sentence overview on the candidate's work experience, skills, etc when sent. In the image above, `{Brief mention of the candidate's relevant skills.}` is the AI Command used to help personalize all outreach efforts in bulk.
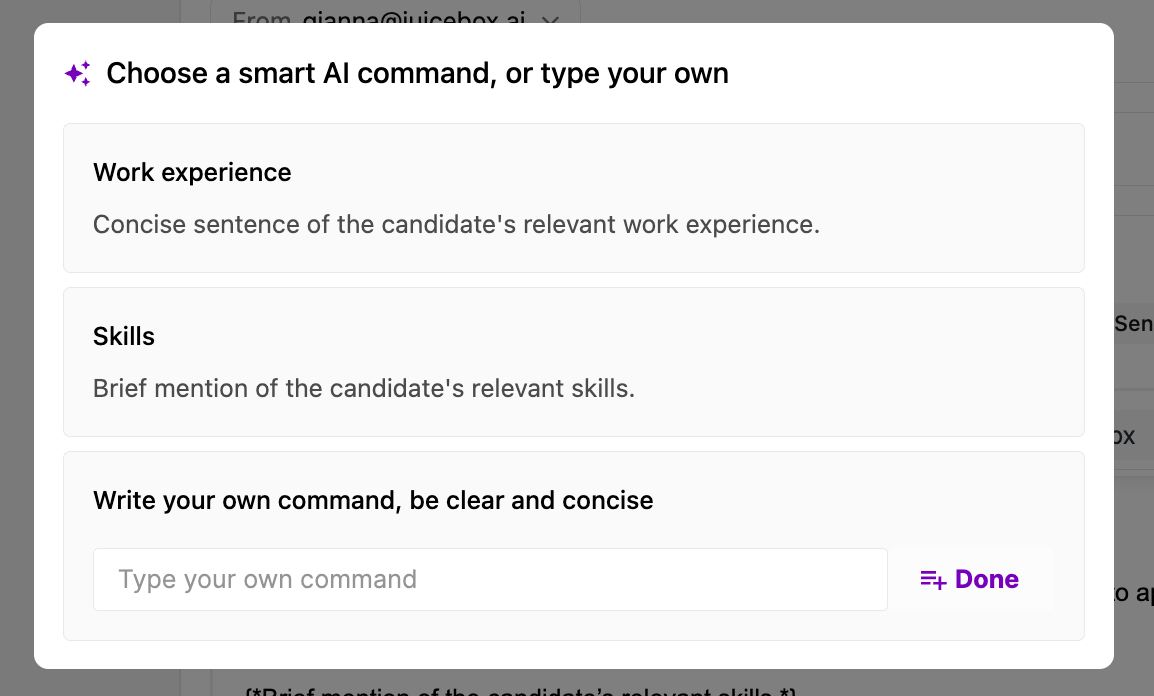 With AI Commands, you can also choose between pre-set examples, focused on Work Experience or Skills, or write your own. When writing your own AI Command, consider the following: topic, sentence length, and applicability across your candidate pool.
**Snippets**
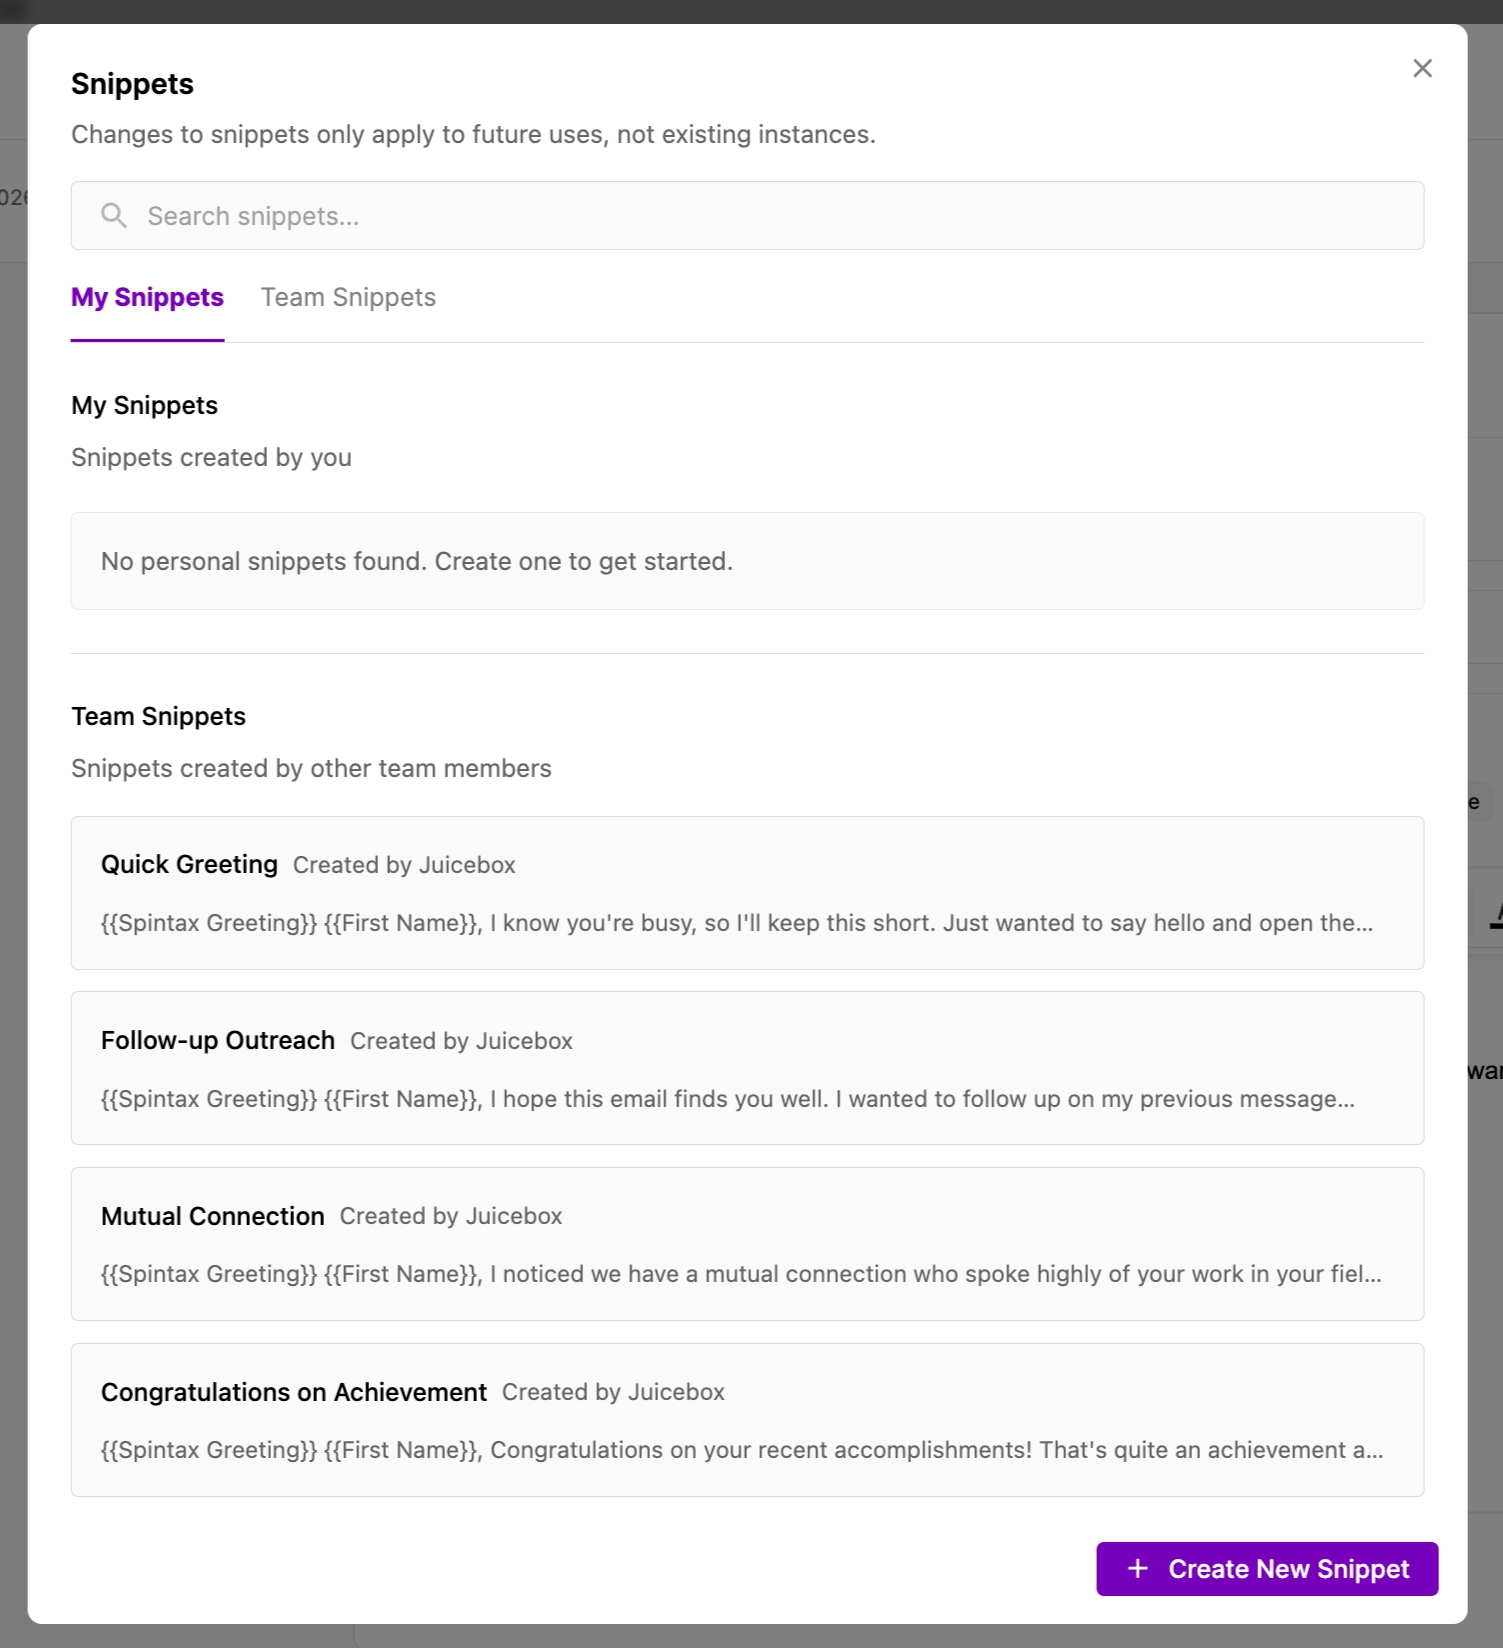
Snippets are pre-saved templates created by yourself or your team, so you can pull in reusable content across sequence steps.
With AI Commands, you can also choose between pre-set examples, focused on Work Experience or Skills, or write your own. When writing your own AI Command, consider the following: topic, sentence length, and applicability across your candidate pool.
**Snippets**
Snippets are pre-saved templates created by yourself or your team, so you can pull in reusable content across sequence steps.
 ### Include a signature
At the bottom of your step, select a saved signature to further personalize your message. To learn how to create a signature in Juicebox, refer to our [Manage Account](/manage-account) article.
### Include a signature
At the bottom of your step, select a saved signature to further personalize your message. To learn how to create a signature in Juicebox, refer to our [Manage Account](/manage-account) article.
 ### Include a candidate unsubscribe link
Across from Signature, you can select whether or not you want to include an unsubscribe link for the candidate to use when they receive an email and no longer want to be contacted.
### Include a candidate unsubscribe link
Across from Signature, you can select whether or not you want to include an unsubscribe link for the candidate to use when they receive an email and no longer want to be contacted.
 ### Preview and test your sequence
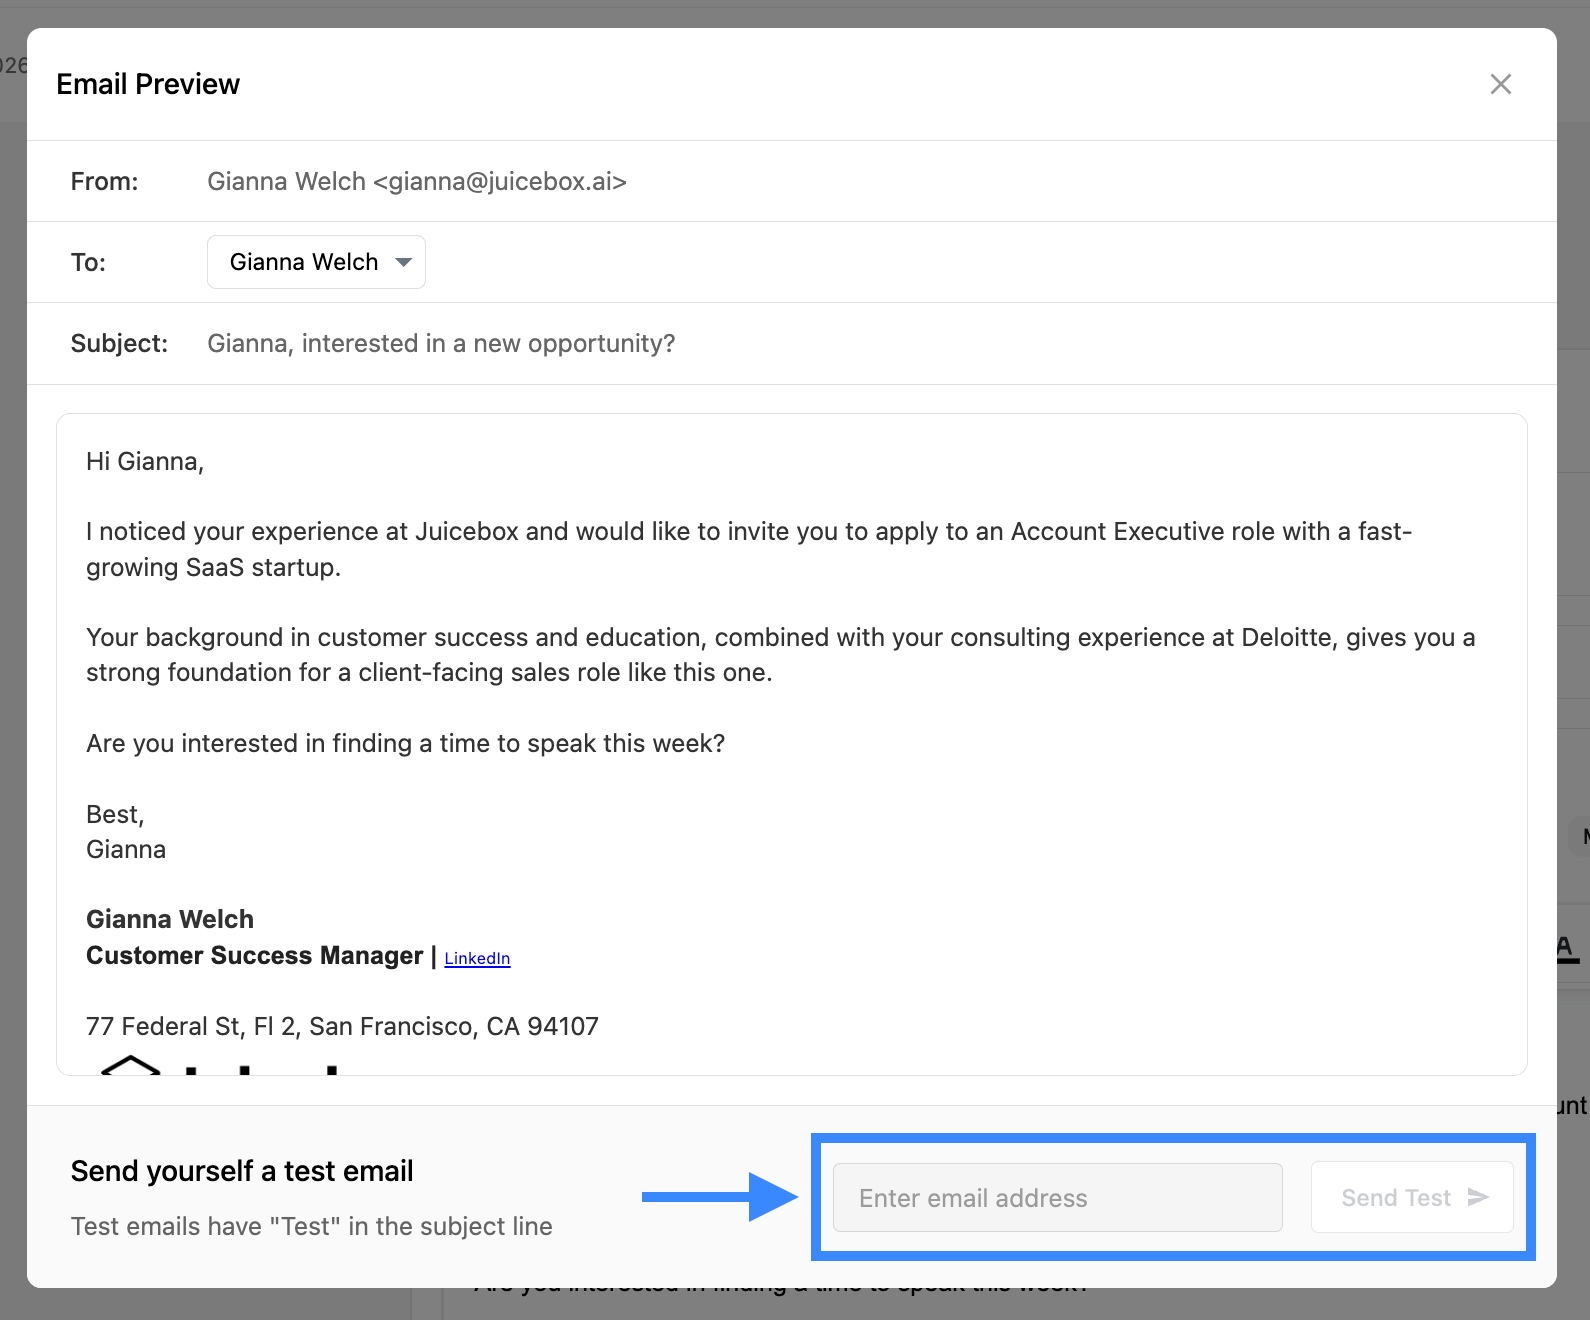
Across from the step number, you can preview what the sequence will look like. From here, you can also input your own email, or a teammate's, to officially test the sequence before sending.
### Preview and test your sequence
Across from the step number, you can preview what the sequence will look like. From here, you can also input your own email, or a teammate's, to officially test the sequence before sending.

 When you are happy with your sequence, select **Save** at the top of the sequence to exit the screen, and begin your outreach!
## Generate with AI
If you choose to generate your sequence with AI, you can provide the job description, your company or client information, and your scheduling link to create a fully tailored sequence for the role.
When you are happy with your sequence, select **Save** at the top of the sequence to exit the screen, and begin your outreach!
## Generate with AI
If you choose to generate your sequence with AI, you can provide the job description, your company or client information, and your scheduling link to create a fully tailored sequence for the role.
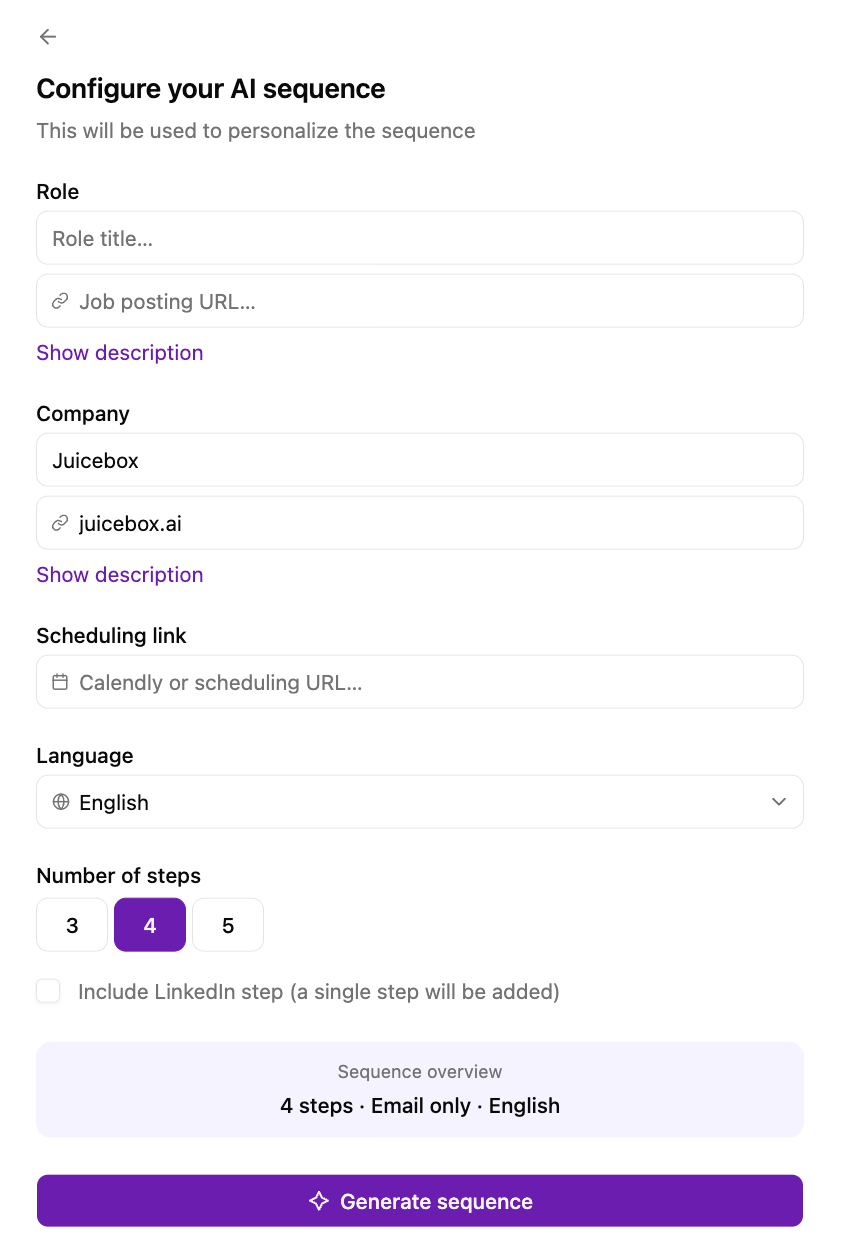 AI-generated sequences can also be created in different languages, allowing you to further tailor your outreach to specific regions.
## Editing an existing sequence
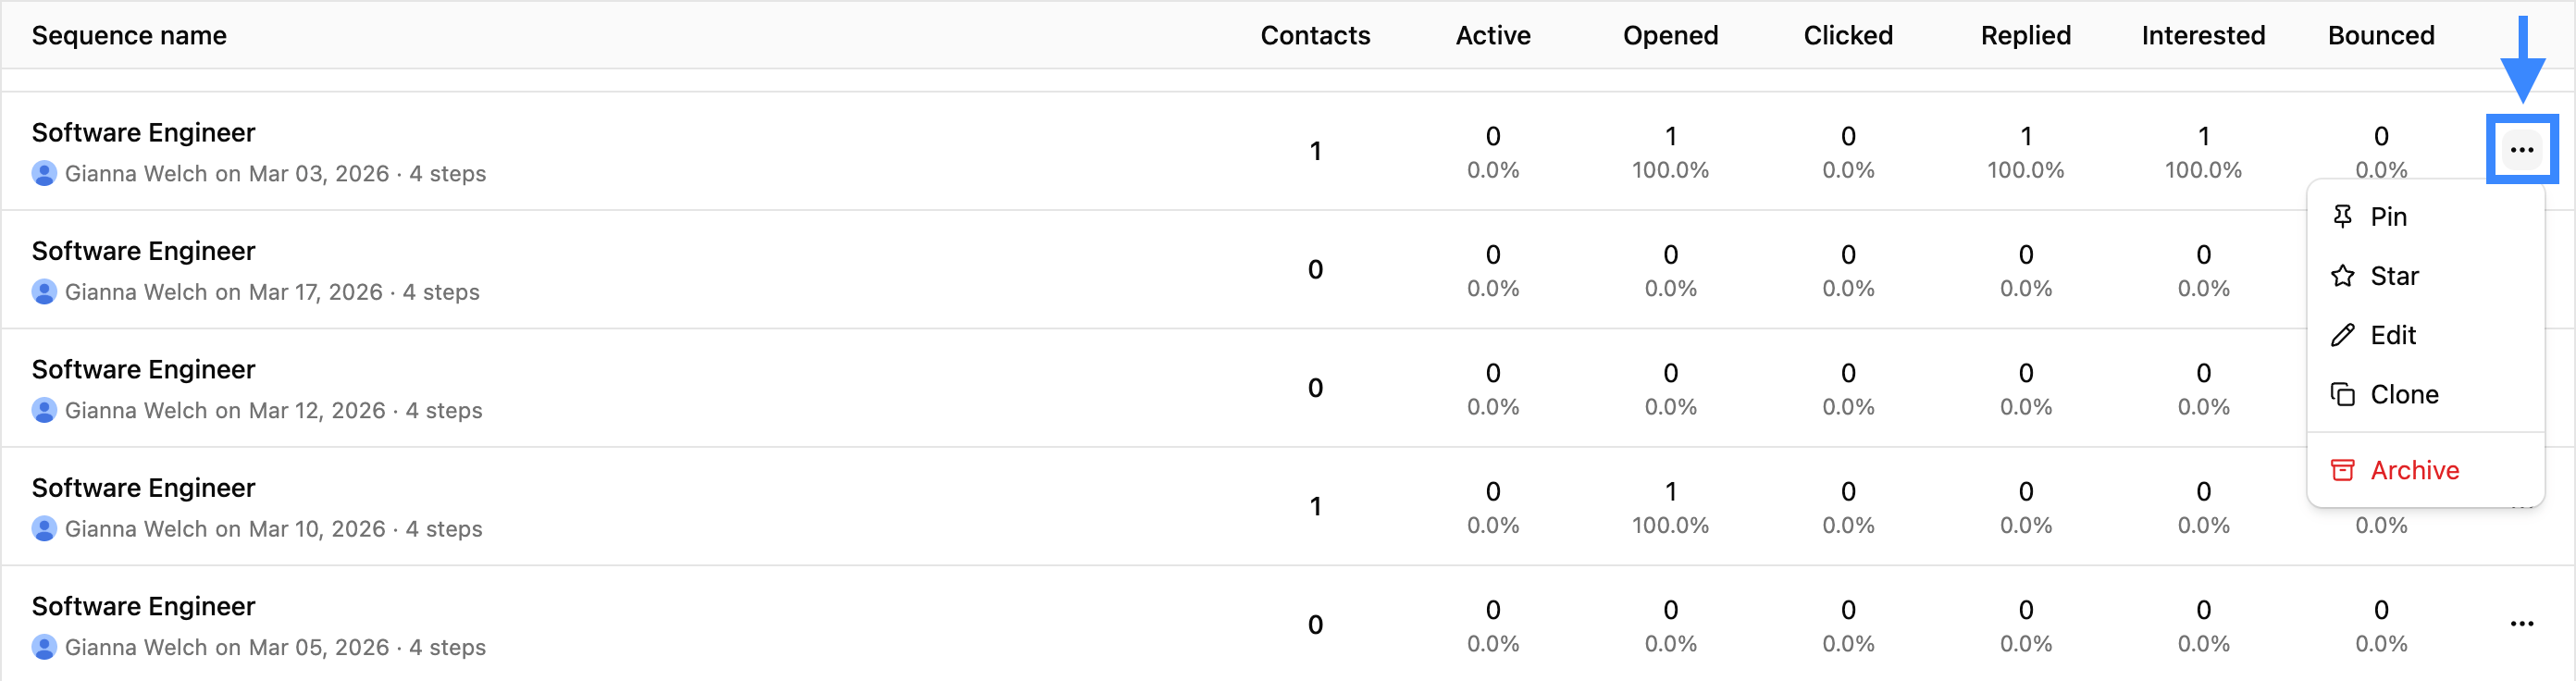
Once a sequence is created, it can be starred or pinned for easy access, edited, cloned, or archived at any time. To edit an existing sequence, select "…" to the right of the sequence > Edit.
AI-generated sequences can also be created in different languages, allowing you to further tailor your outreach to specific regions.
## Editing an existing sequence
Once a sequence is created, it can be starred or pinned for easy access, edited, cloned, or archived at any time. To edit an existing sequence, select "…" to the right of the sequence > Edit.
 After your sequence has been edited, you can then choose to apply those changes to the candidates already in the sequence or delay those edits for net-new candidates enrolled only.
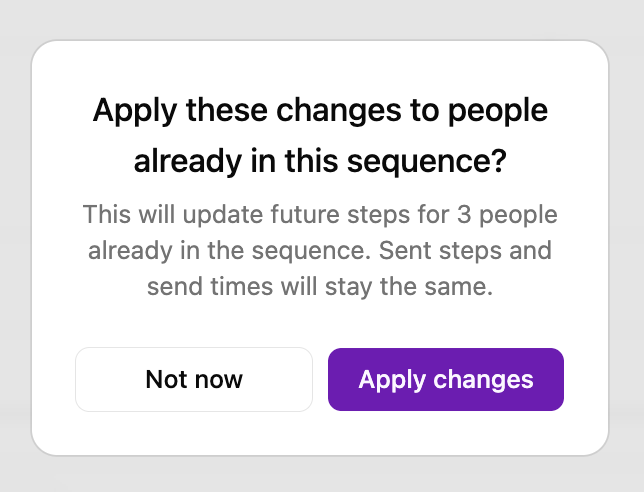 Please note, only the edits made on a candidate's outstanding steps will update. If you made edits to step 1, but step 1 has already been sent out to 5 candidates, those 5 candidates will only receive the edits made to steps 2+.
## Non-email steps
If you use the Connection Request, LinkedIn InMail, or Call step type, you can only choose the task owner and pre-write the message you want to send to the candidate within the step.
Please note, only the edits made on a candidate's outstanding steps will update. If you made edits to step 1, but step 1 has already been sent out to 5 candidates, those 5 candidates will only receive the edits made to steps 2+.
## Non-email steps
If you use the Connection Request, LinkedIn InMail, or Call step type, you can only choose the task owner and pre-write the message you want to send to the candidate within the step.
 As a reminder, these steps are treated as tasks and **will not** be automated by Juicebox. When it is time to complete a task, the task owner will receive a notification from Juicebox and will then need to complete it manually via LinkedIn or phone.
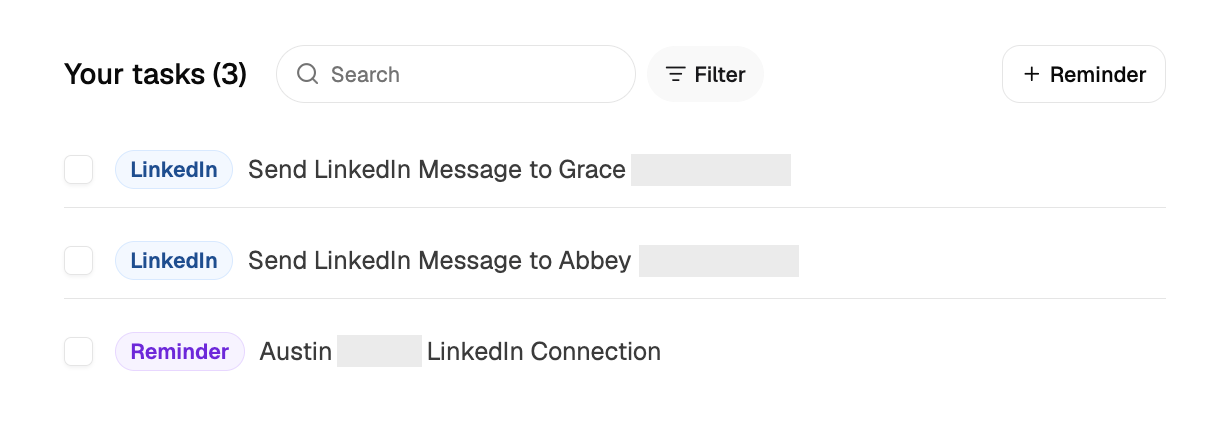
When a task has been triggered, it will appear on your home page. From here, you can execute your task or filter by status, task type, or project!
As a reminder, these steps are treated as tasks and **will not** be automated by Juicebox. When it is time to complete a task, the task owner will receive a notification from Juicebox and will then need to complete it manually via LinkedIn or phone.
When a task has been triggered, it will appear on your home page. From here, you can execute your task or filter by status, task type, or project!
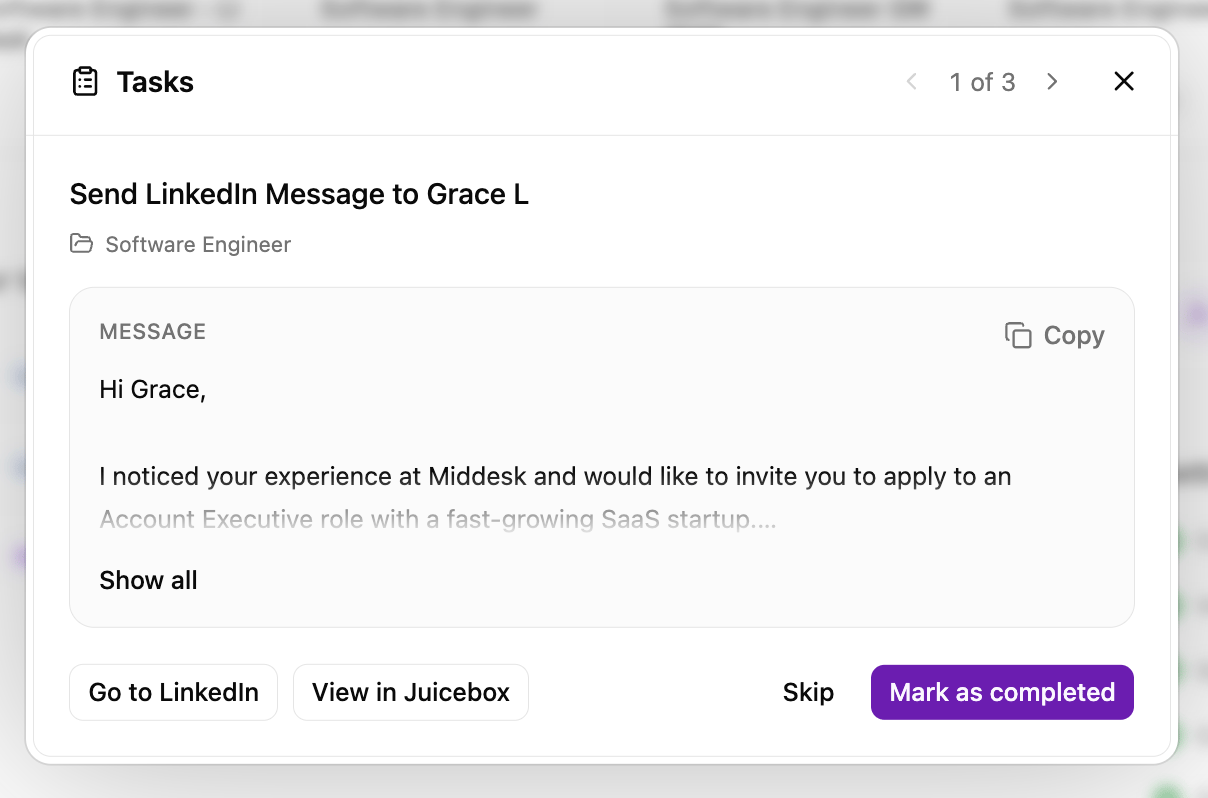
 After completing the task, you can **Mark as completed** or **Skip** to resume the sequence for any remaining steps. Note that when a task is pending, the sequence will be paused until the task is completed.
 ## Creating a sequence from your shortlist
From your project's shortlist, you can create a sequence from the drop down after you select your candidates and hit **Add to Sequence**.
## Creating a sequence from your shortlist
From your project's shortlist, you can create a sequence from the drop down after you select your candidates and hit **Add to Sequence**.
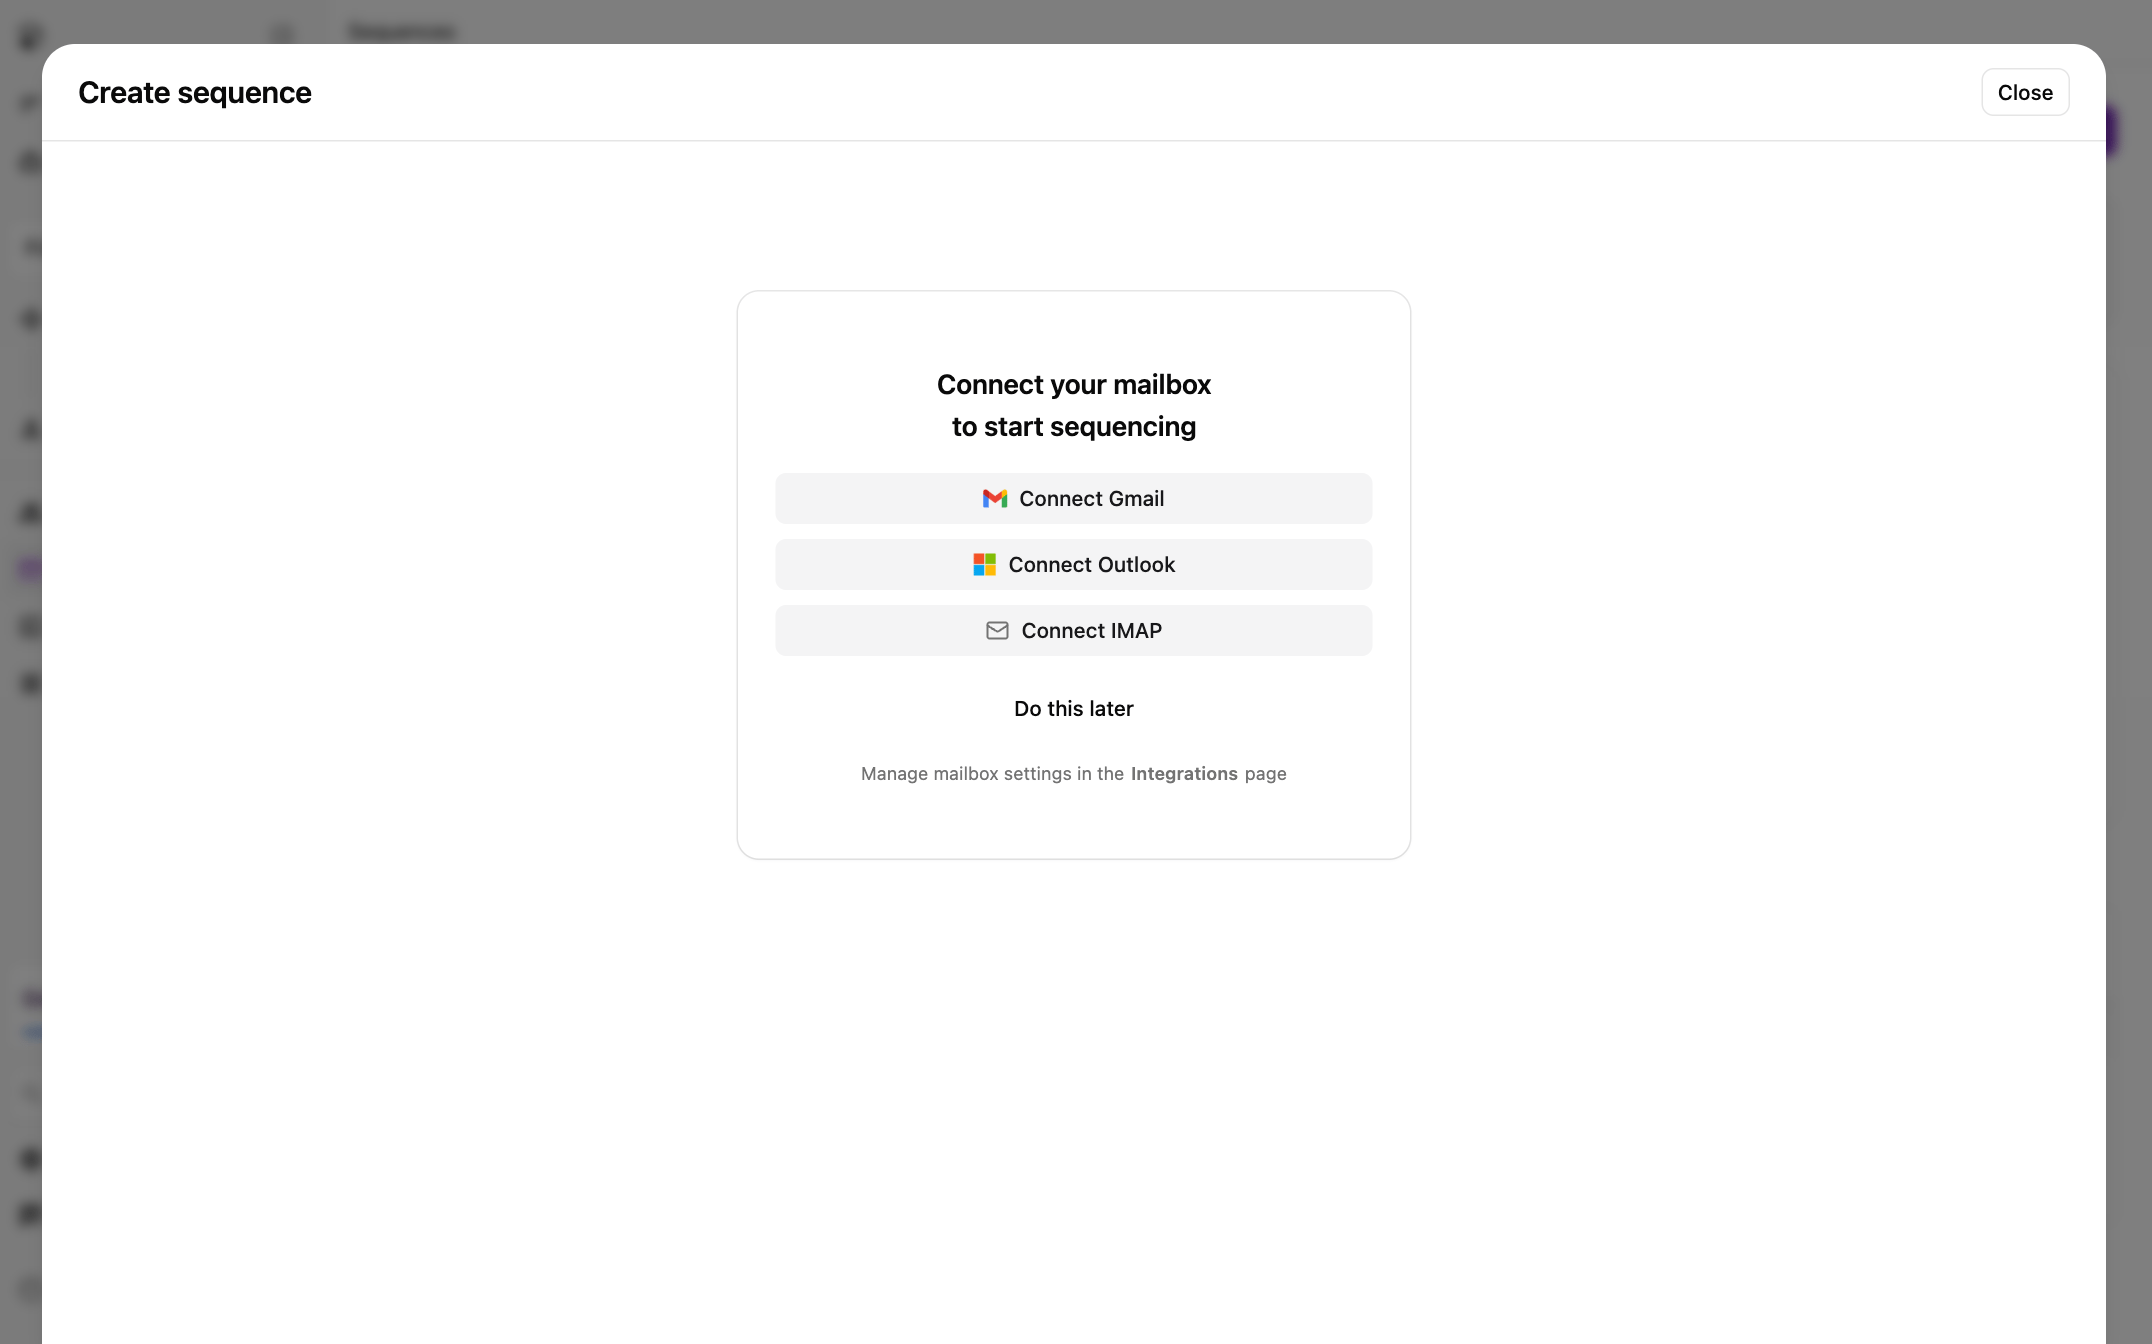
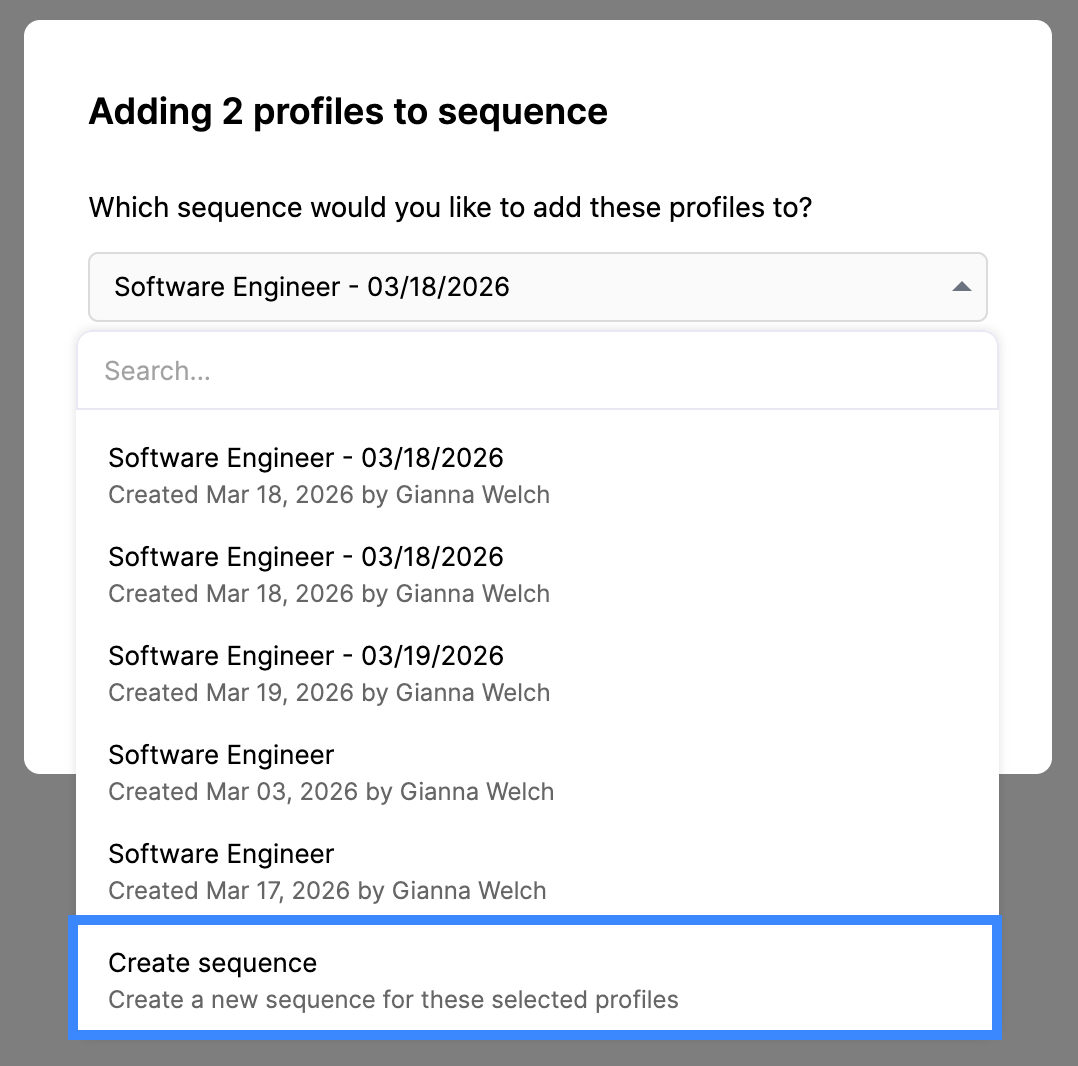 If your mailbox is not yet connected, Juicebox will prompt you to integrate your email before being able to create a sequence.
 ## Pausing, resuming, or stopping a sequence
If you want to stop, pause or resume a sequence, you can select the individual sequence from the Sequences homepage. Once that sequence has been selected, you can bulk select all candidates next to **Full name** or individually select the candidates you want to stop/resume the sequence for.
## Pausing, resuming, or stopping a sequence
If you want to stop, pause or resume a sequence, you can select the individual sequence from the Sequences homepage. Once that sequence has been selected, you can bulk select all candidates next to **Full name** or individually select the candidates you want to stop/resume the sequence for.
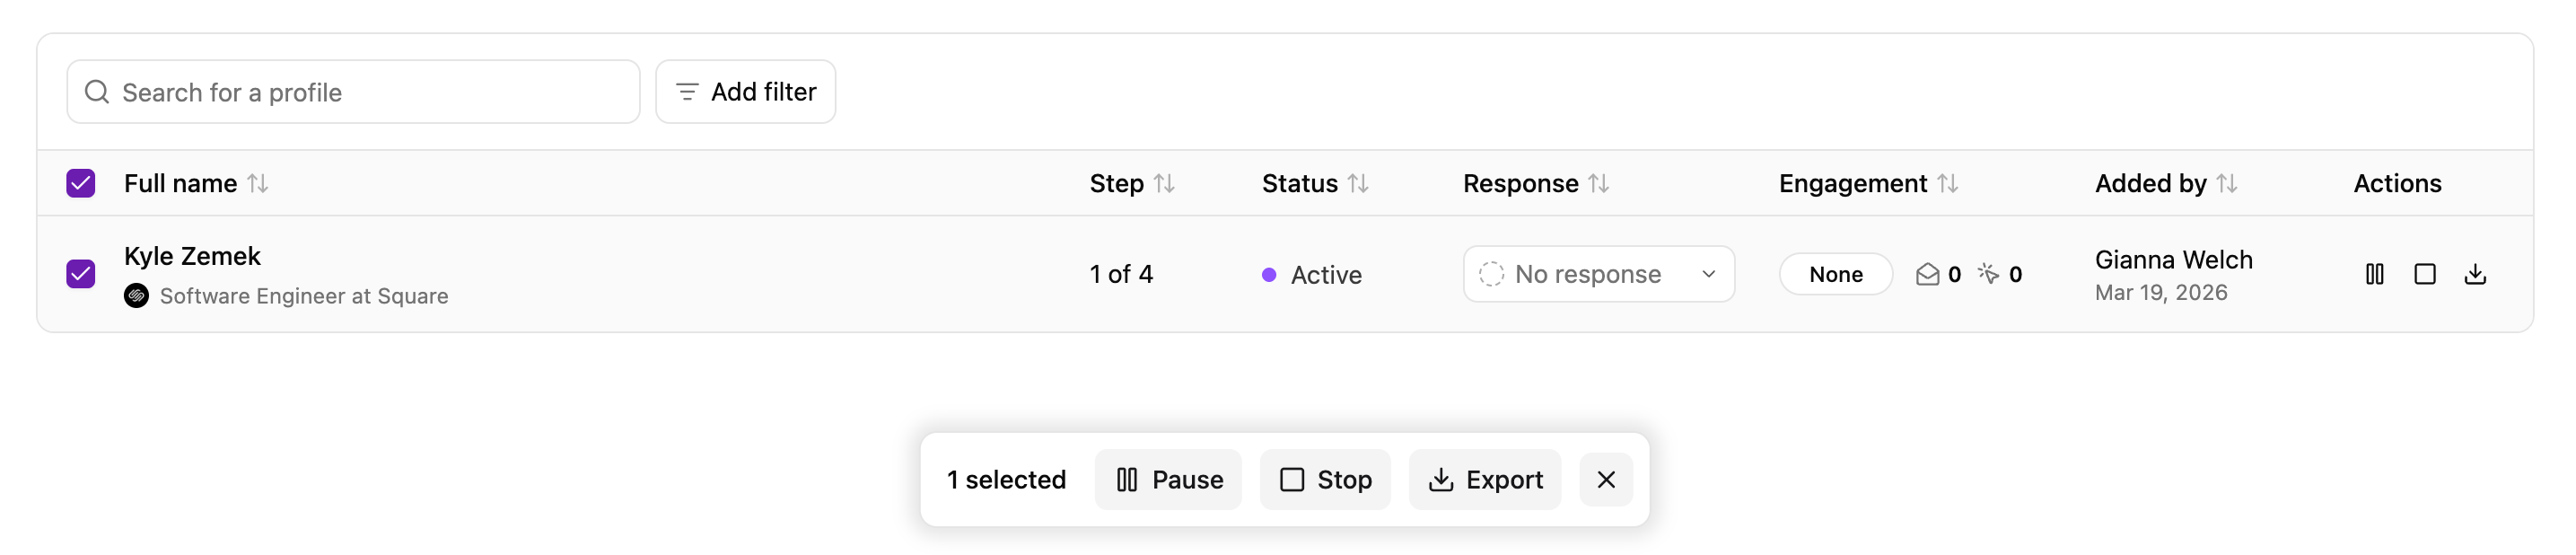 Sequences can be paused or stopped in a few different ways:
* **Automatically**
* When a candidate replies to your outreach, the sequence will automatically stop for that candidate.
* If the mailbox is disconnected from Juicebox, all sequences from that mailbox will automatically pause.
* **Manually**
* You can manually **pause**, **resume**, or **stop** a sequence at any time, either for a single or all candidate.
Manual controls are also helpful if you want to delay outreach, make edits, or stop follow-ups after receiving a response through another channel (like LinkedIn).
1. **Pause**: Temporarily halts all remaining steps in the sequence. Use this if you want to resume sending later.
2. **Resume**: Continues the sequence from the next unsent step for each candidate.
3. **Stop**: Permanently ends the sequence for the selected candidate(s). No further steps will be sent. Use this when a profile is no longer relevant, has opted out, or has already engaged outside of email.
Sequences can be paused or stopped in a few different ways:
* **Automatically**
* When a candidate replies to your outreach, the sequence will automatically stop for that candidate.
* If the mailbox is disconnected from Juicebox, all sequences from that mailbox will automatically pause.
* **Manually**
* You can manually **pause**, **resume**, or **stop** a sequence at any time, either for a single or all candidate.
Manual controls are also helpful if you want to delay outreach, make edits, or stop follow-ups after receiving a response through another channel (like LinkedIn).
1. **Pause**: Temporarily halts all remaining steps in the sequence. Use this if you want to resume sending later.
2. **Resume**: Continues the sequence from the next unsent step for each candidate.
3. **Stop**: Permanently ends the sequence for the selected candidate(s). No further steps will be sent. Use this when a profile is no longer relevant, has opted out, or has already engaged outside of email.