

Agent overview
Juicebox Agents are automated sourcing assistants that continuously source for talent based on the criteria you define. Every Agent lives inside a project, alongside any manual searches for the role you’re hiring for. Instead of running the same search manually every day, Agents work in the background to monitor the market and surface new, relevant candidates as they appear. By setting up an Agent, you can:- Calibrate with context — the Agent pulls from your connected tools, your ATS, and your past activity in Juicebox, so you spend less time explaining the role from scratch.
- Source smarter — the Agent maps the talent market, tests multiple versions of the search, and self-corrects before surfacing candidates.
- Improve over time — the Agent learns from the profiles you approve and reject, so lead quality sharpens with every batch.
- Build and automate outreach — ask the Agent to draft or refine a sequence in chat, review it in the side pane, and choose whether to use it for daily sourcing. Outreach sends from a connected mailbox, with messaging and timing you control.
Agents are an optional add-on to your paid Juicebox subscription. Agents that are sourcing, paused, or awaiting action each take up an Agent seat. Agents that are calibrating or closed do not.
Context intelligence
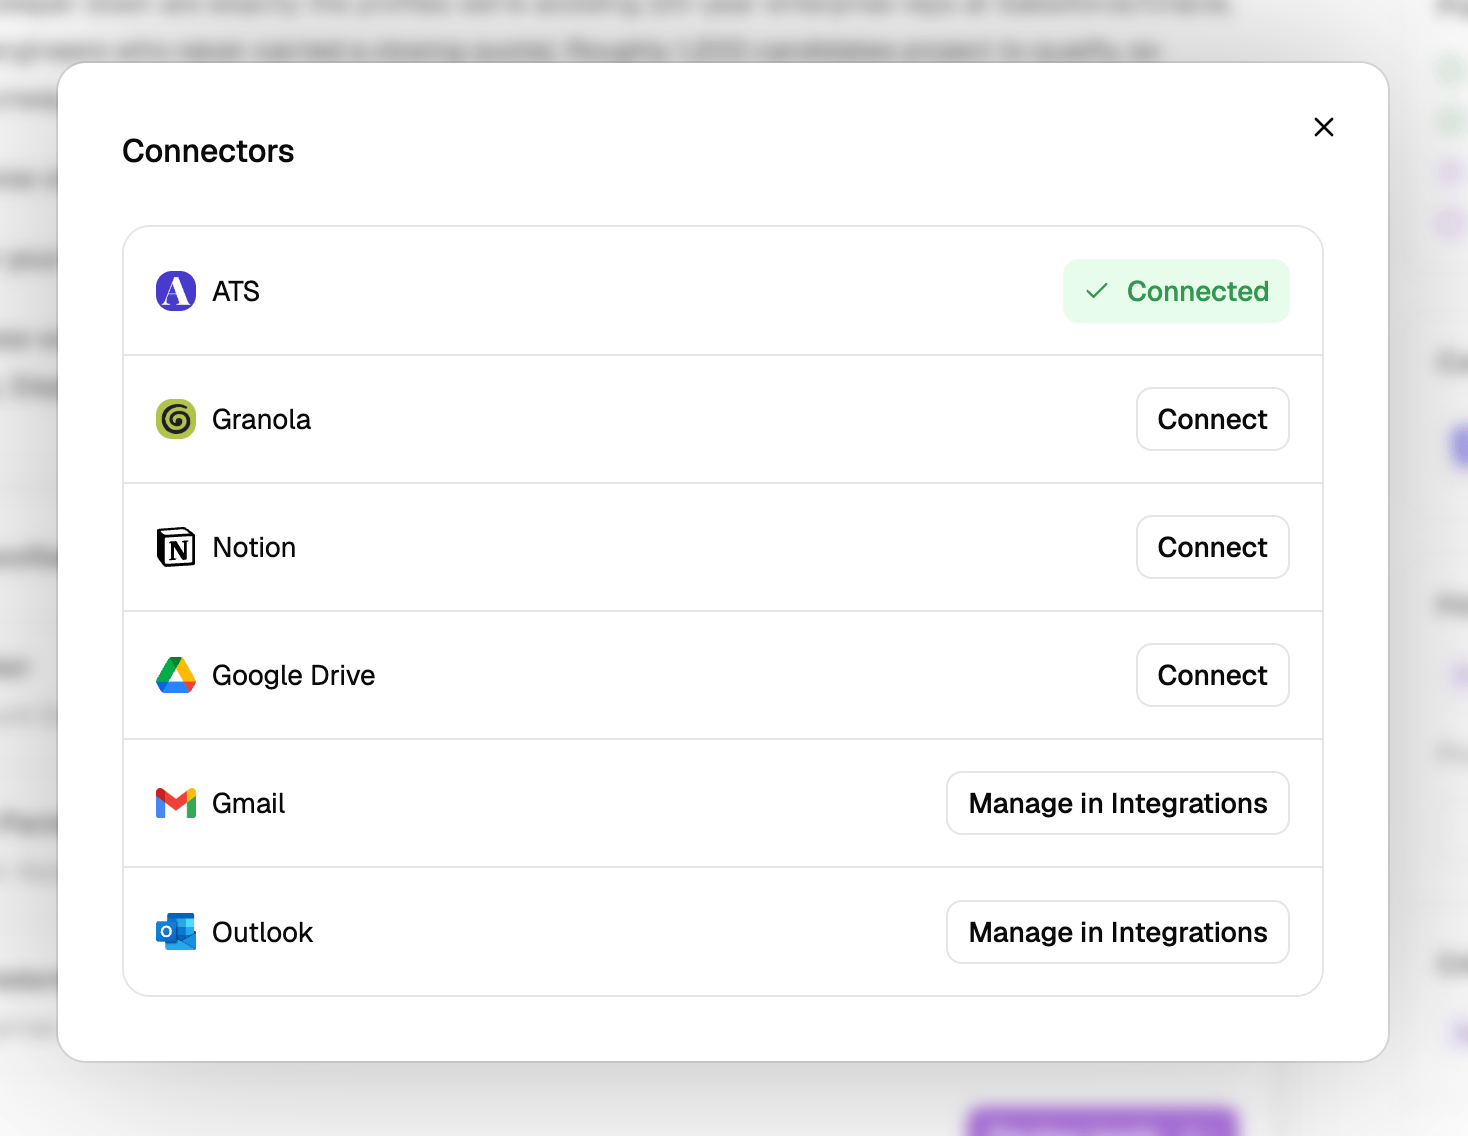
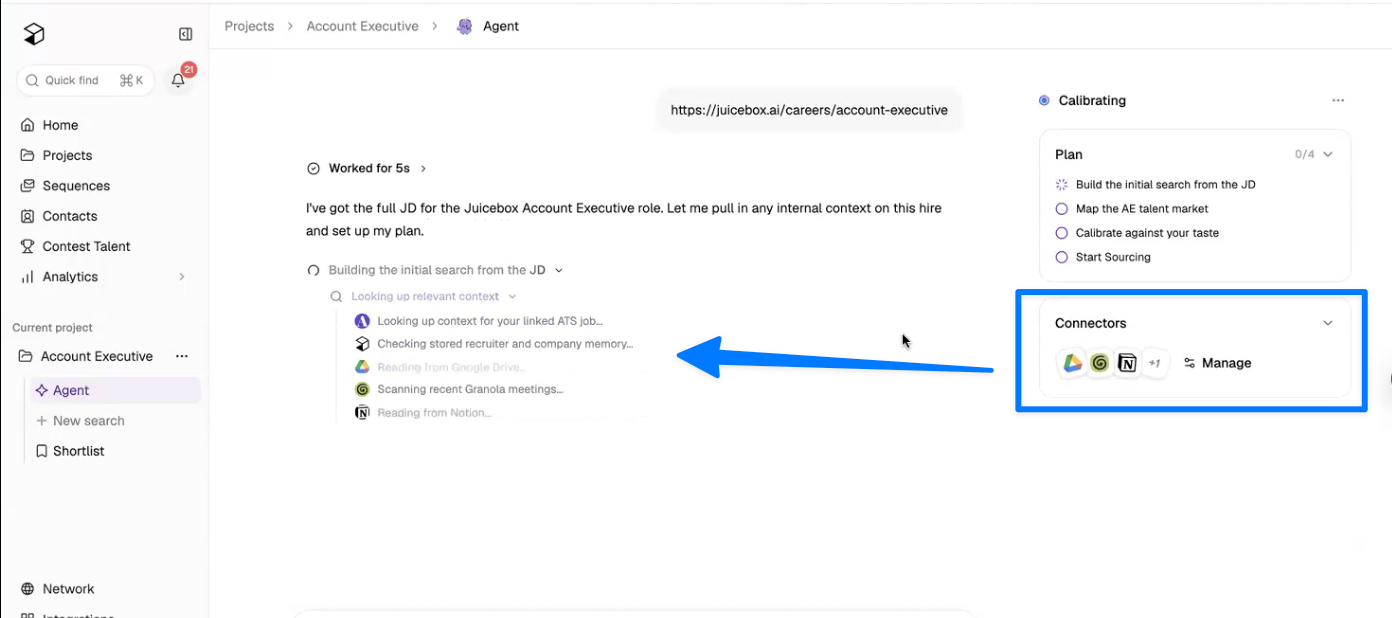
Your Agent doesn’t work in isolation. Before building a search, it researches the role using context it already has access to:- Connectors: Connect tools like Google Drive, Notion, Granola, Metaview, and your ATS, and the Agent can pull intake notes, role docs, candidate sheets, and intake call transcripts to inform the search.
- Organizational memory: The Agent references your past searches, previous Agents for similar roles, and past hires in Juicebox, so learnings carry over instead of being lost when an Agent finishes sourcing. It also uses the company and user context stored in your Knowledge Vault.
- ATS data: With your ATS connected, the Agent can pull related open roles and past hires to understand what a successful candidate looks like for your team.
Manage connectors from the Integrations tab in Settings. ATS connections are available on the Business plan. Connected tools can provide context for your sourcing Agent and for AI-generated sequences in Composer chat.
Market mapping
Instead of building a search directly from your request, the Agent first maps the talent market. It analyzes the full candidate pool — common employers, job titles, seniority, and years of experience — and tests different iterations of the search criteria to find the strategy that produces the strongest pipeline, not just a few good first profiles. If the data suggests a change in approach, the Agent will proactively adjust its criteria or ask you a clarifying question.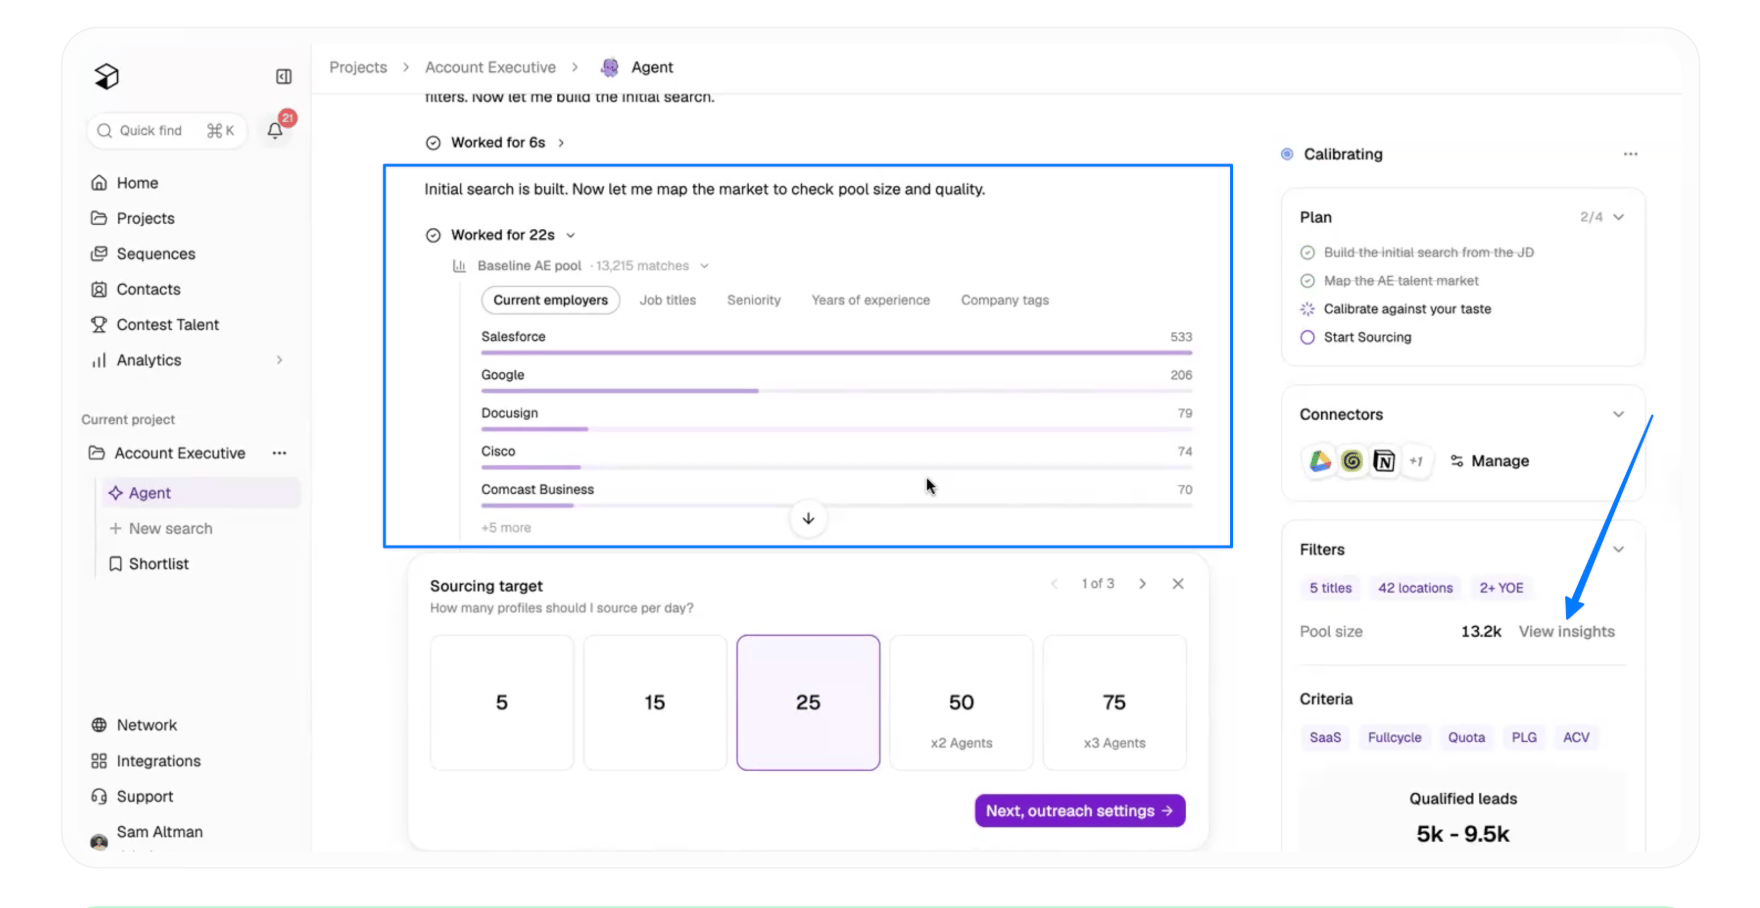
Qualified leads estimate
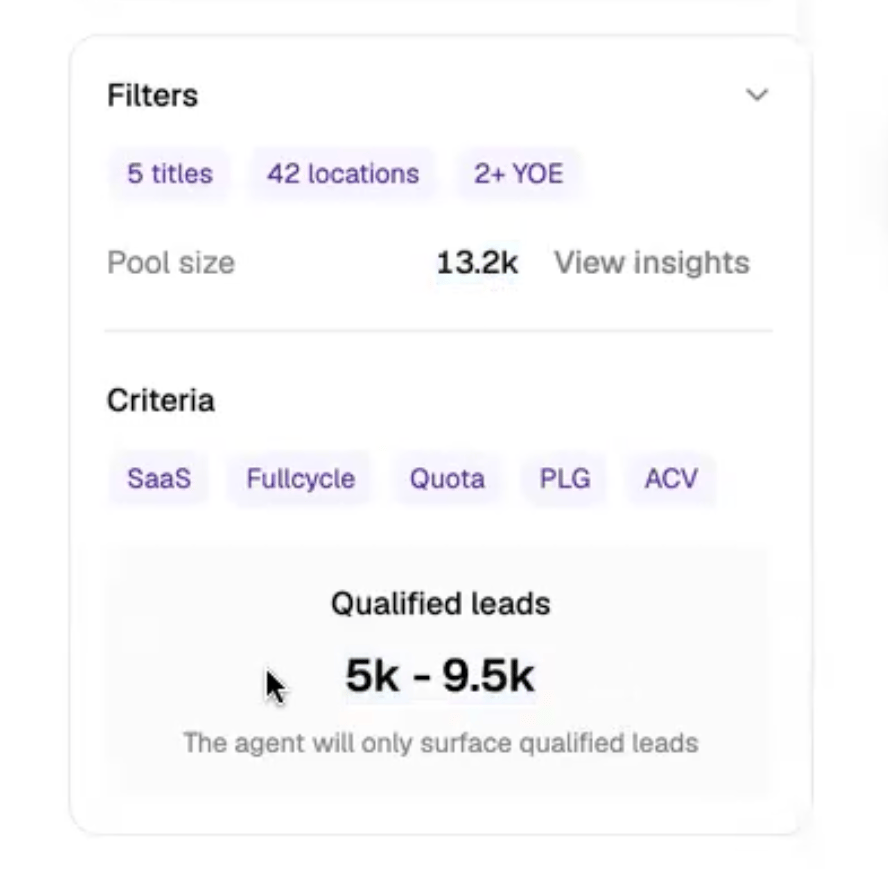
Alongside the total talent pool size (controlled by your filters), the Agent shows a qualified leads range: an estimate of profiles that meet your search filters and pass the quality screen against your full requirements. The more you calibrate and give feedback, the more accurate this estimate becomes, giving you a realistic view of how long the Agent can source for the role.Chat stays with you while sourcing
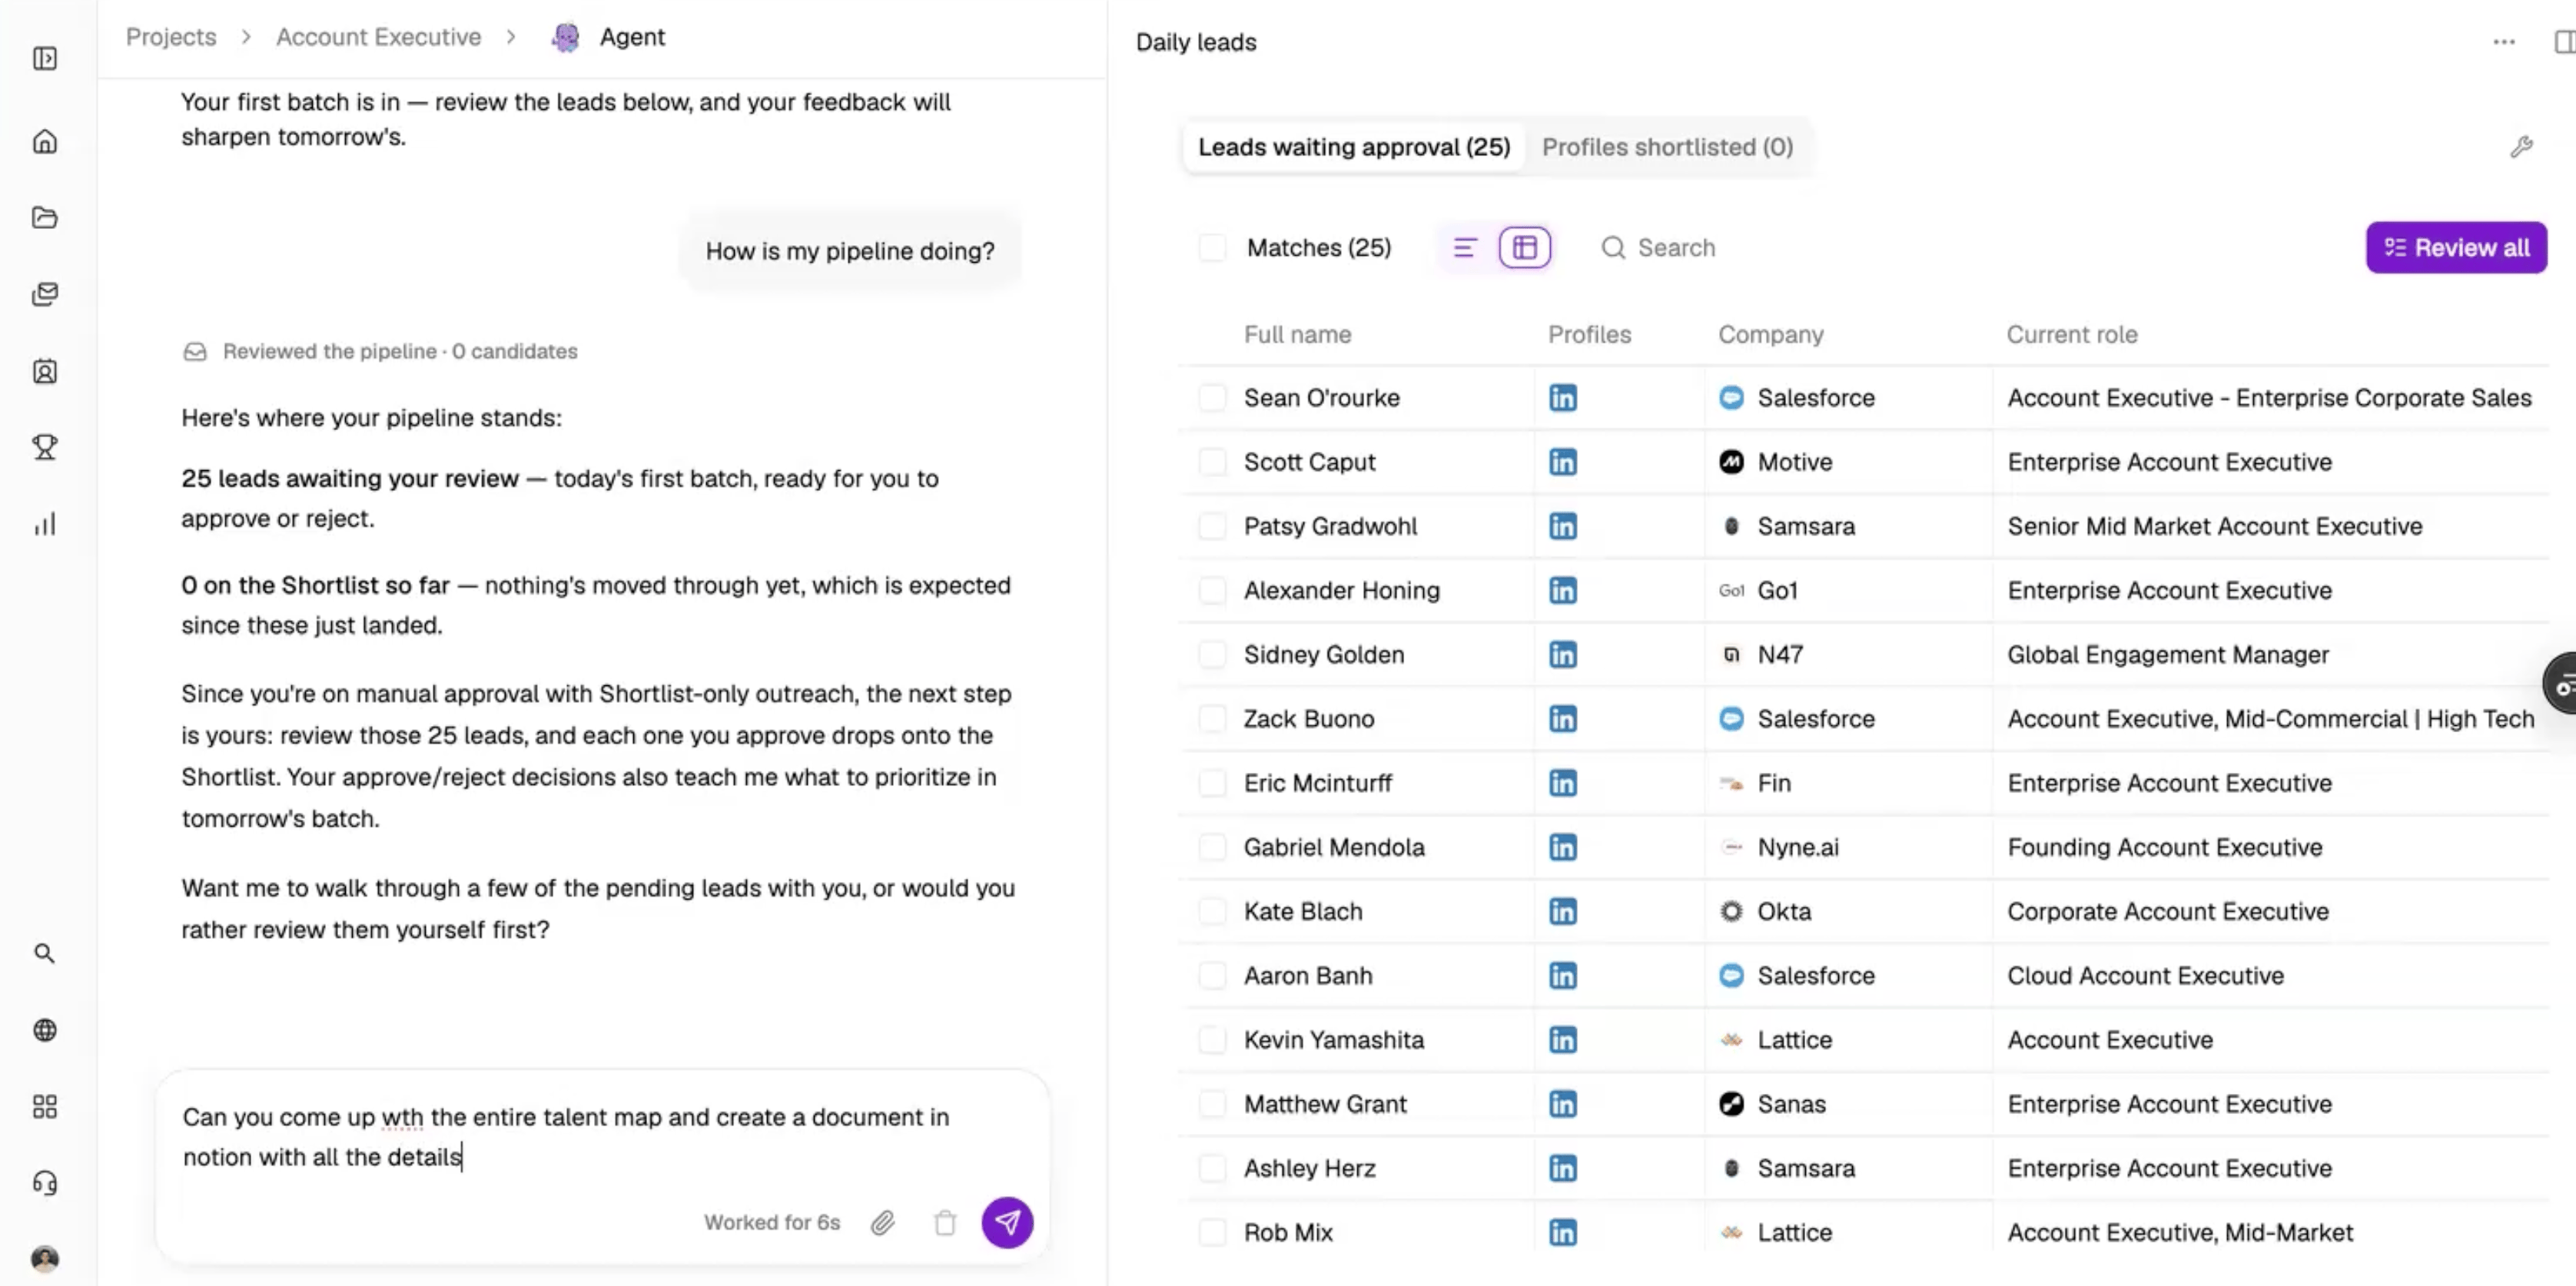
The Agent chat remains available throughout the Agent’s lifecycle, from calibration through active sourcing, and sourced leads appear in a side panel next to it. You can use the chat at any time to:- Ask how your pipeline is doing and get recommendations
- Ask which criteria are limiting your qualified pool
- Create or refine an outreach sequence and review the result beside the chat
- Take actions in connected apps, such as pulling a candidate list from Google Sheets to find similar profiles, or writing a talent market map into Notion
Dictating messages to your Agent
You can speak your message instead of typing it. Select the microphone button (Start voice input) in the Agent chat input, then start talking. A waveform shows while Juicebox is listening.- Juicebox transcribes your speech into the input so you can review and edit it. It never sends your message automatically.
- Recording stops on its own after about 8 seconds if you haven’t started speaking, shortly after you stop speaking, or after 90 seconds. Select the button again (Stop voice input) to stop early.
- Select the microphone again to keep adding to what you already have.
- Juicebox improves recognition of names, skills and technical terms using your project, your recent searches and your Agent chat.
- Juicebox doesn’t store your recordings.
Voice input isn’t available to view-only admins, sequence seats or hiring managers. It’s also off if your admin has turned off recording for your organization.
Use cases
Agents work best on roles that are repeatable, evergreen, or high-volume. These are the kinds of searches you’d otherwise re-run every week. Common examples include:- Streamlined job titles and backgrounds that are consistent across companies / industries
- Examples: Find Technical Recruiters in the Bay Area; Find Account Executives in NYC
- Rediscovering past ATS talent
- Examples: Find candidates from my ATS who have 3+ years of experience in LLMs; Find all silver-medalists or candidates who made it to X stage
- Market mapping and competitive intelligence
- Examples: Find VPs or Directors at X competitors; Find all SWEs who just went through a layoff; Find any candidate skilled in AI/ML within the Bay Area
- Business development or hyper-targeted prospect lists
- Examples: Find Operation leads at emerging companies; Find VPs of Talent in Healthtech at a company of 200 or less
Setting up an Agent
To set up an Agent, follow these steps:- Navigate to Create new project and select Project, or open an existing project you’d like to add an Agent to.
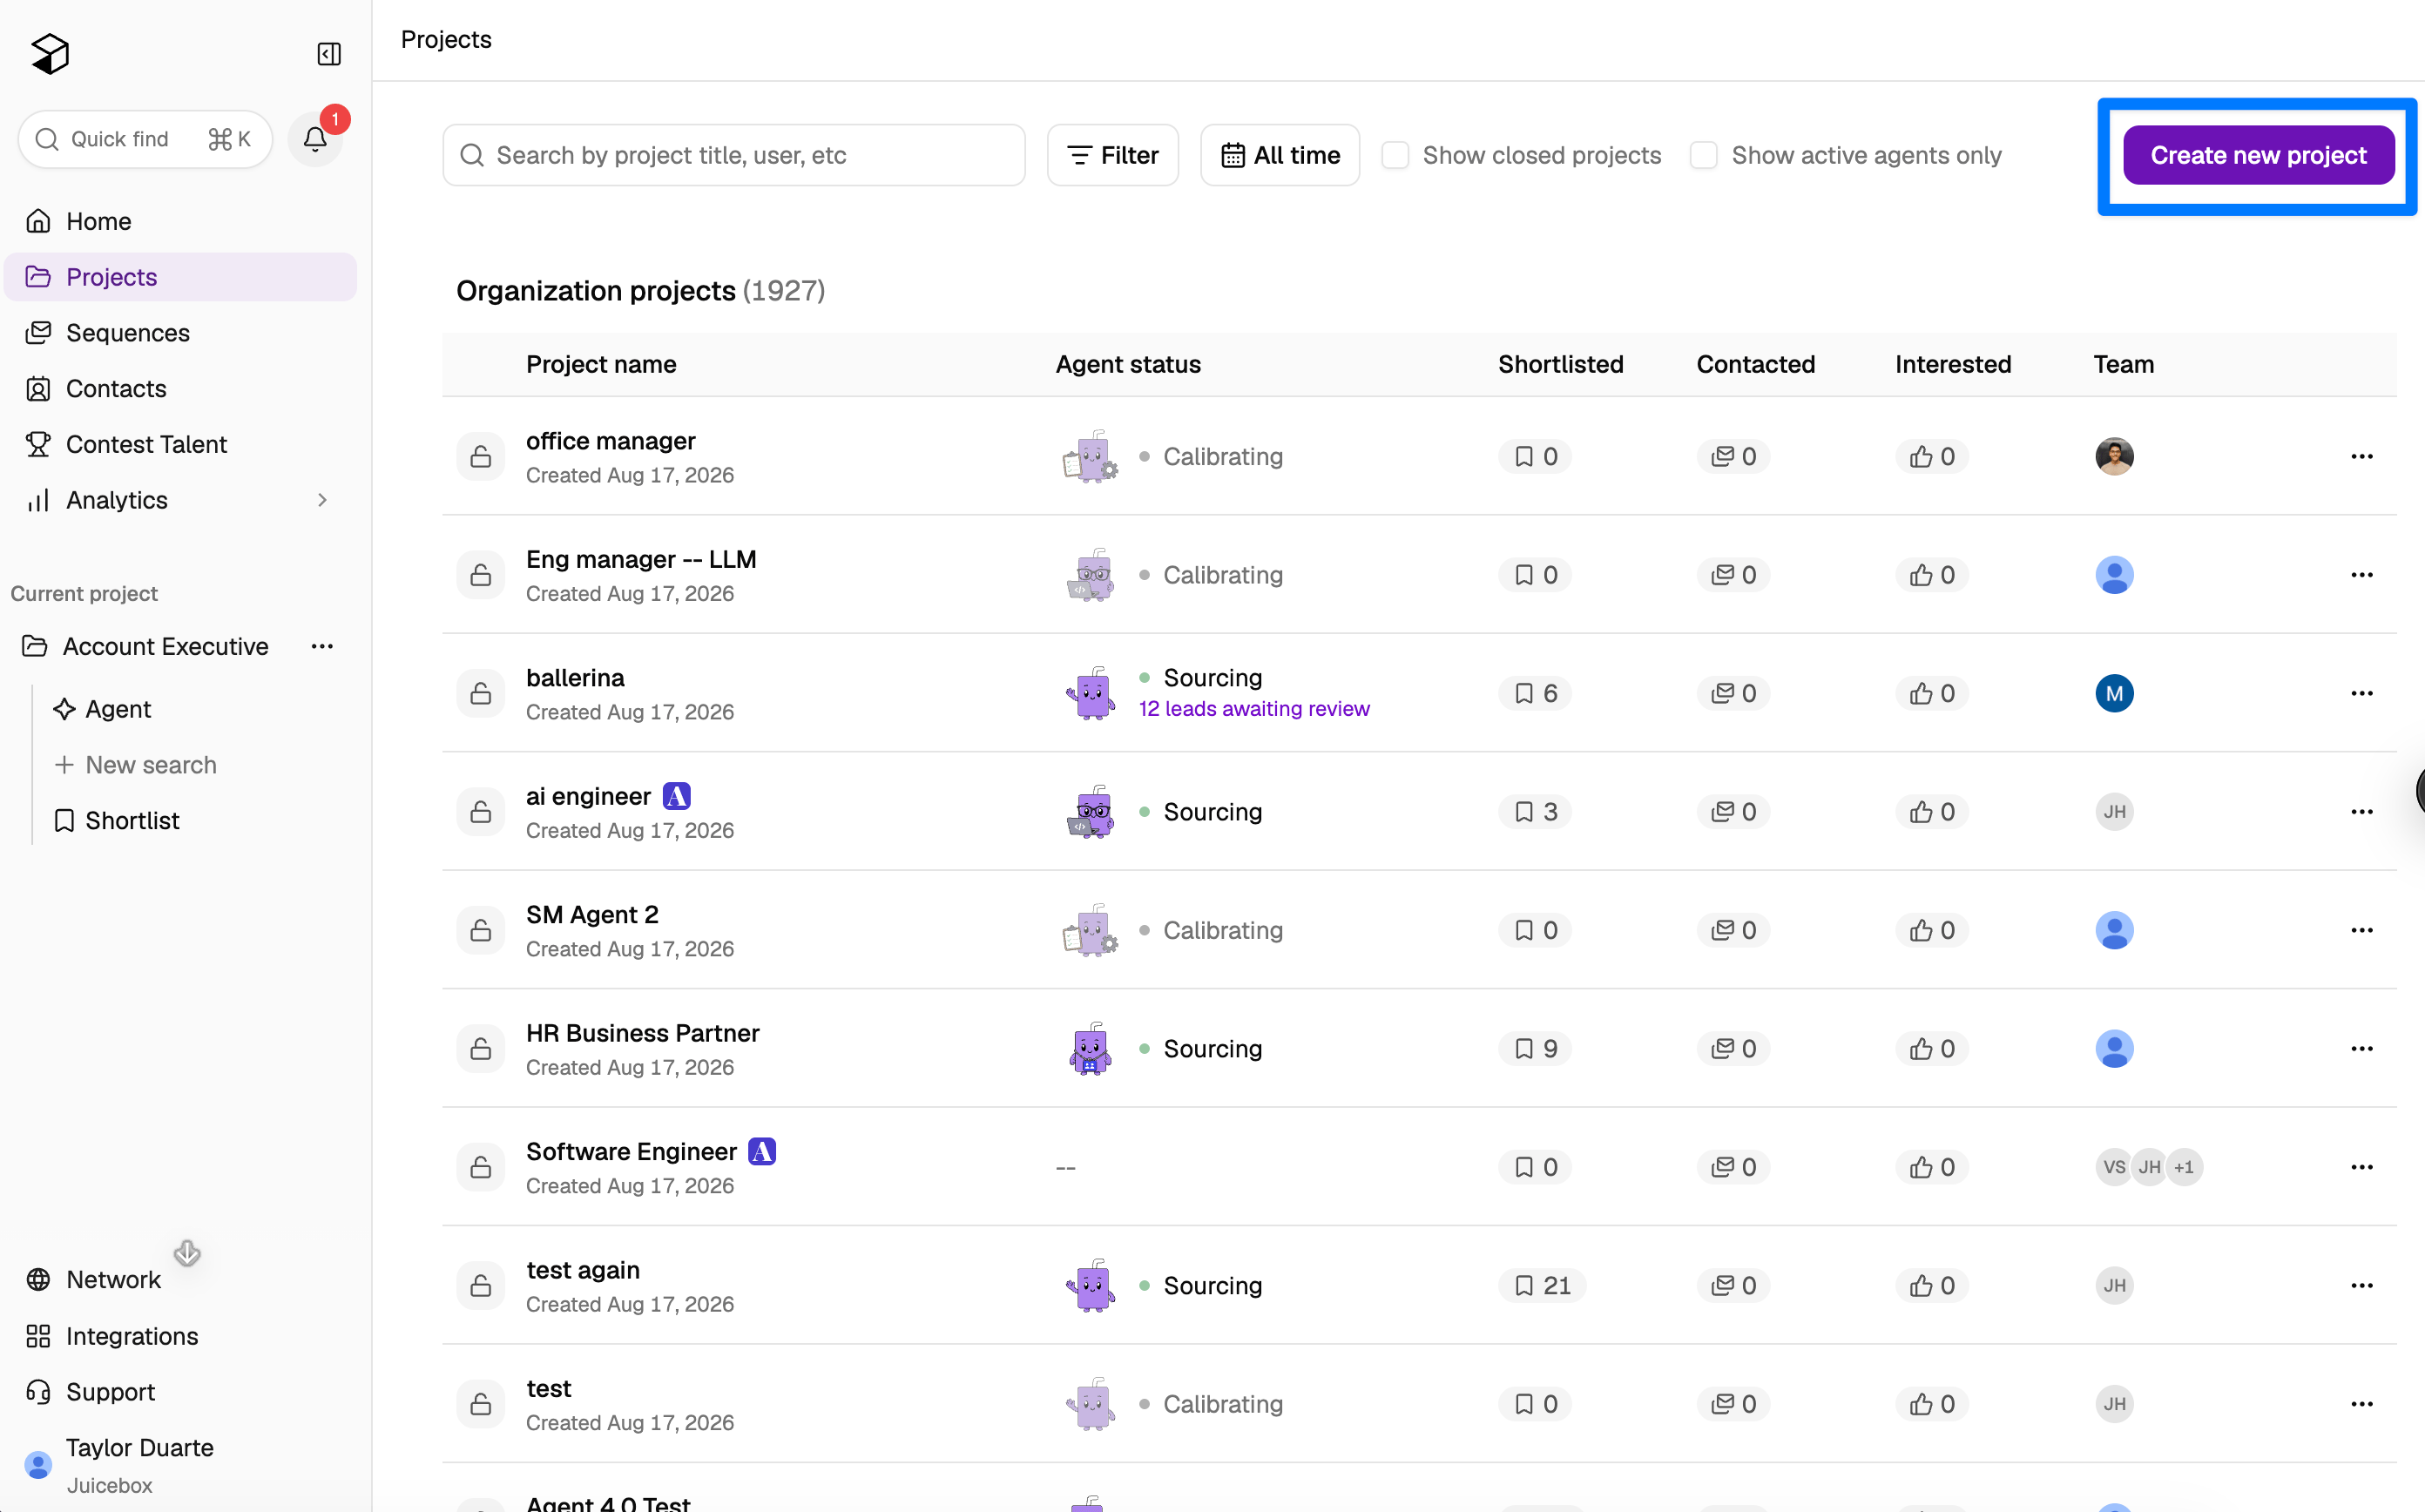
- Name the project after the role and configure collaborators. On the Business plan, you can also link the project to your ATS job and enable auto-exports, which keeps a single source of truth across systems.
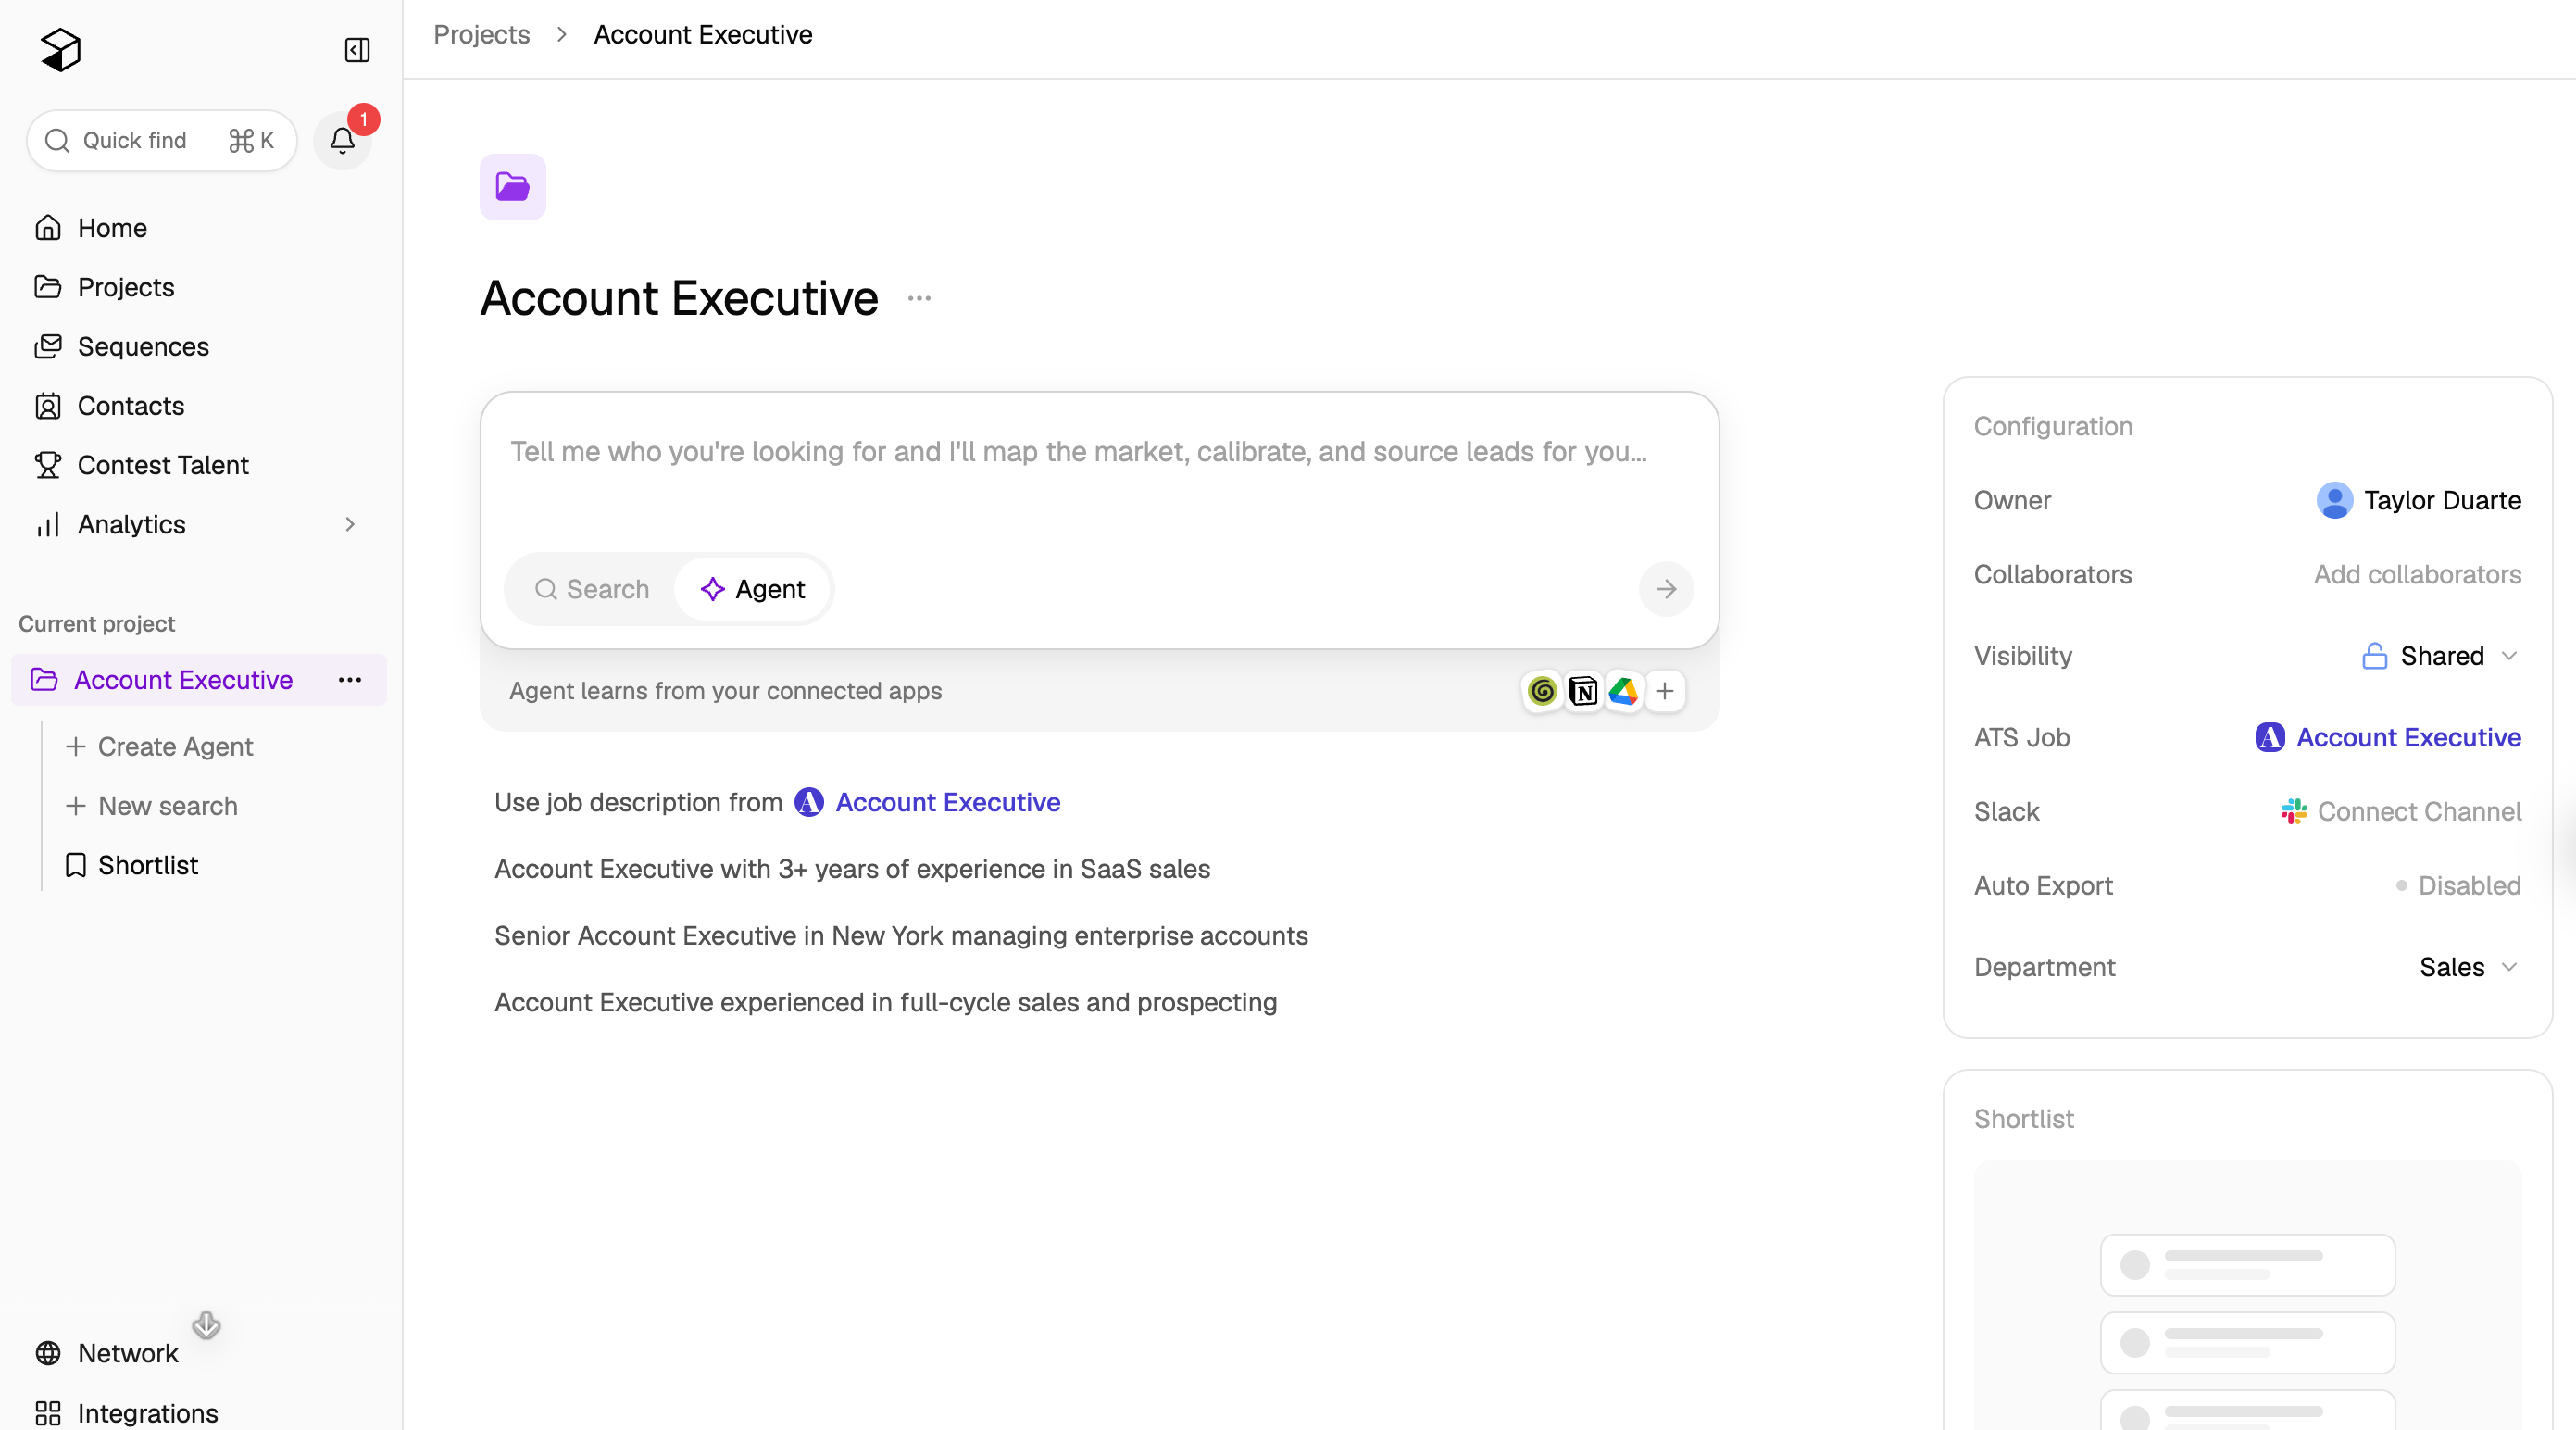
- From the project setup page, toggle to Agent to hand this role off to an Agent instead of running a manual search.
- Tell the Agent what you’re looking for, using any of these four methods:
- Describe the type of candidate using your natural language
- Example: I’m looking for a senior product designer with 5+ years of experience in B2B SaaS, based in SF or NYC, who has worked on design systems
- Input a link to the Job Description for the Agent to source against
- Example: Find candidates for this role: JD link
- Replicate a candidate profile by inputting the candidate’s LinkedIn URL
- Example: Find similar candidates to LinkedIn URL
- Select a job from your ATS to calibrate a new Agent
- Describe the type of candidate using your natural language
- Your connected tools are visible in the Connectors panel beside the chat. You can connect additional tools here (or from the Integrations tab in Settings) at any point so the Agent can use them for context.
- Once submitted, the Agent will share a plan and begin context research: it reviews your connected tools, organizational memory, and ATS data, then maps the talent market before configuring the initial filters and search criteria. You can follow along with what it found and why in the Agent’s activity trace.
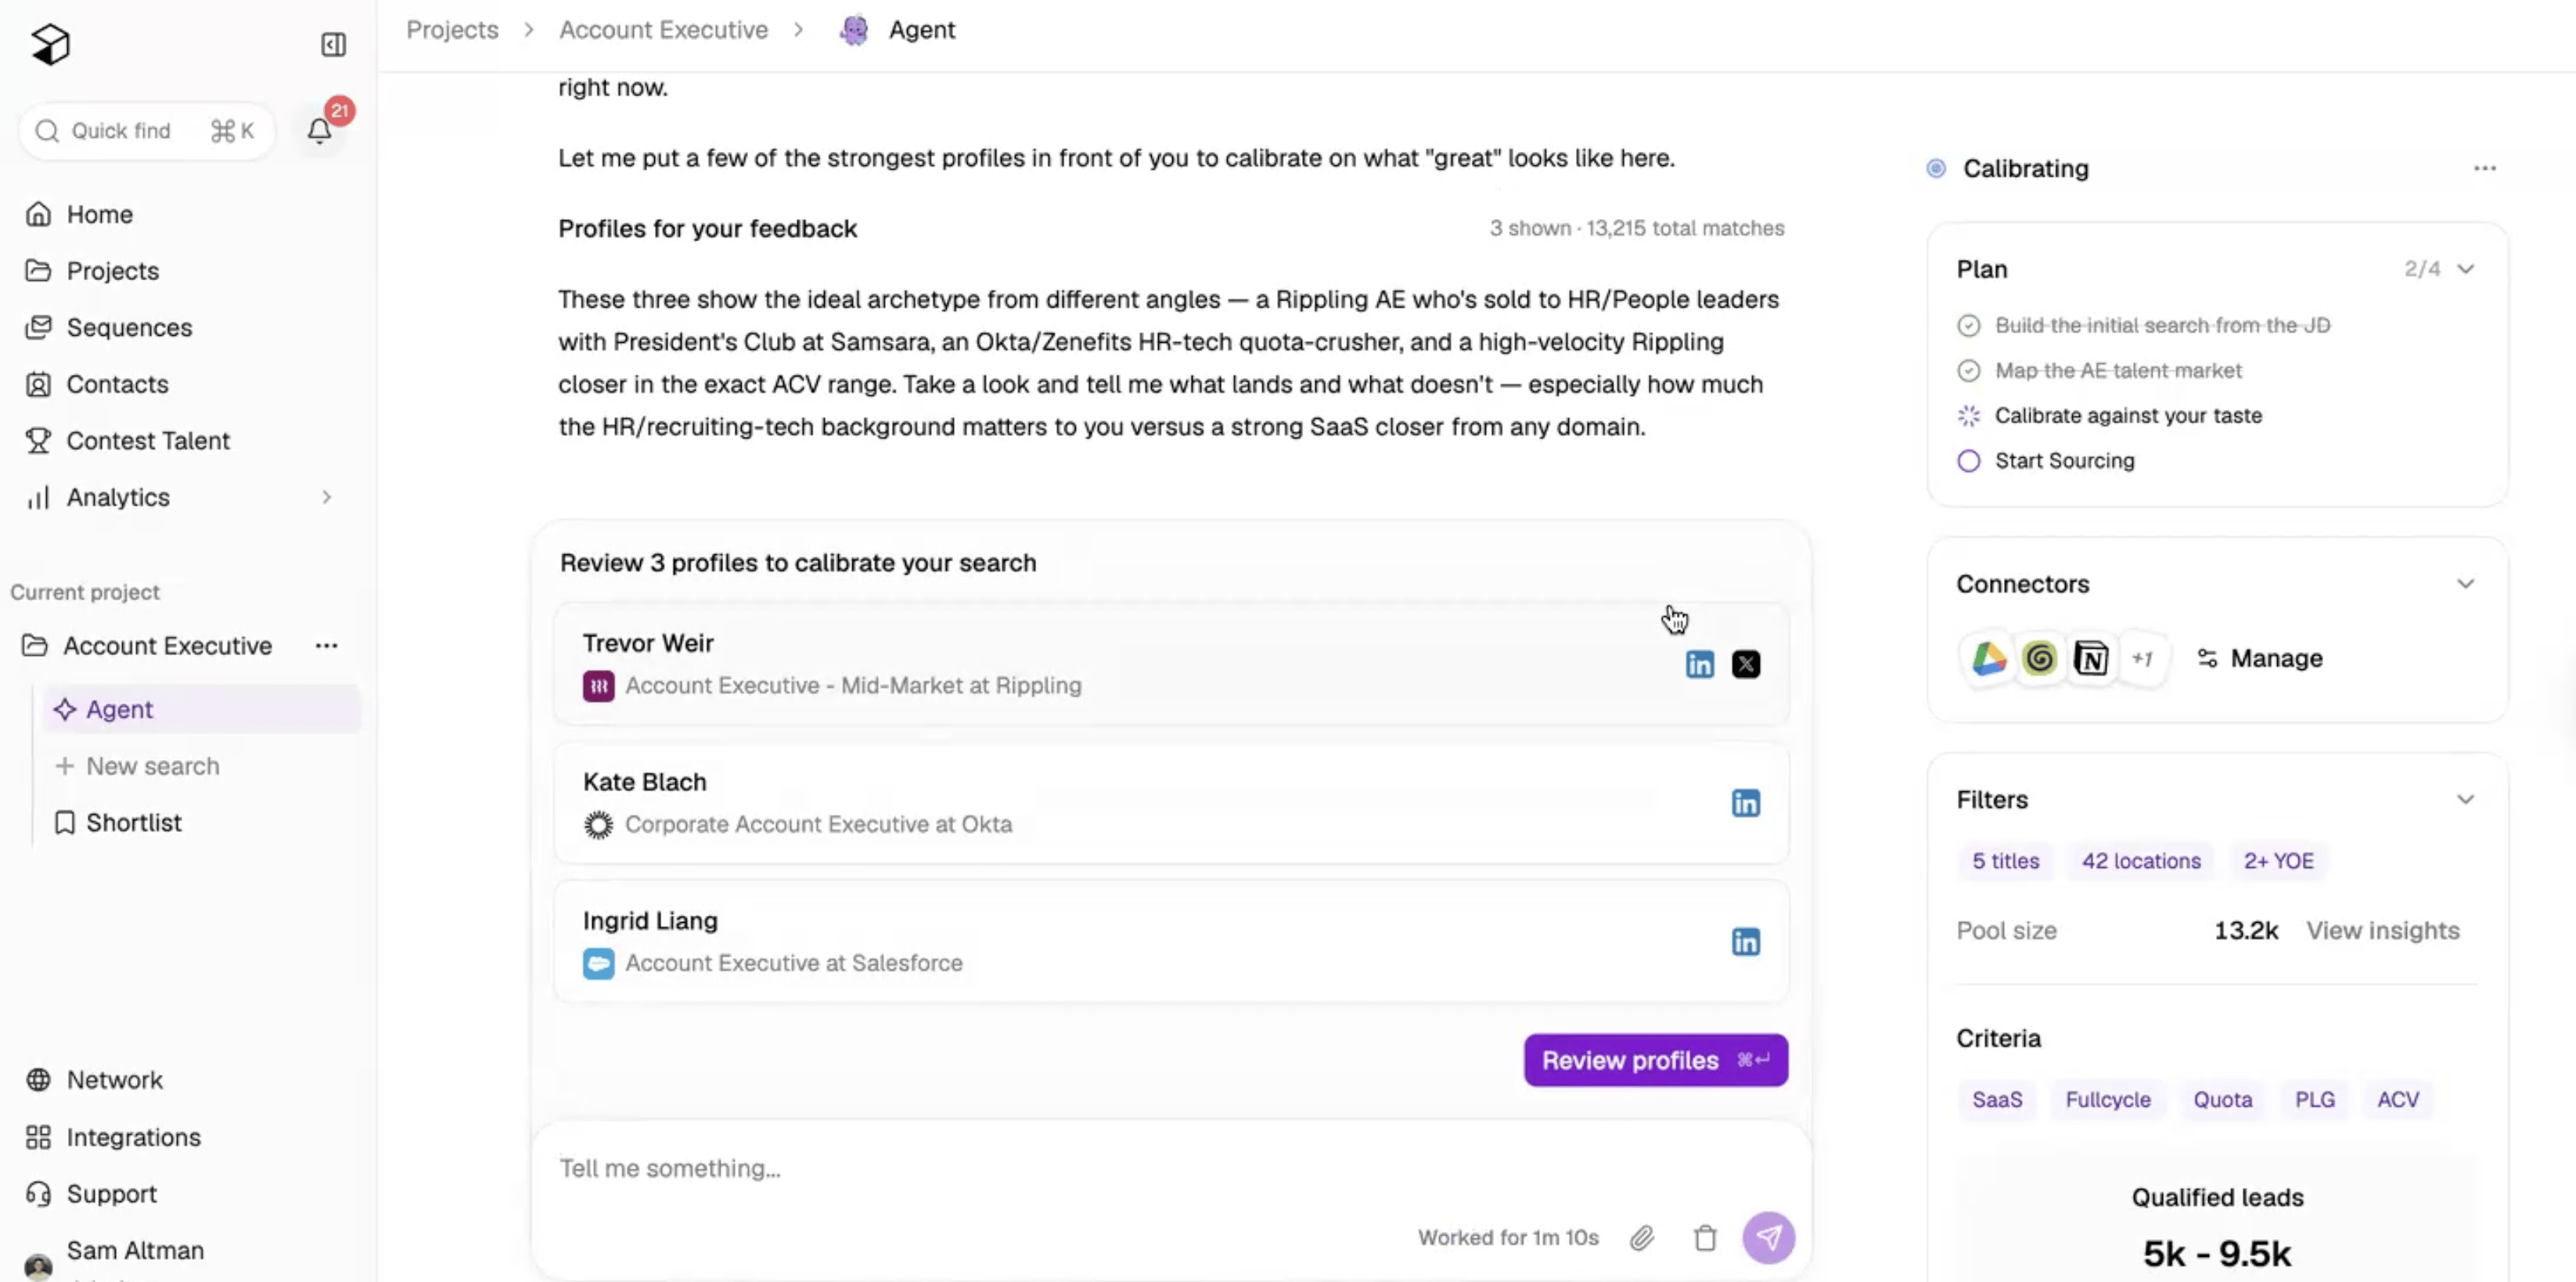
- Depending on the request, your Agent may provide you with its top picks to review or ask follow-up questions for additional context, similar to how you would typically collaborate with a sourcer.
- Review your filters and criteria to confirm that all requirements are included, or provide the Agent with any additional details. You’ll also see your total pool size and a qualified leads estimate here.
- Review the selected profiles to provide feedback and further refine your results.
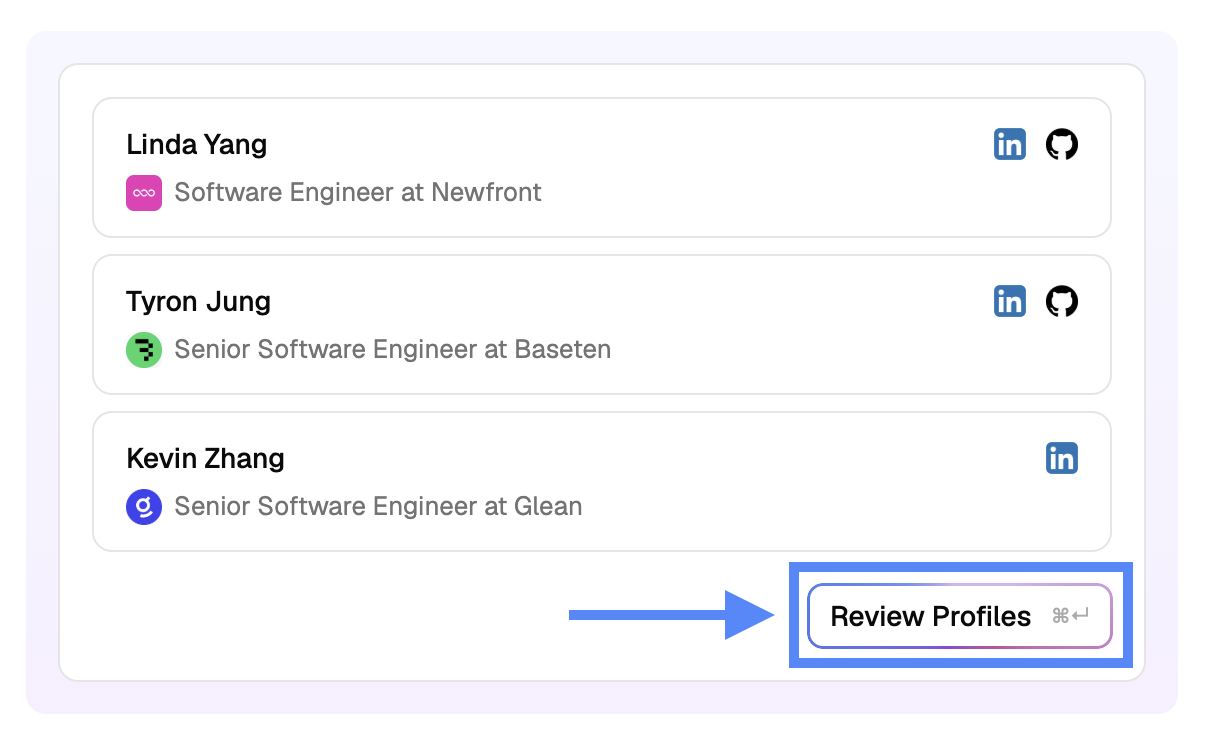 If a profile has the right experience and skills, select Looks Good. If the candidate is misaligned, select Give Feedback, and leave any reasons why the candidate is not a fit (for example, average tenure should be at least three years).
Build and refine outreach with your Agent
Your sourcing Agent can draft a new sequence, read an existing sequence, revise its messages and settings, and send a test email to your inbox. Ask in the same conversation you use for sourcing—for example,Build a three-email sequence for this role or Make the second email shorter. The sequence opens beside the chat so you can review the result and edit it directly.
- After calibration, choose how the Agent should contact approved profiles. If you collapsed the setup prompt, select Sourcing settings above the chat to reopen it.
- Build me a sequence hands the request to your Agent. It uses the context from your conversation to draft an AI-generated sequence in the Sequence side pane.
- Use an existing sequence lets you select a sequence you have already prepared.
- I’ll do this later, shortlist for now adds candidates to your shortlist without sending outreach. You can add them to a sequence later.

Choose how your Agent should contact approved profiles, then select Confirm. Example setup.
- If you ask the Agent to build a sequence, review it beside the Agent chat. Give the Agent outreach examples, selling points, and feedback such as
Make the first email shorter. You can also edit the title, messages, sender, and timing directly in the canvas. Select Preview on a step to check the personalized copy before using the sequence.

Agent’s Sequence side pane. Example outreach for a fictional company.
- When you are happy with a sequence the Agent built, confirm its request to use that sequence for daily sourcing. Then finish Last step, set your sourcing strategy. If you chose an existing sequence or shortlist-only outreach, Confirm takes you directly to this step. Choose your daily lead target and how leads should be approved:
- Manual lets you review and approve each lead before the Agent sends outreach or adds them to your shortlist, depending on your outreach choice.
- Automatic lets the Agent approve matching leads and carry out your selected outreach or shortlist action.
Choose a daily lead target that you and your team have time to review. Drafting a sequence does not start sourcing; finish the strategy settings before starting the Agent.

Set your daily sourcing target and approval type, then select Start sourcing. Example setup.
Reviewing leads
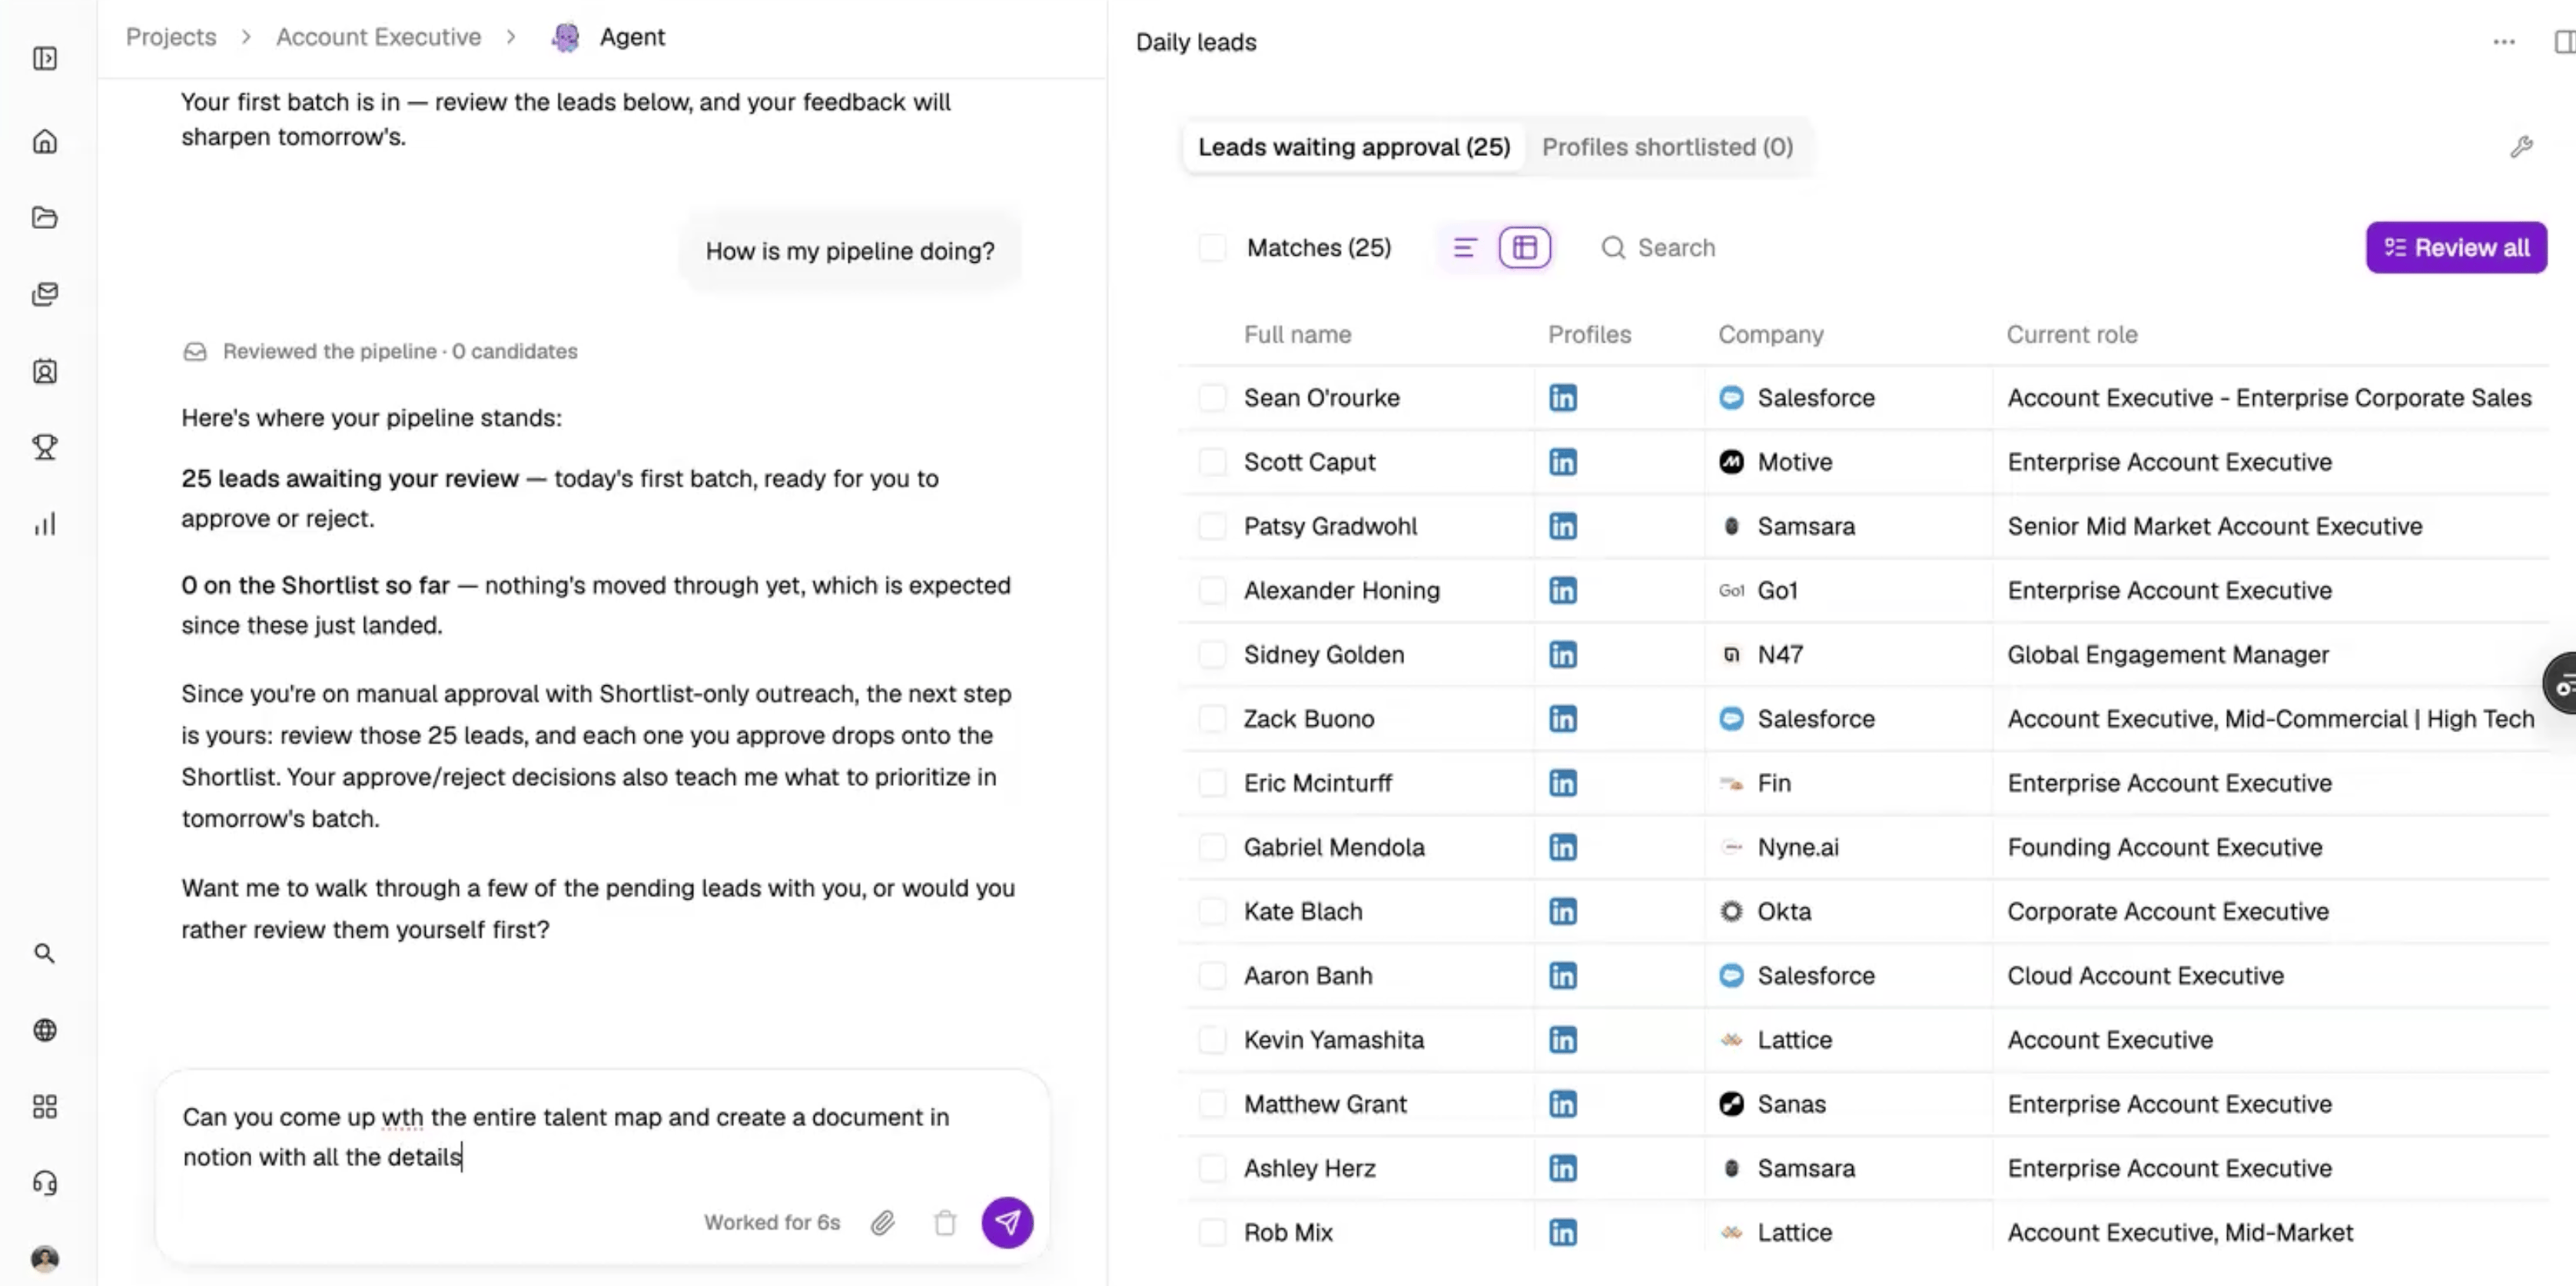
Once your Agent has sourced its daily batch of leads, they appear in the panel beside the Agent chat, along with a daily message letting you know a new batch is ready. To review leads awaiting approval, select Review Leads or select a candidate’s name directly to open their profile and evaluate their fit. During the review process, you can leave additional feedback to help the Agent continue learning and improve the quality of future leads.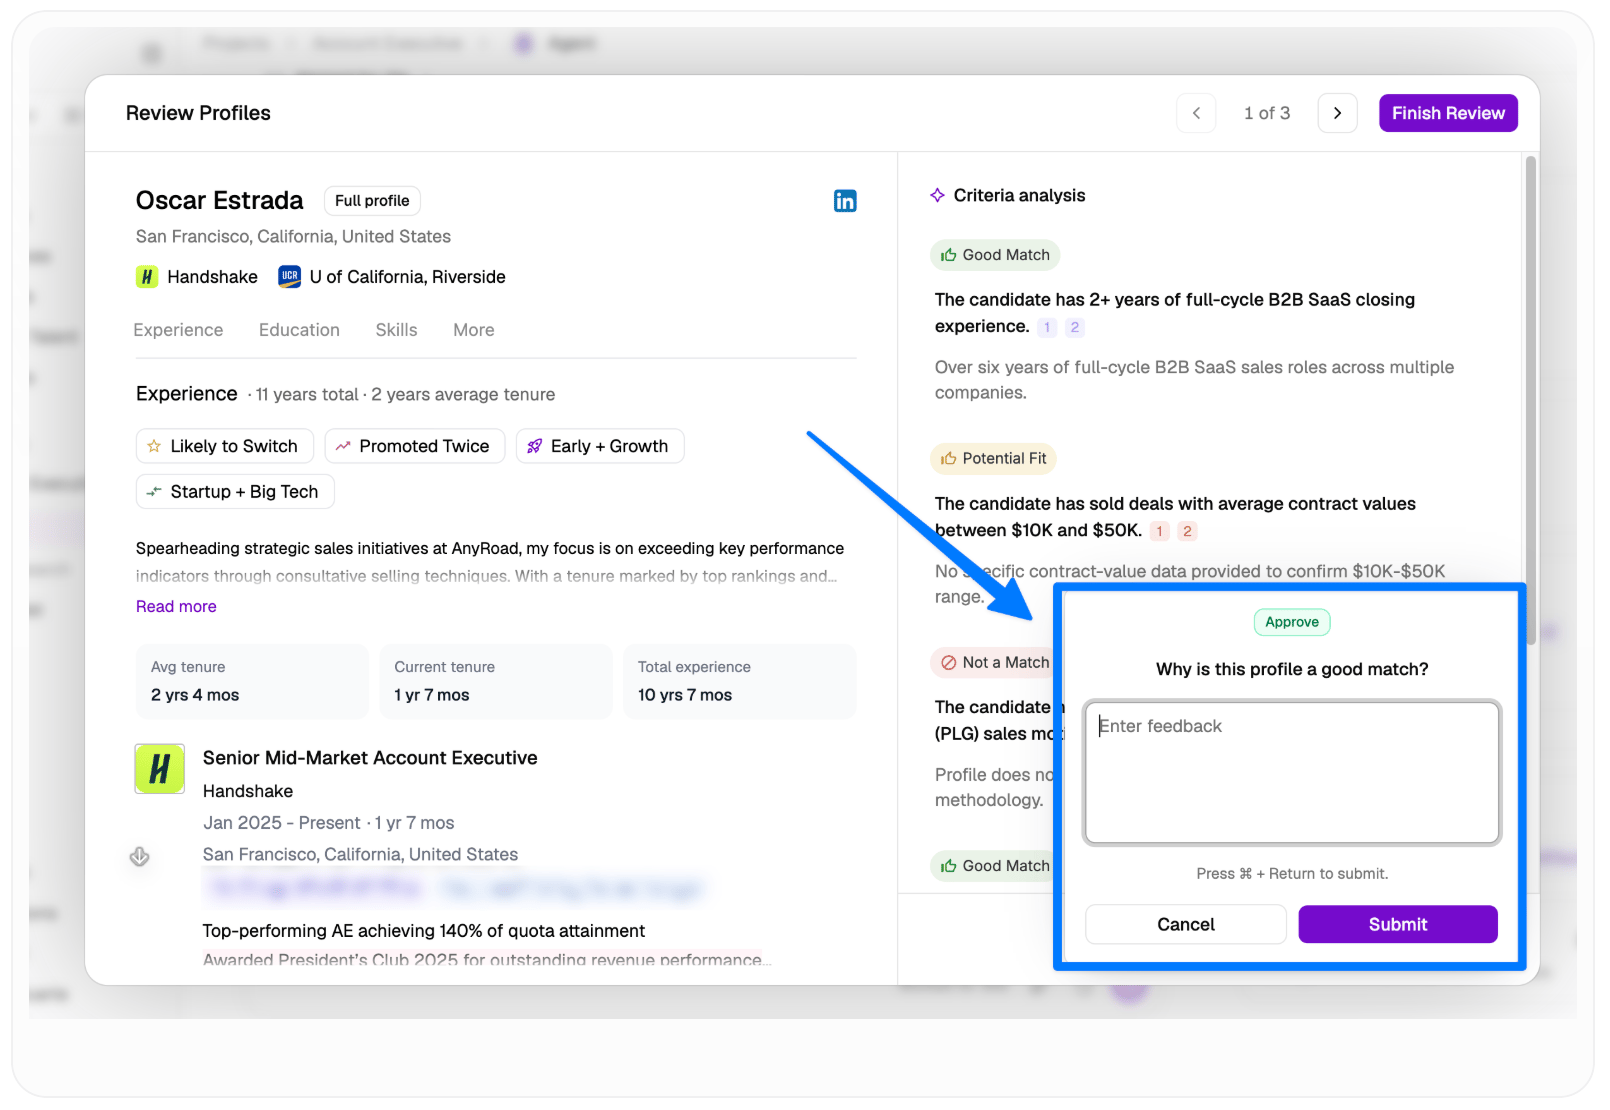
The sourcing panel also shows your daily leads at a glance: how many leads are waiting for approval and how many profiles have been shortlisted, along with when your next batch of leads will arrive. If you’d like to revisit any previously approved profiles, select Profiles shortlisted in the sourcing panel. From there, you can review each candidate’s match summary or open their Juicebox profile directly.
Shortlists and outreach
Leads you shortlist appear in your project shortlist, alongside profiles you found through manual search. Use the Owner column to tell which profiles you sourced yourself and which the Agent surfaced.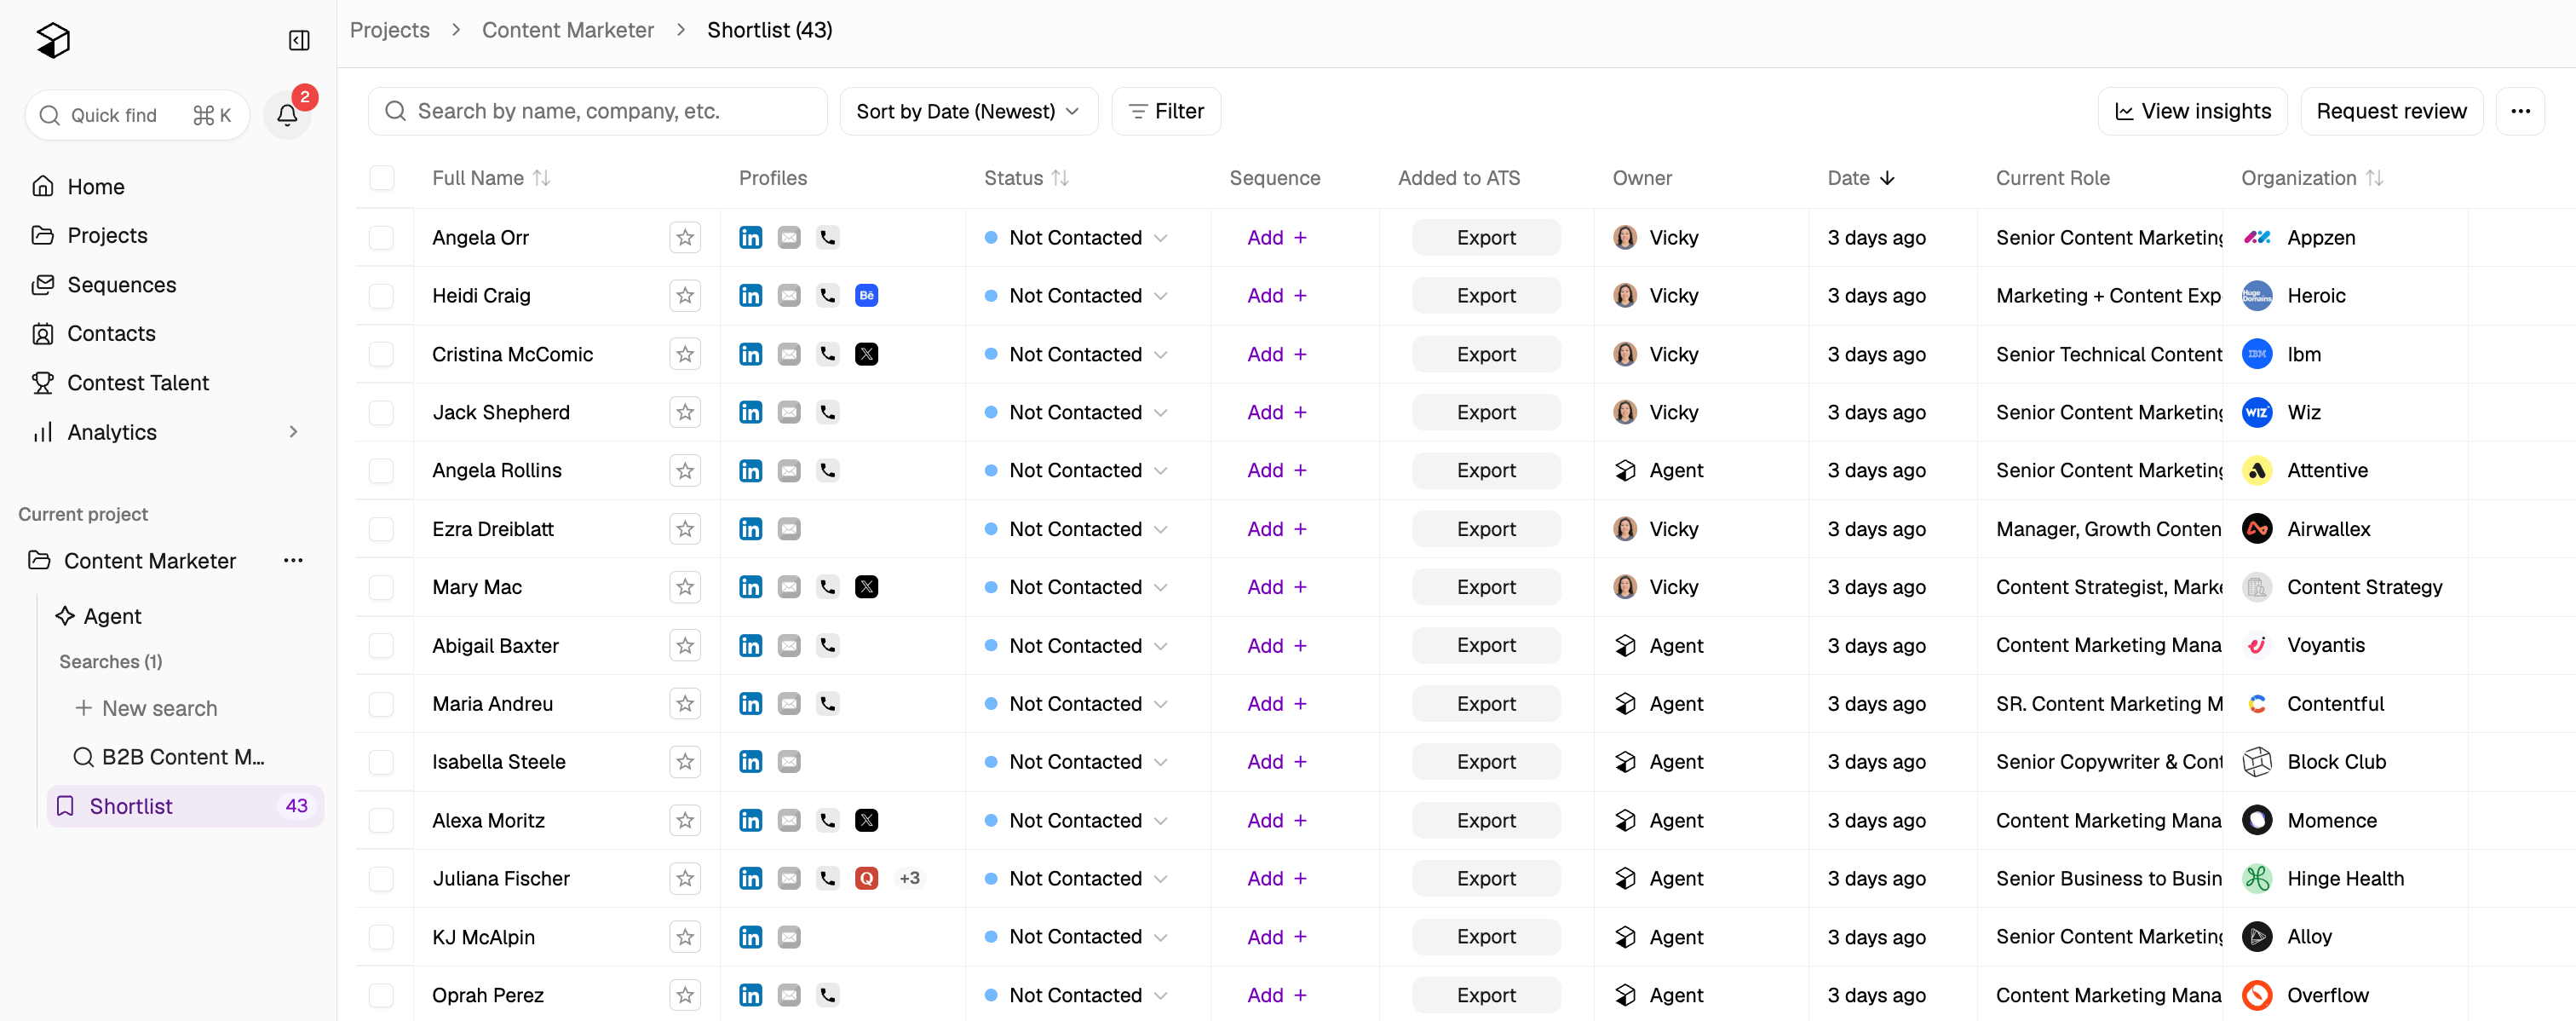
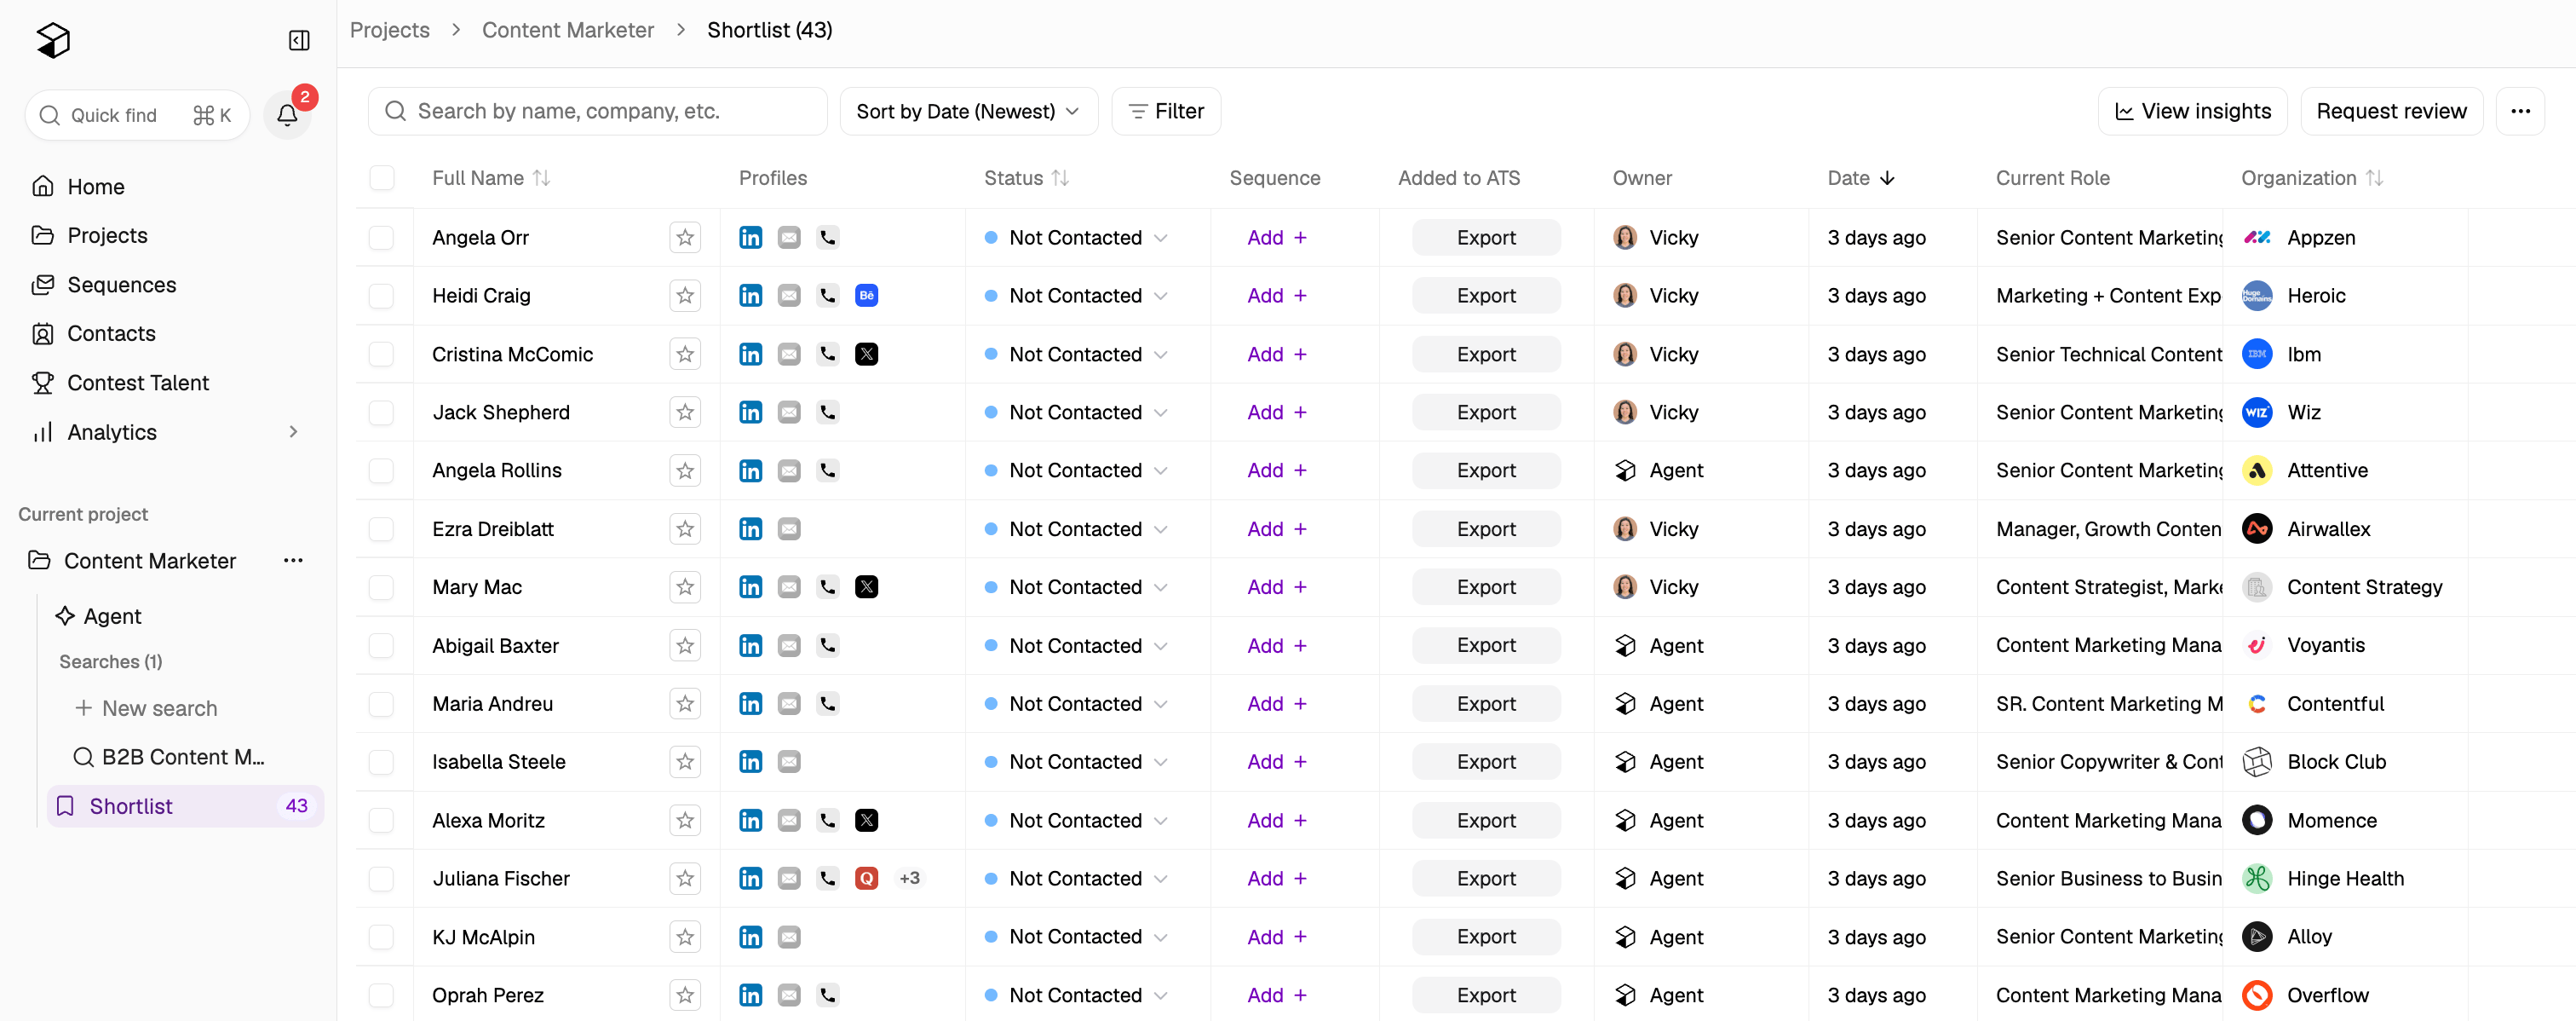
For more information on shortlists, please view our help article here.
Managing an Agent’s lifecycle
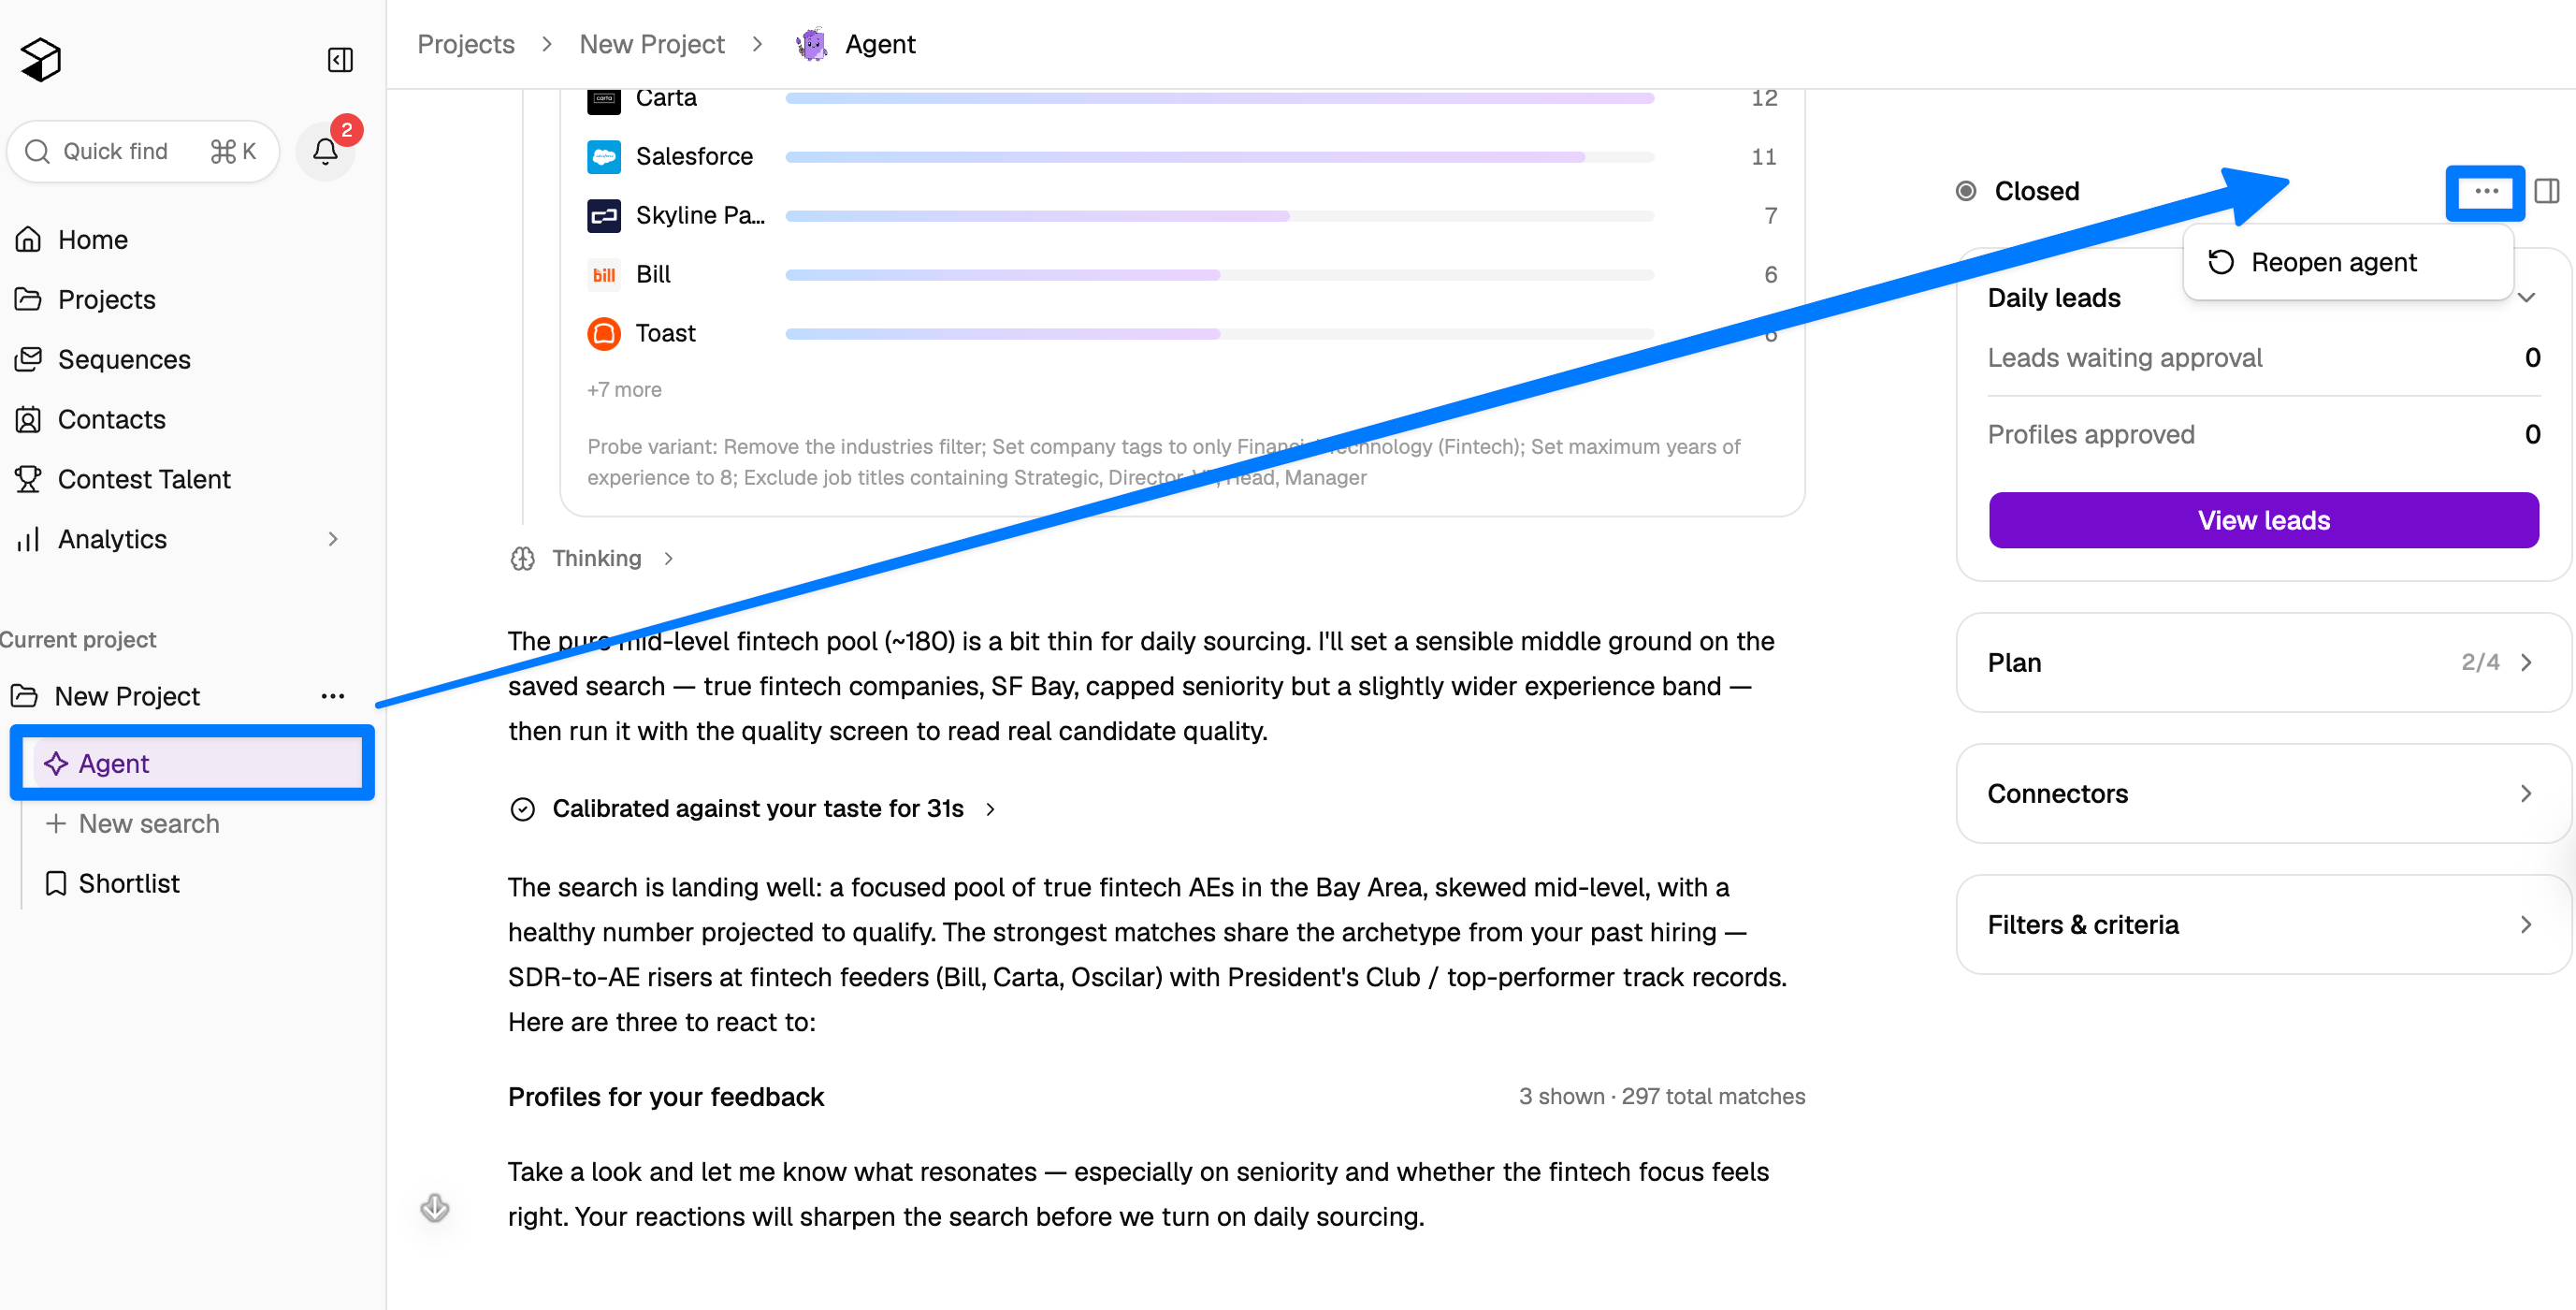
An Agent’s status tells you whether it needs your attention. When an Agent exhausts its qualified pool, it stops sourcing and is tagged Action Needed. Open the Agent and either apply the recommendations it suggests or edit your filters and criteria directly to widen the pool..png?fit=max&auto=format&n=9NO9AEp9WpKiqQSM&q=85&s=c4c178282902e34f5c3458c46bbd0fa8)
-1.png?fit=max&auto=format&n=9NO9AEp9WpKiqQSM&q=85&s=444546343d2c0ac5761cdd2966711eea)
- Open your Agent and apply the Agent’s recommendations, or edit your filters and criteria directly.
.png?fit=max&auto=format&n=9NO9AEp9WpKiqQSM&q=85&s=f7a81fd7cf896835cd9c885bda5530d7)
-1.png?fit=max&auto=format&n=9NO9AEp9WpKiqQSM&q=85&s=b0d1a2e14a3e1b743d51f80083dd4046)
Viewing insights
Similar to projects, Agents also include an Insights report that provides a breakdown of the Agent’s leads by location, job title, skills, years of experience, and more. To open it, select View Insights on the right side of the Agent’s Calibrate screen.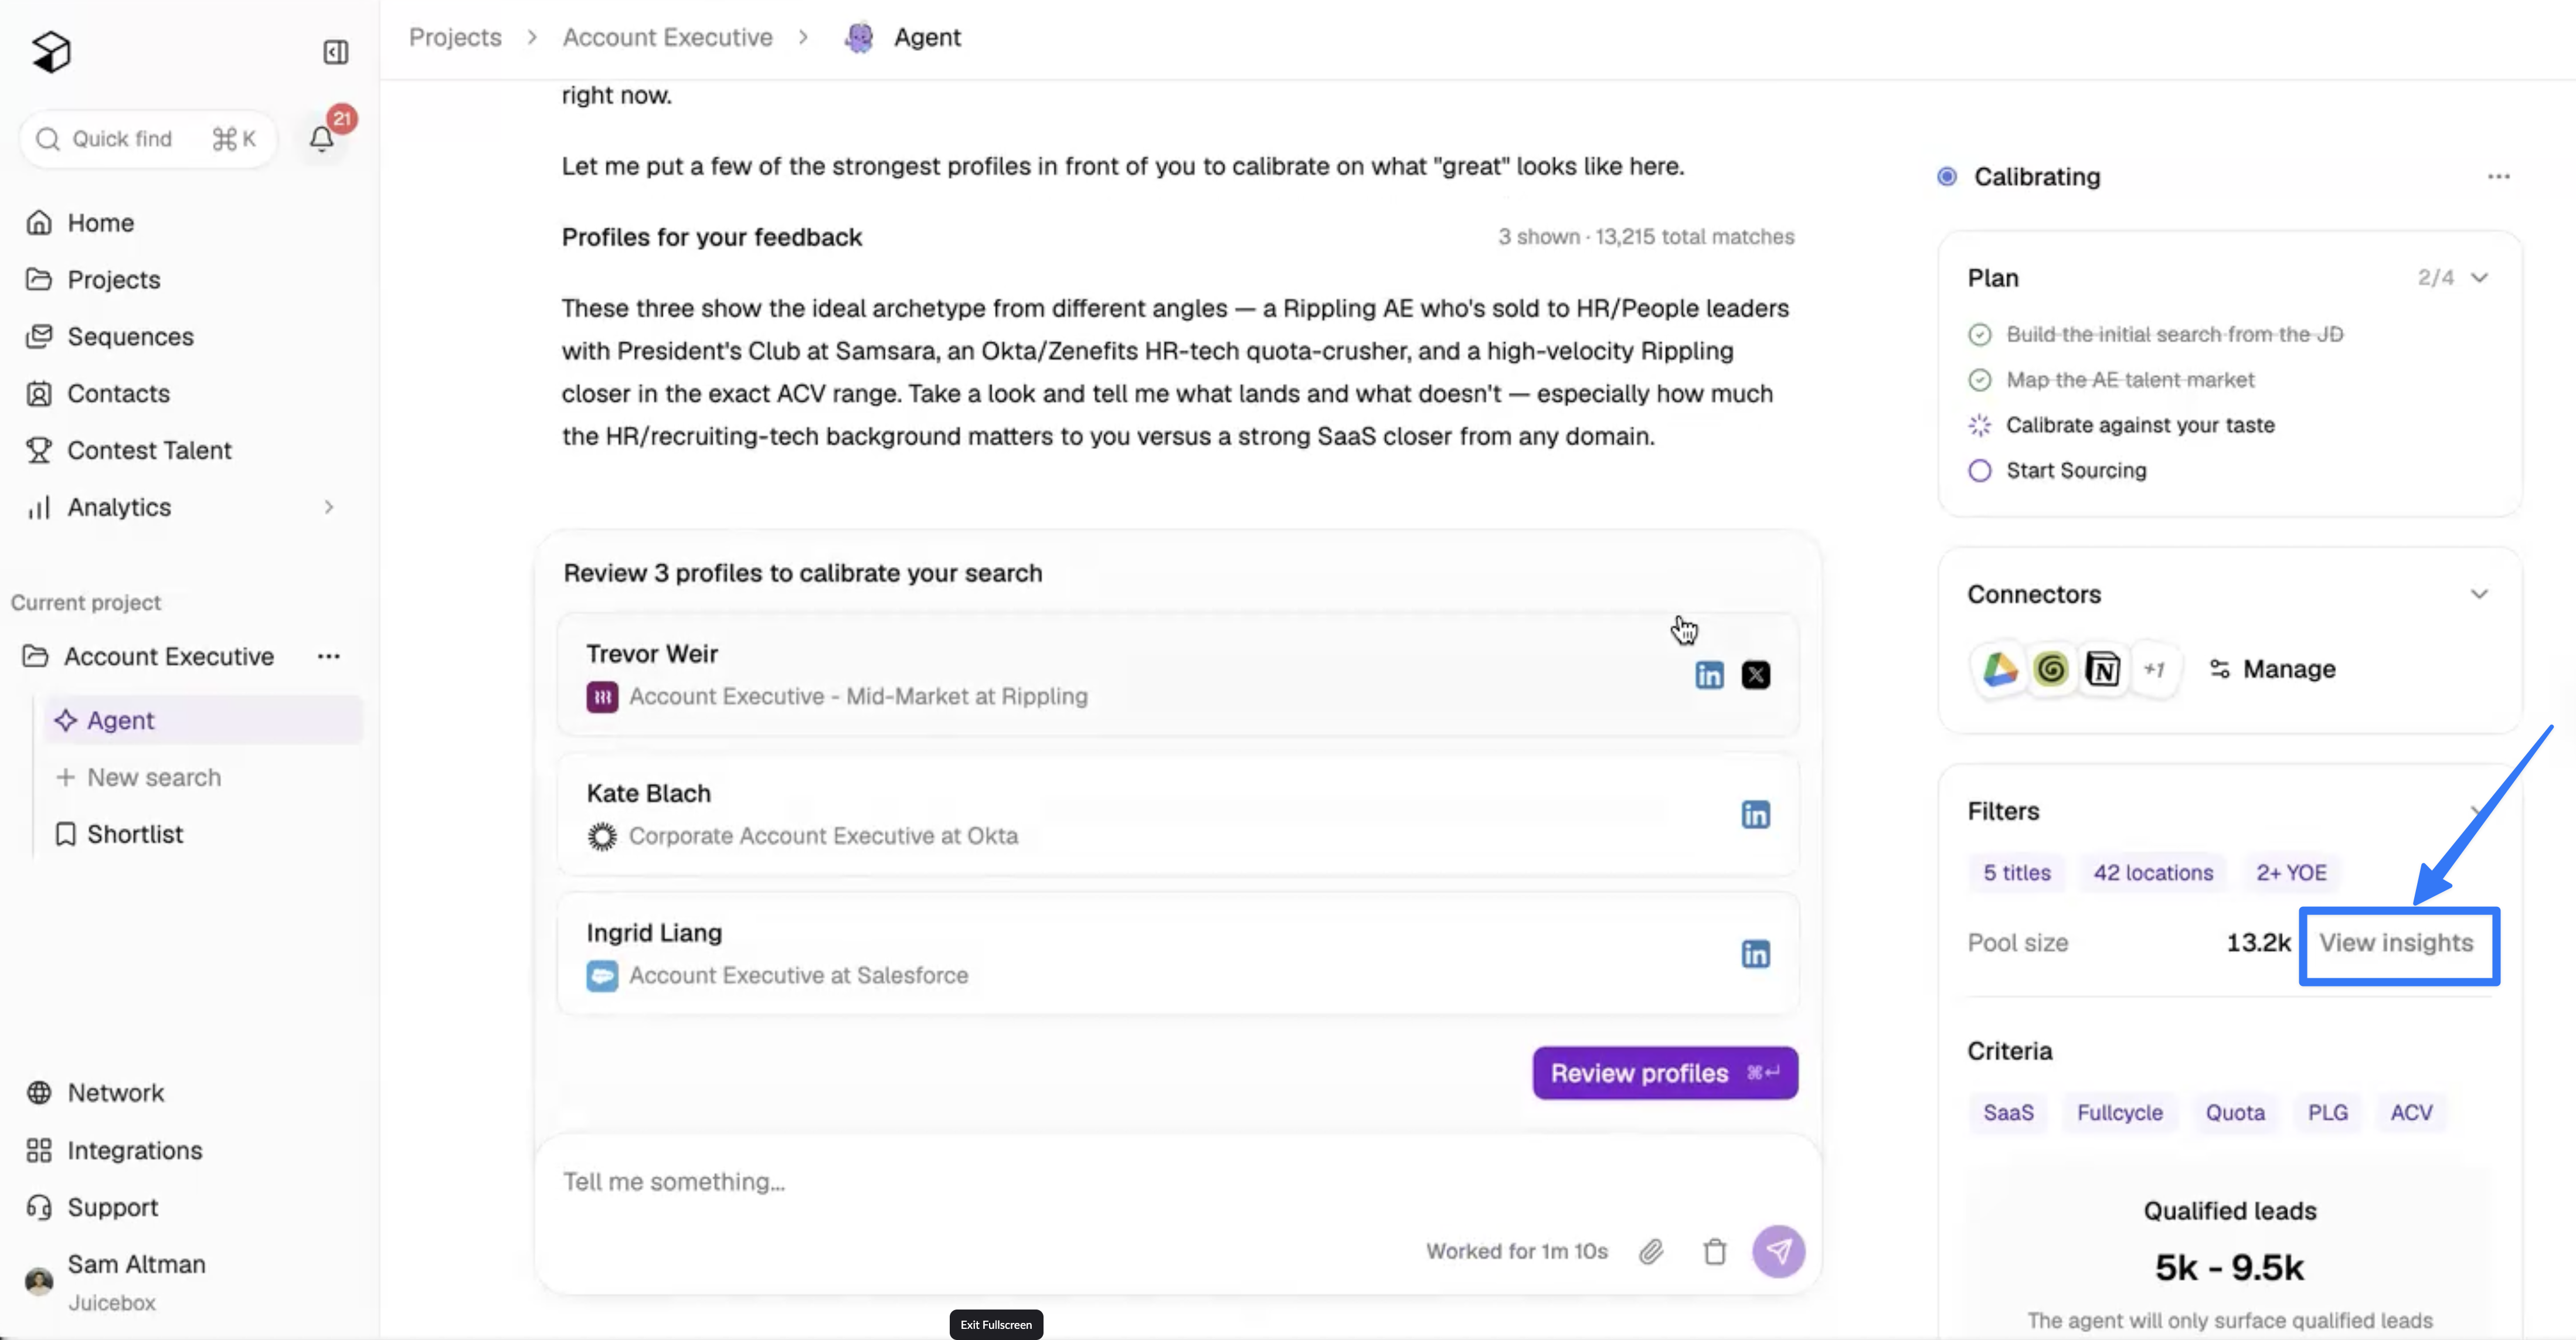
Switching an existing search to an Agent
If a project is already running a manual search that looks like a good fit for an Agent, select the Agent button from your search to calibrate one using your existing filters and criteria. From your search, select the Agent button to use your existing filters and search criteria to calibrate an Agent.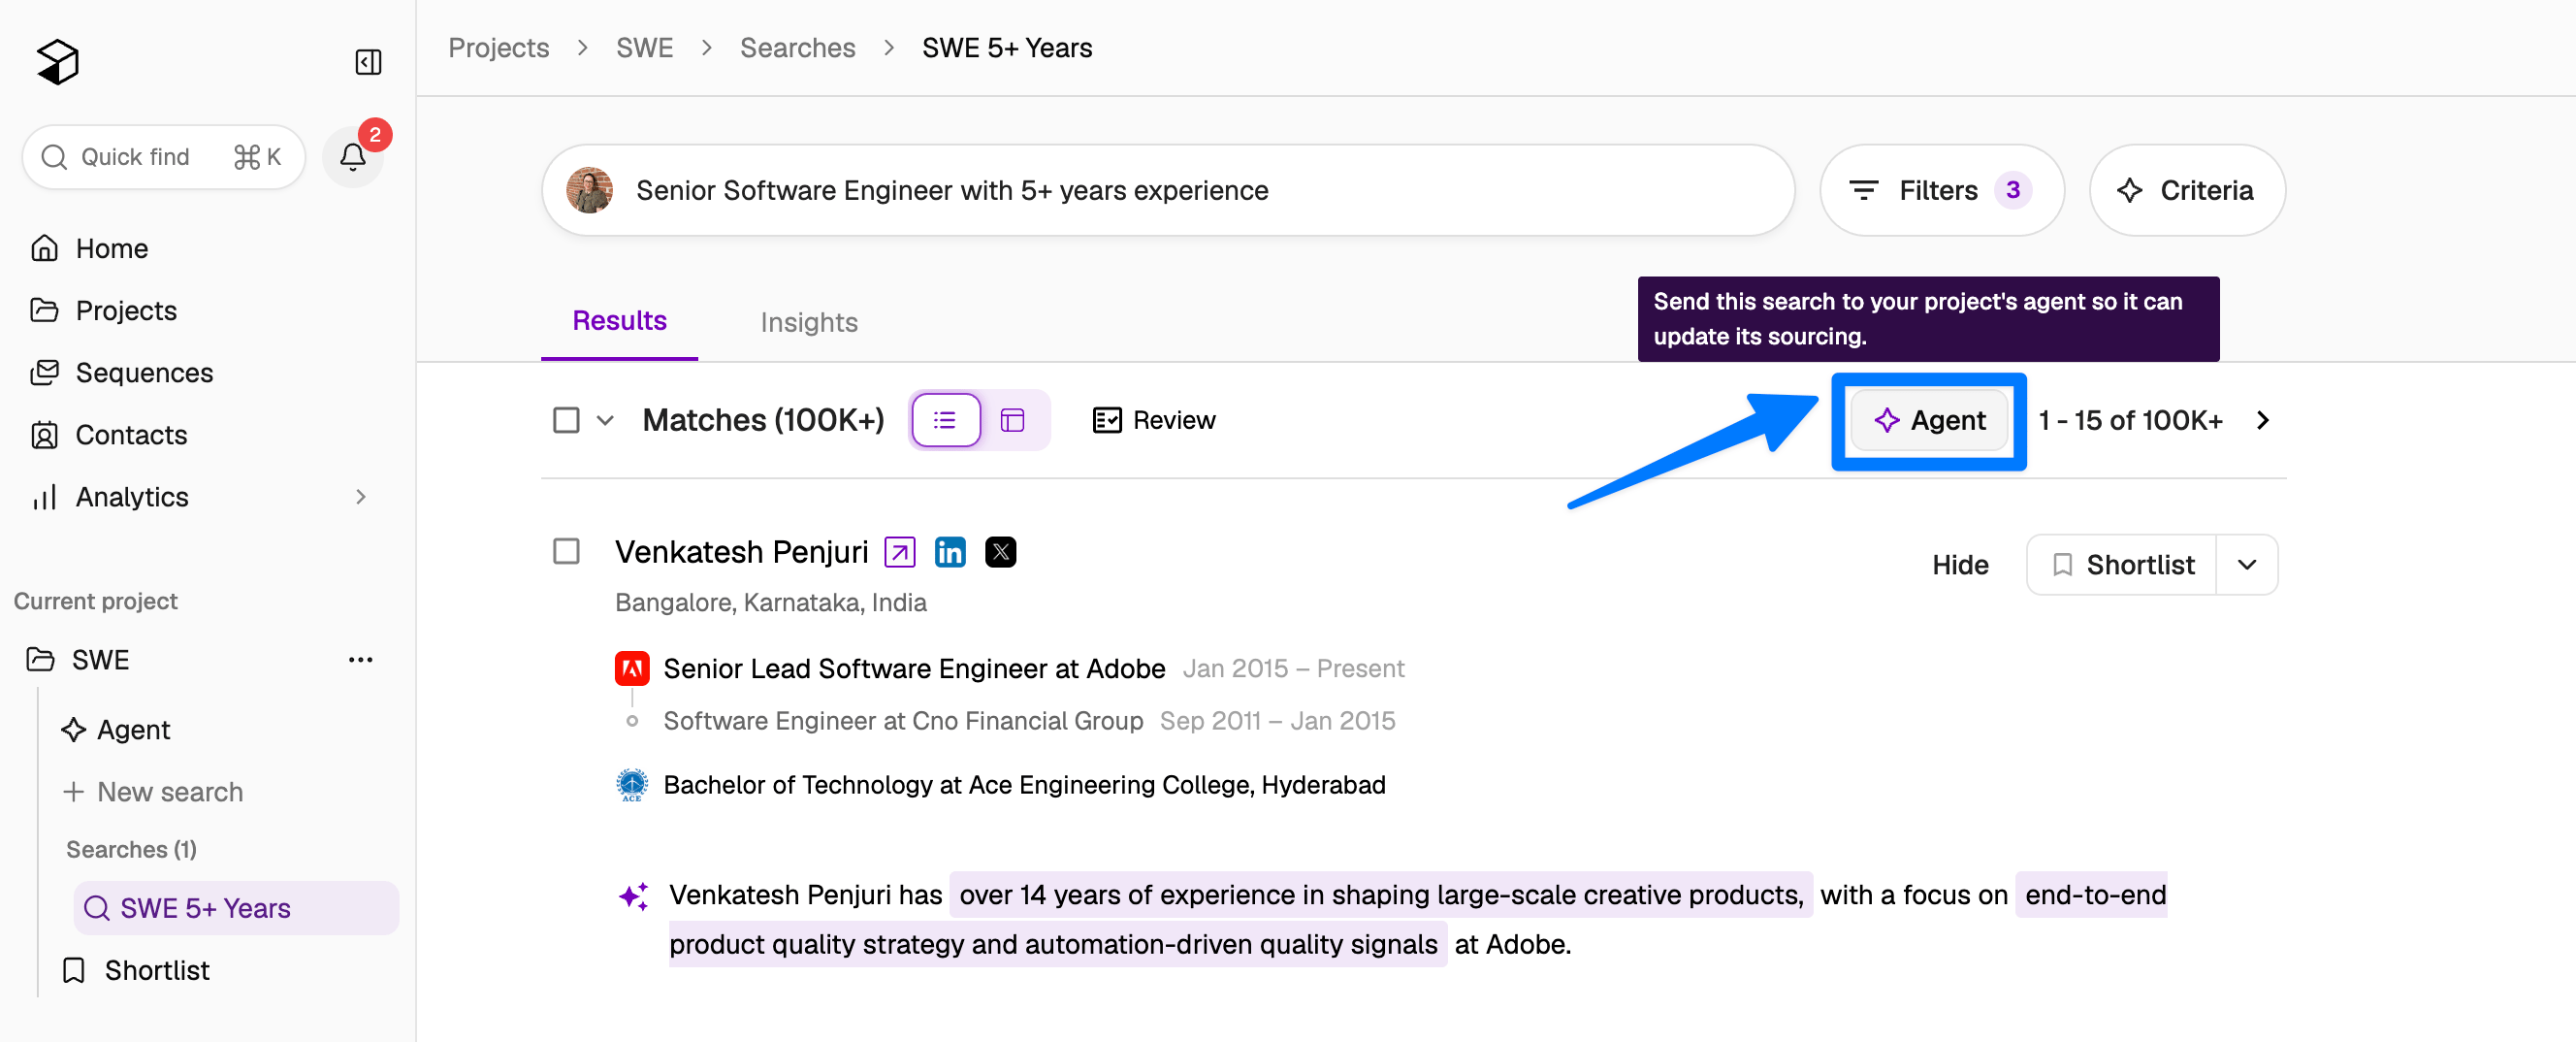
Trying Agents without an Agent seat
If your plan doesn’t currently include Agent seats, you can still start an Agent to see exactly how one works before deciding to buy. Here’s how to try an Agent:- Name the role and describe what you’re looking for.
- The Agent walks you through calibration, explaining what it’s about to do and narrating each step so you can see how it thinks.
- The Agent surfaces a batch of three profiles. You can review each one to get a real feel for the match quality and leave feedback.
- After you approve three leads, you can set up your outreach or shortlist preferences. Starting automatic daily sourcing requires a paid Agent seat.